Setting up a Celestia full consensus node
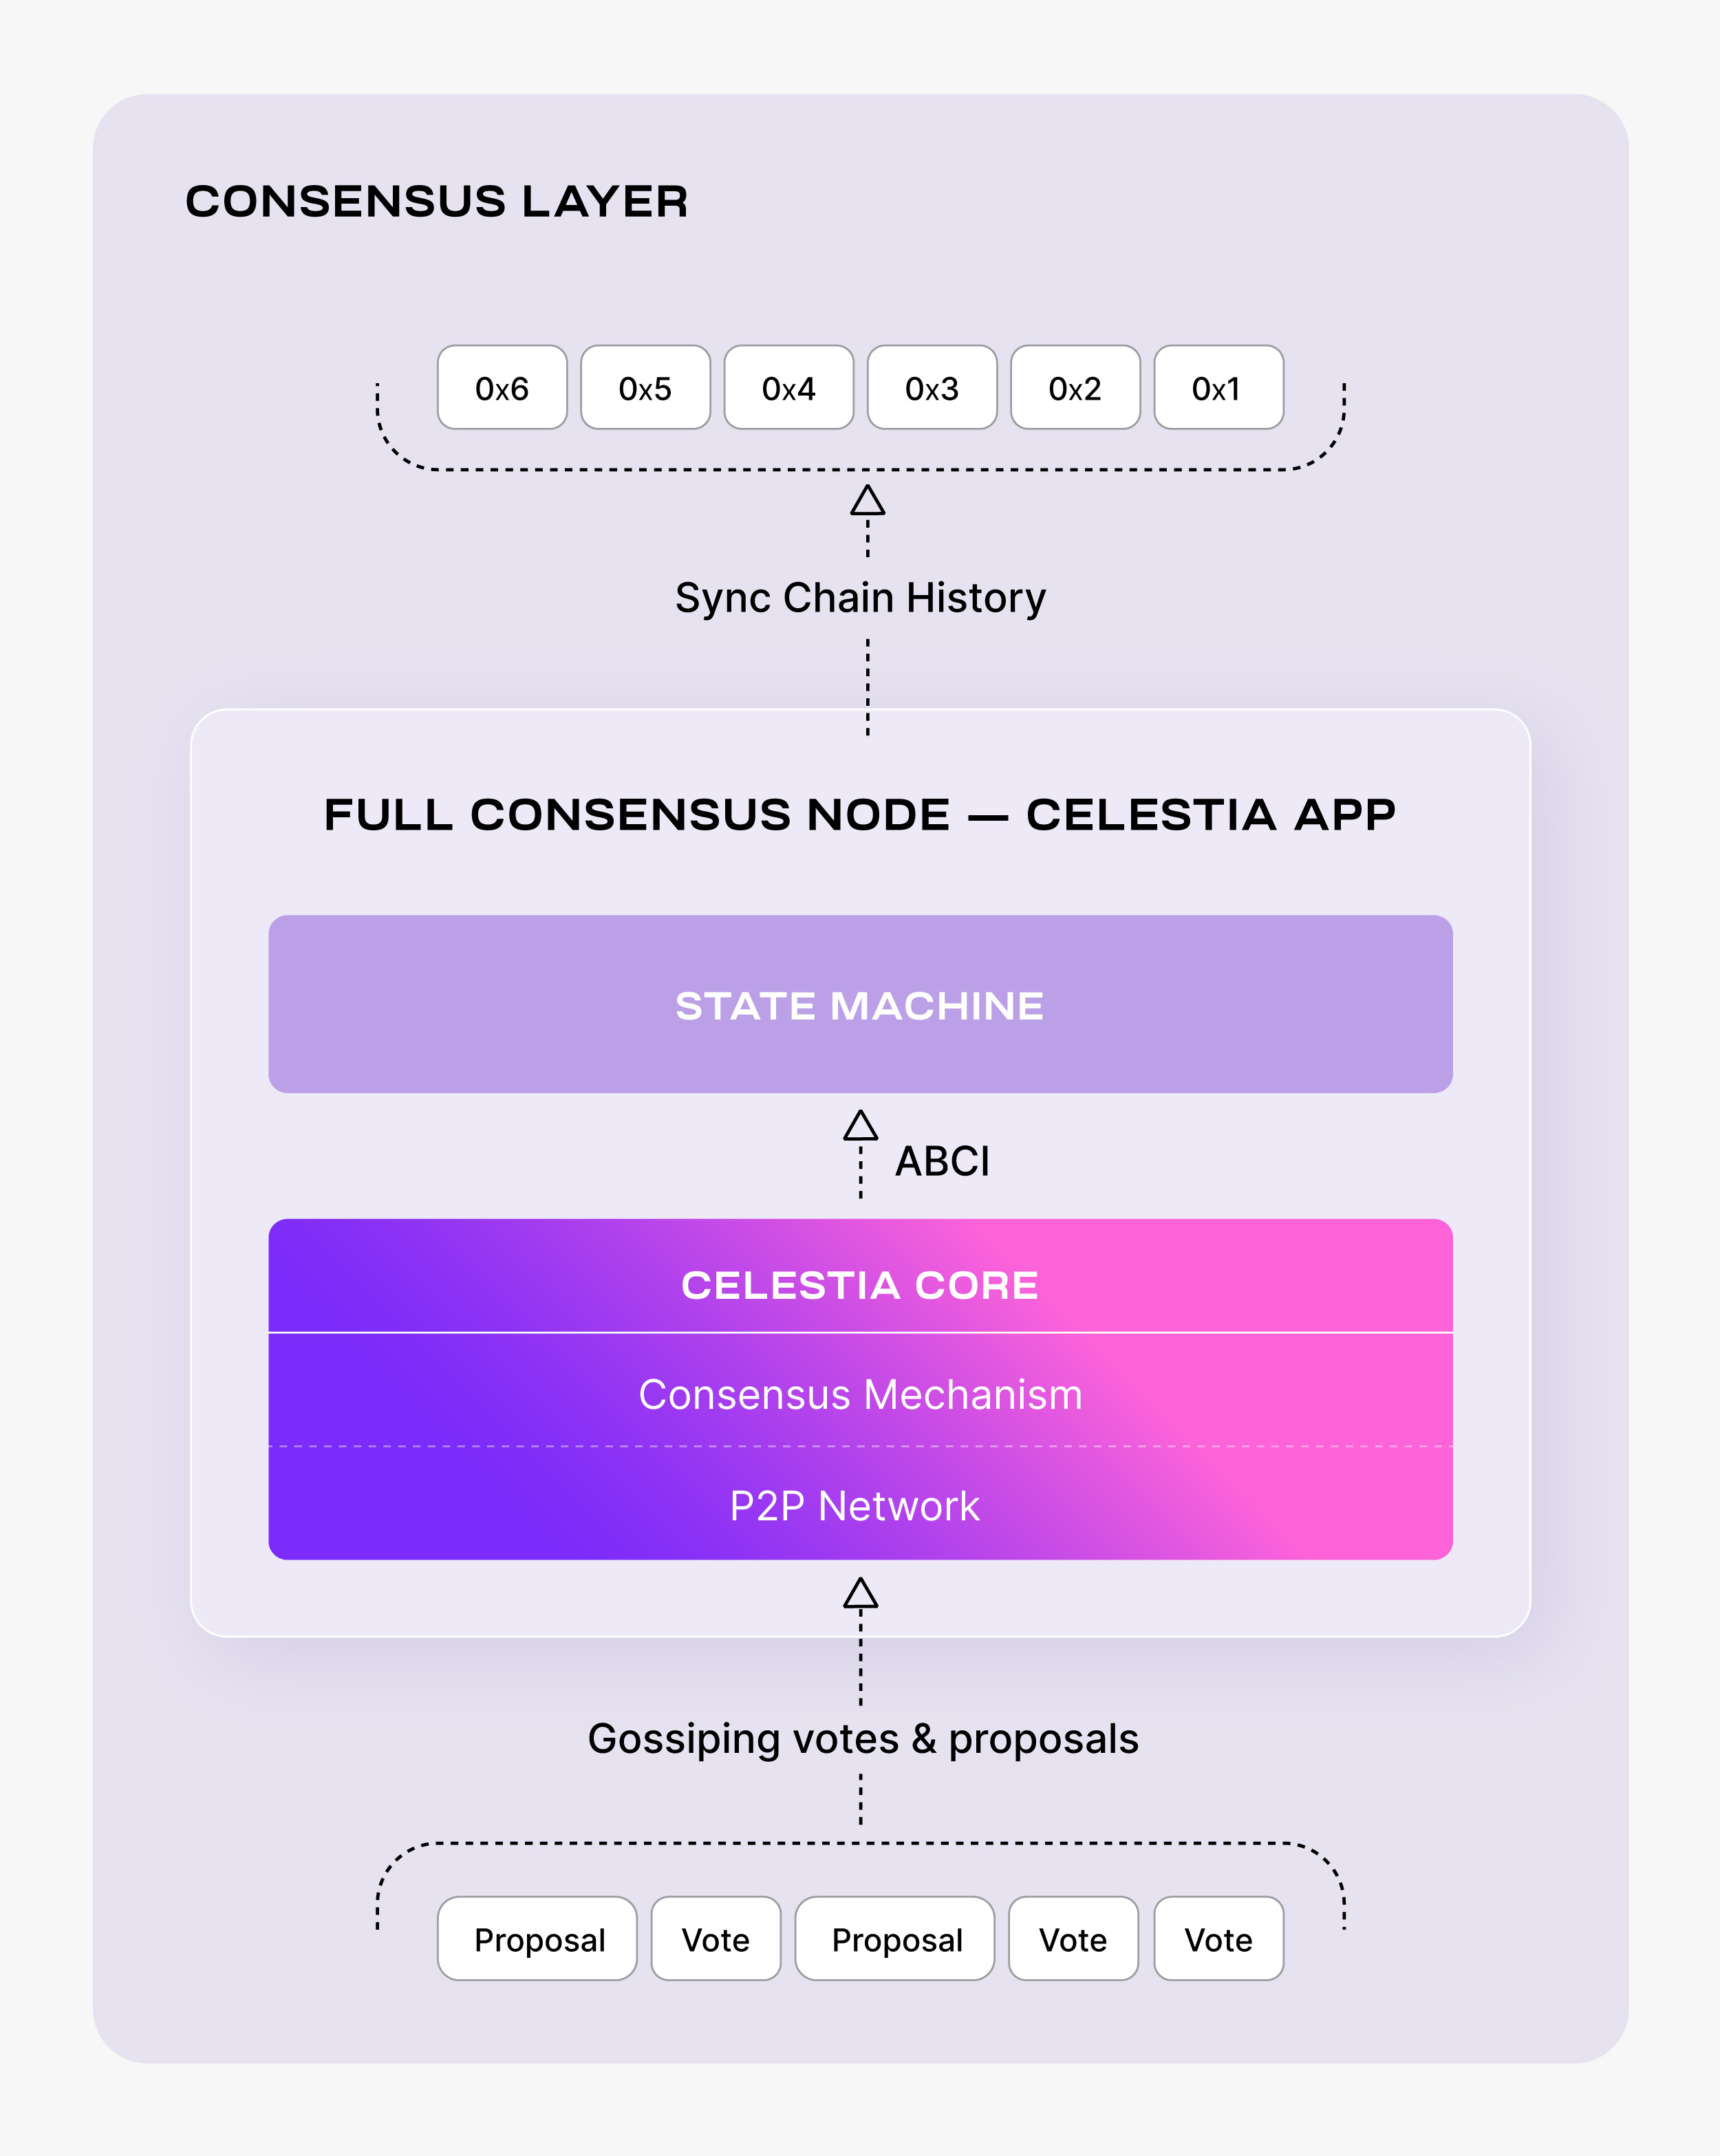
This guide covers how to set up a full consensus node on Celestia. Full consensus nodes allow you to sync blockchain history in the Celestia consensus layer.
Hardware requirements
The following hardware minimum requirements are recommended for running a full consensus node:
- Memory: 8 GB RAM
- CPU: Quad-Core
- Disk: 250 GB SSD Storage
- Bandwidth: 1 Gbps for Download/1 Gbps for Upload
Running a full consensus node requires significant storage capacity to store the entire blockchain history. As of the latest recommendation, it is advisable to have at least 250 GB of SSD storage for a Celestia full consensus node if you are using pruning. If you are not using pruning, you are running an archive node, and it is recommended to have 500 GB of SSD storage. Please ensure that your storage meets this requirement to ensure smooth syncing and operation of the node.
Setting up a full consensus node
The following tutorial is done on an Ubuntu Linux 20.04 (LTS) x64 instance machine.
Set up the dependencies
Follow the instructions on installing dependencies.
Install celestia-app
Follow the tutorial on installing celestia-app.
Set up the P2P networks
Now we will set up the P2P Networks by cloning the networks repository:
cd $HOME
rm -rf networks
git clone https://github.com/celestiaorg/networks.git
cd $HOME
rm -rf networks
git clone https://github.com/celestiaorg/networks.gitTo initialize the network, pick a "node-name" that describes your node. Keep in mind that this might change if a new testnet is deployed.
celestia-appd init "node-name" --chain-id celestiacelestia-appd init "node-name" --chain-id celestiacelestia-appd init "node-name" --chain-id mocha-4celestia-appd init "node-name" --chain-id mocha-4celestia-appd init "node-name" --chain-id arabica-11celestia-appd init "node-name" --chain-id arabica-11Download the genesis.json file:
celestia-appd download-genesis celestiacelestia-appd download-genesis celestiacelestia-appd download-genesis mocha-4celestia-appd download-genesis mocha-4celestia-appd download-genesis arabica-11celestia-appd download-genesis arabica-11Set seeds in the $HOME/.celestia-app/config/config.toml file:
SEEDS=$(curl -sL https://raw.githubusercontent.com/celestiaorg/networks/master/celestia/seeds.txt | tr '\n' ',')
echo $SEEDS
sed -i.bak -e "s/^seeds *=.*/seeds = \"$SEEDS\"/" $HOME/.celestia-app/config/config.tomlSEEDS=$(curl -sL https://raw.githubusercontent.com/celestiaorg/networks/master/celestia/seeds.txt | tr '\n' ',')
echo $SEEDS
sed -i.bak -e "s/^seeds *=.*/seeds = \"$SEEDS\"/" $HOME/.celestia-app/config/config.tomlSEEDS=$(curl -sL https://raw.githubusercontent.com/celestiaorg/networks/master/mocha-4/seeds.txt | tr '\n' ',')
echo $SEEDS
sed -i.bak -e "s/^seeds *=.*/seeds = \"$SEEDS\"/" $HOME/.celestia-app/config/config.tomlSEEDS=$(curl -sL https://raw.githubusercontent.com/celestiaorg/networks/master/mocha-4/seeds.txt | tr '\n' ',')
echo $SEEDS
sed -i.bak -e "s/^seeds *=.*/seeds = \"$SEEDS\"/" $HOME/.celestia-app/config/config.toml# For Arabica, you can set seeds manually in the
# `$HOME/.celestia-app/config/config.toml` file:
# Comma separated list of seed nodes to connect to
seeds = ""# For Arabica, you can set seeds manually in the
# `$HOME/.celestia-app/config/config.toml` file:
# Comma separated list of seed nodes to connect to
seeds = ""Optionally, you can set persistent peers in your config.toml file. You can get the persistent peers from the networks repository with the following commands:
Setting persistent peers is advised only if you are running a sentry node.
PERSISTENT_PEERS=$(curl -sL https://raw.githubusercontent.com/celestiaorg/networks/master/celestia/peers.txt | tr '\n' ',')
echo $PERSISTENT_PEERS
sed -i.bak -e "s/^persistent_peers *=.*/persistent_peers = \"$PERSISTENT_PEERS\"/" $HOME/.celestia-app/config/config.tomlPERSISTENT_PEERS=$(curl -sL https://raw.githubusercontent.com/celestiaorg/networks/master/celestia/peers.txt | tr '\n' ',')
echo $PERSISTENT_PEERS
sed -i.bak -e "s/^persistent_peers *=.*/persistent_peers = \"$PERSISTENT_PEERS\"/" $HOME/.celestia-app/config/config.tomlPERSISTENT_PEERS=$(curl -sL https://raw.githubusercontent.com/celestiaorg/networks/master/mocha-4/peers.txt | tr '\n' ',')
echo $PERSISTENT_PEERS
sed -i.bak -e "s/^persistent_peers *=.*/persistent_peers = \"$PERSISTENT_PEERS\"/" $HOME/.celestia-app/config/config.tomlPERSISTENT_PEERS=$(curl -sL https://raw.githubusercontent.com/celestiaorg/networks/master/mocha-4/peers.txt | tr '\n' ',')
echo $PERSISTENT_PEERS
sed -i.bak -e "s/^persistent_peers *=.*/persistent_peers = \"$PERSISTENT_PEERS\"/" $HOME/.celestia-app/config/config.tomlPERSISTENT_PEERS=$(curl -sL https://raw.githubusercontent.com/celestiaorg/networks/master/arabica-11/peers.txt | tr '\n' ',')
echo $PERSISTENT_PEERS
sed -i.bak -e "s/^persistent_peers *=.*/persistent_peers = \"$PERSISTENT_PEERS\"/" $HOME/.celestia-app/config/config.tomlPERSISTENT_PEERS=$(curl -sL https://raw.githubusercontent.com/celestiaorg/networks/master/arabica-11/peers.txt | tr '\n' ',')
echo $PERSISTENT_PEERS
sed -i.bak -e "s/^persistent_peers *=.*/persistent_peers = \"$PERSISTENT_PEERS\"/" $HOME/.celestia-app/config/config.tomlStorage and pruning configurations
Connecting a consensus node to a bridge node
If your consensus node is being connected to a celestia-node bridge node, you will need to enable transaction indexing and retain all block data. This can be achieved with the following settings in your config.toml.
Enable transaction indexing
indexer = "kv"indexer = "kv"Retain all block data
And in your app.toml, min-retain-blocks should remain as the default setting of 0:
min-retain-blocks = 0 # retain all block data, this is default settingmin-retain-blocks = 0 # retain all block data, this is default settingQuerying transactions by hash
To query transactions using their hash, transaction indexing must be turned on. Set the indexer to "kv" in your config.toml:
indexer = "kv"indexer = "kv"Accessing historical state
If you want to query the historical state — for example, you might want to know the balance of a Celestia wallet at a given height in the past — you should run an archive node with pruning = "nothing" in your app.toml. Note that this configuration is resource-intensive and will require significant storage:
pruning = "nothing"pruning = "nothing"Saving on storage requirements
If you want to save on storage requirements, consider using pruning = "everything" in your app.toml to prune everything. If you select "everything" or "default", but still want to keep the block data, you can do so by not changing the default value of min-retain-blocks = 0 in your app.toml. A value of 0 for min-retain-blocks will keep all block data. This will prune snapshots of the state, but it will keep block data:
pruning = "everything"
min-retain-blocks = 0 # this is the default setting
pruning = "everything"
min-retain-blocks = 0 # this is the default settingSyncing
By default, a consensus node will sync using block sync; that is request, validate and execute every block up to the head of the blockchain. This is the most secure mechanism yet the slowest (taking up to days depending on the height of the blockchain).
There are two alternatives for quicker syncing.
State sync
State sync uses light client verification to verify state snapshots from peers and then apply them. State sync relies on weak subjectivity; a trusted header (specifically the hash and height) must be provided. This can be found by querying a trusted RPC endpoint (/block). RPC endpoints are also required for retrieving light blocks. These can be found in the docs here under the respective networks or from the chain-registry.
In $HOME/.celestia-app/config/config.toml, set
rpc_servers = ""
trust_height = 0
trust_hash = ""
rpc_servers = ""
trust_height = 0
trust_hash = ""To their respective fields. At least two different rpc endpoints should be provided. The more, the greater the chance of detecting any fraudulent behavior.
Once setup, you should be ready to start the node as normal. In the logs, you should see: Discovering snapshots. This may take a few minutes before snapshots are found depending on the network topology.
Quick sync
Quick sync effectively downloads the entire data directory from a third-party provider meaning the node has all the application and blockchain state as the node it was copied from.
Run the following command to quick-sync from a snapshot:
cd $HOME
rm -rf ~/.celestia-app/data
mkdir -p ~/.celestia-app/data
SNAP_NAME=$(curl -s https://snaps.qubelabs.io/celestia/ | \
    egrep -o ">celestia.*tar" | tr -d ">")
aria2c -x 16 -s 16 -o celestia-snap.tar "https://snaps.qubelabs.io/celestia/${SNAP_NAME}"
tar xf celestia-snap.tar -C ~/.celestia-app/data/
cd $HOME
rm -rf ~/.celestia-app/data
mkdir -p ~/.celestia-app/data
SNAP_NAME=$(curl -s https://snaps.qubelabs.io/celestia/ | \
egrep -o ">celestia.*tar" | tr -d ">")
aria2c -x 16 -s 16 -o celestia-snap.tar "https://snaps.qubelabs.io/celestia/${SNAP_NAME}"
tar xf celestia-snap.tar -C ~/.celestia-app/data/cd $HOME
rm -rf ~/.celestia-app/data
mkdir -p ~/.celestia-app/data
SNAP_NAME=$(curl -s https://snaps.qubelabs.io/celestia/ | \
egrep -o ">mocha-4.*tar" | tr -d ">")
aria2c -x 16 -s 16 -o celestia-snap.tar "https://snaps.qubelabs.io/celestia/${SNAP_NAME}"
tar xf celestia-snap.tar -C ~/.celestia-app/data/cd $HOME
rm -rf ~/.celestia-app/data
mkdir -p ~/.celestia-app/data
SNAP_NAME=$(curl -s https://snaps.qubelabs.io/celestia/ | \
egrep -o ">arabica-11.*tar" | tr -d ">")
aria2c -x 16 -s 16 -o celestia-snap.tar "https://snaps.qubelabs.io/celestia/${SNAP_NAME}"
tar xf celestia-snap.tar -C ~/.celestia-app/data/Start the consensus node
In order to start your full consensus node, run the following:
celestia-appd startcelestia-appd startOptional: If you would like celestia-app to run as a background process, you can follow the SystemD tutorial.
TIP
Refer to the ports section of the celestia-node troubleshooting page for information on which ports are required to be open on your machine.
Extra resources for consensus nodes
Optional: Reset network
This will delete all data folders so we can start fresh:
celestia-appd tendermint unsafe-reset-all --home $HOME/.celestia-appcelestia-appd tendermint unsafe-reset-all --home $HOME/.celestia-appOptional: Configuring an RPC endpoint
You can configure your full consensus node to be a public RPC endpoint. This allows it to accept connections from data availability nodes and serve requests for the data availability API.
Expose RPC
By default, the RPC service listens on localhost which means it can't be accessed from other machines. To make the RPC service available publicly, you need to bind it to a public IP or 0.0.0.0 (which means listening on all available network interfaces).
You can do this by editing the config.toml file:
sed -i 's#"tcp://127.0.0.1:26657"#"tcp://0.0.0.0:26657"#g' ~/.celestia-app/config/config.tomlsed -i 's#"tcp://127.0.0.1:26657"#"tcp://0.0.0.0:26657"#g' ~/.celestia-app/config/config.tomlThis command replaces the localhost IP address with 0.0.0.0, making the RPC service listen on all available network interfaces.
Note on external-address
The external-address field in the configuration is used when your node is behind a NAT and you need to advertise a different address for peers to dial. Populating this field is not necessary for making the RPC endpoint public.
EXTERNAL-ADDRESS=$(wget -qO- eth0.me)
sed -i.bak -e "s/^external-address = ""/external-address = "$EXTERNAL-ADDRESS:26656"/" \
$HOME/.celestia-app/config/config.tomlEXTERNAL-ADDRESS=$(wget -qO- eth0.me)
sed -i.bak -e "s/^external-address = ""/external-address = "$EXTERNAL-ADDRESS:26656"/" \
$HOME/.celestia-app/config/config.tomlRestart the node
After making these changes, restart celestia-appd to load the new configurations.
Optional: Transaction indexer configuration options
This section guides you on how to configure your config.toml file in celestia-app to select which transactions to index. Depending on the application's configuration, a node operator may decide which transactions to index.
The available options are:
null: This option disables indexing. If you don't need to query transactions, you can choose this option to save space.kv(default): This is the simplest indexer, backed by key-value storage (defaults to levelDB; see DBBackend). Whenkvis chosen,tx.heightandtx.hashwill always be indexed. This option is suitable for basic queries on transactions.psql: This indexer is backed by PostgreSQL. When psql is chosen,tx.heightandtx.hashwill always be indexed. This option is suitable for complex queries on transactions.
An example to set the value to kv in config.toml is:
indexer = "kv"indexer = "kv"Remember to restart celestia-appd after making changes to the configuration to load the new settings.
Optional: Discard ABCI responses configuration
This section will guide you on how to configure your config.toml file in celestia-app to manage the storage of ABCI responses. ABCI responses are the results of executing transactions and are used for /block_results RPC queries and to reindex events in the command-line tool.
The discard_abci_responses option allows you to control whether these responses are persisted in the state store:
false(default): ABCI responses are stored in the state store. This ensures that ABCI responses are available for/block_resultsRPC queries and for reindexing events. However, it can consume a significant amount of disk space.true: ABCI responses are not stored in the state store. This can save a considerable amount of disk space, but/block_resultsRPC queries and event reindexing will not be available.
An example to set the value to false in config.toml is:
discard_abci_responses = falsediscard_abci_responses = falseRemember to restart celestia-appd after making changes to the configuration to load the new settings.
FAQ
+2/3 committed an invalid block: wrong Block.Header.Version
If you encounter an error like:
2024-04-25 14:48:24 6:48PM ERR CONSENSUS FAILURE!!! err="+2/3 committed an invalid block: wrong Block.Header.Version. Expected {11 1}, got {11 2}" module=consensus stack="goroutine 214 [running]:\nruntime/debug.Stack()\n\t/usr/local/go/src/runtime/debug/stack.go:24 +0x64\ngithub.com/tendermint/tendermint/consensus.(*State).receiveRoutine.func2()\n\t/go/pkg/mod/github.com/celestiaorg/[email protected]/consensus/state.go:746 +0x44\npanic({0x1b91180?, 0x400153b240?})\n\t/usr/local/go/src/runtime/panic.go:770 +0x124\ngithub.com/tendermint/tendermint/consensus.(*State).finalizeCommit(0x400065ea88, 0x3)\n\t/go/pkg/mod/github.com/celestiaorg/[email protected]/consensus/state.go:1637 +0xd30\ngithub.com/tendermint/tendermint/consensus.(*State).tryFinalizeCommit(0x400065ea88, 0x3)\n\t/go/pkg/mod/github.com/celestiaorg/[email protected]/consensus/state.go:1606 +0x26c\ngithub.com/tendermint/tendermint/consensus.(*State).handleCompleteProposal(0x400065ea88, 0x3)\n\t/go/pkg/mod/github.com/celestiaorg/[email protected]/consensus/state.go:2001 +0x2d8\ngithub.com/tendermint/tendermint/consensus.(*State).handleMsg(0x400065ea88, {{0x2b30a00, 0x400143e048}, {0x40002a61b0, 0x28}})\n\t/go/pkg/mod/github.com/celestiaorg/[email protected]/consensus/state.go:856 +0x1c8\ngithub.com/tendermint/tendermint/consensus.(*State).receiveRoutine(0x400065ea88, 0x0)\n\t/go/pkg/mod/github.com/celestiaorg/[email protected]/consensus/state.go:782 +0x2c4\ncreated by github.com/tendermint/tendermint/consensus.(*State).OnStart in goroutine 169\n\t/go/pkg/mod/github.com/celestiaorg/[email protected]/consensus/state.go:391 +0x110\n"2024-04-25 14:48:24 6:48PM ERR CONSENSUS FAILURE!!! err="+2/3 committed an invalid block: wrong Block.Header.Version. Expected {11 1}, got {11 2}" module=consensus stack="goroutine 214 [running]:\nruntime/debug.Stack()\n\t/usr/local/go/src/runtime/debug/stack.go:24 +0x64\ngithub.com/tendermint/tendermint/consensus.(*State).receiveRoutine.func2()\n\t/go/pkg/mod/github.com/celestiaorg/[email protected]/consensus/state.go:746 +0x44\npanic({0x1b91180?, 0x400153b240?})\n\t/usr/local/go/src/runtime/panic.go:770 +0x124\ngithub.com/tendermint/tendermint/consensus.(*State).finalizeCommit(0x400065ea88, 0x3)\n\t/go/pkg/mod/github.com/celestiaorg/[email protected]/consensus/state.go:1637 +0xd30\ngithub.com/tendermint/tendermint/consensus.(*State).tryFinalizeCommit(0x400065ea88, 0x3)\n\t/go/pkg/mod/github.com/celestiaorg/[email protected]/consensus/state.go:1606 +0x26c\ngithub.com/tendermint/tendermint/consensus.(*State).handleCompleteProposal(0x400065ea88, 0x3)\n\t/go/pkg/mod/github.com/celestiaorg/[email protected]/consensus/state.go:2001 +0x2d8\ngithub.com/tendermint/tendermint/consensus.(*State).handleMsg(0x400065ea88, {{0x2b30a00, 0x400143e048}, {0x40002a61b0, 0x28}})\n\t/go/pkg/mod/github.com/celestiaorg/[email protected]/consensus/state.go:856 +0x1c8\ngithub.com/tendermint/tendermint/consensus.(*State).receiveRoutine(0x400065ea88, 0x0)\n\t/go/pkg/mod/github.com/celestiaorg/[email protected]/consensus/state.go:782 +0x2c4\ncreated by github.com/tendermint/tendermint/consensus.(*State).OnStart in goroutine 169\n\t/go/pkg/mod/github.com/celestiaorg/[email protected]/consensus/state.go:391 +0x110\n"then it is likely that the network has upgraded to a new app version but your consensus node was not prepared for the upgrade. To fix this, you'll need to update your binary to the latest version and restart your node with the relevant --v2-upgrade-height for the network you're running on. If your node still can't sync to the tip of the chain after the above steps, consider a celestia-appd tendermint unsafe-reset-all to reset your node and start syncing from the genesis block.