Quickstart: Deploy an Arbitrum Orbit rollup
This guide covers deploying a rollup using the Celestia Orbit chain deployment portal.
After completing this tutorial, you will have a local development network rollup capable of hosting EVM-compatible smart contracts. This rollup will process transactions locally, settle on the public Arbitrum Sepolia testnet, and post data to Celestia's Mocha testnet.
If you're looking to learn more about the integration of Celestia and Orbit, read the Arbitrum Orbit integration overview. If you're looking to learn more about Orbit, read A gentle introduction: Orbit chains.
Thank you, Offchain Labs!
This guide was made possible with the support and information provided by the Offchain Labs team, the creators of Arbitrum. For more detailed information and support, visit Arbitrum documentation and the original deployment guide.
Prerequisites
- Familiarity with Ethereum, Ethereum's testnets, Arbitrum, and Celestia
- A gentle introduction: Orbit chains
- Arbitrum Orbit integration overview
- Docker running on your machine
- Docker Compose
- A fully synced and funded Mocha testnet light node on v0.13.2
- A browser-based Ethereum wallet (like MetaMask)
- At least 1 Arbitrum Sepolia testnet ETH (for custom gas token chains, 0.6 ETH and 0.4 native tokens)
Setup
This section was adapted from Arbitrum's Orbit quickstart.
Step 1: Acquire Arbitrum Sepolia ETH
You'll need at least 1 testnet ETH for a regular Orbit rollup or 0.6 ETH plus 0.4 of your desired native token for Orbit rollups with a custom gas token. The funds will cover the cost of deploying the base contracts to the base chain, in this case, Arbitrum Sepolia.
The simplest way to do this is to:
- Use an L1 testnet ETH faucet like sepoliafaucet.com to acquire some testnet ETH on Ethereum Sepolia testnet.
- Bridge your L1 testnet ETH to L2 Arbitrum Sepolia using the Arbitrum bridge.
Step 2: Pick your deployment type
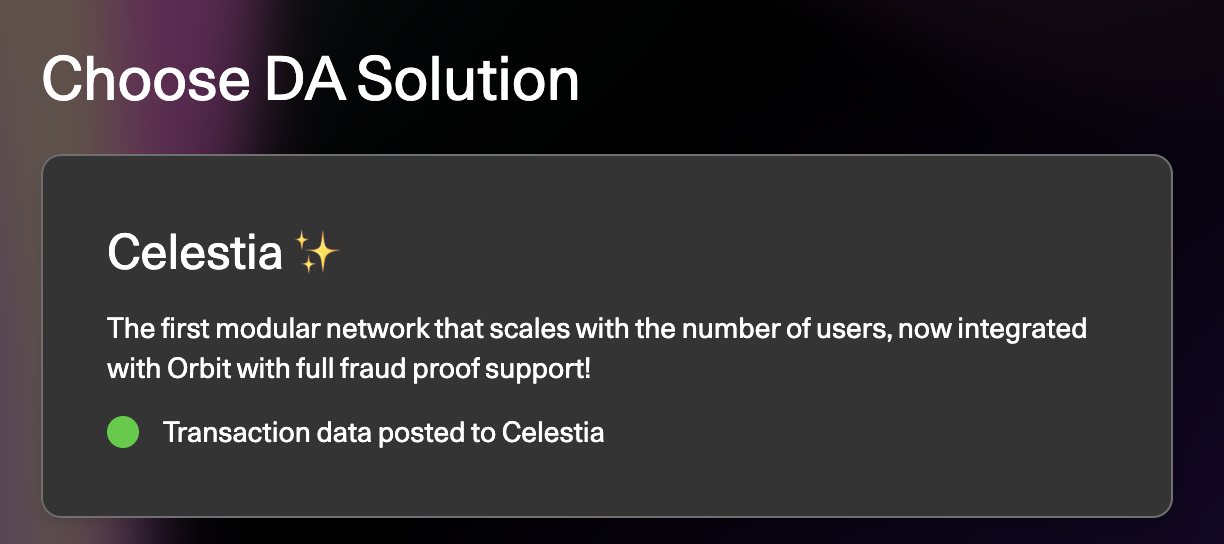
Visit the Celestia Orbit chain deployment portal. This portal offers the following options:
- Celestia Rollup: Transaction data is posted to Celestia
- Rollup: Transaction data is posted to Ethereum
- AnyTrust: Transaction data is posted by a Data Availability Committee
Connect your wallet to the deployment portal. You may be prompted to add the Arbitrum Sepolia network to your wallet and/or switch your wallet to this network; approve this.
In this guide, we will select Celestia ✨ and deploy a rollup which posts data to Celestia (1 above).

Click Next. In the next step, we will configure the deployment.
Step 3: Configure your Orbit chain's deployment
The deployment portal will then display a form that looks like this:

Parameter descriptions can be found in the table below (more in-depth descriptions can be found in the deployment UI). We recommend sticking to the defaults; to learn more about customizing your Orbit chain's deployment configuration, visit How to customize your Orbit chain's deployment configuration:
| Parameter | Description |
|---|---|
| Chain ID | This is a unique integer identifier for your chain's network, primarily used on chain indexes like Chainlist.org. It's not crucial for development networks, but in production, you'll need to choose a unique ID. |
| Chain Name | The name you assign to your Orbit chain, which helps users and developers distinguish it from other chains. It should be memorable and recognizable. |
| Challenge Period Blocks | Determines the time frame within which validators can dispute the state of the chain posted to the base chain. It's measured in blocks on the underlying L1 chain. A longer period allows more time for disputes but also delays withdrawals. |
| Stake Token | Specifies the token that validators must stake to participate in the validation process, using the token's contract address on the base chain. This can be ETH or another token, defined by its address. |
| Base Stake | The minimum amount of stake token required for validators to post state assertions. A lower base stake lowers the barrier to entry but increases vulnerability to attacks, whereas a higher stake encourages honest participation but raises the entry barrier. |
| Owner | The account address that has the authority to deploy, own, and update the base contracts of your Orbit chain on its base chain. In production, this is usually a high-stakes address controlled by a DAO or a multisig setup. For development chains, it's a lower-stakes administrative account. |
| Gas Token | The token used for gas payments on the network, which must be natively deployed on the parent chain. There are specific requirements for custom gas tokens, such as having 18 decimals and not being a rebasing or fee-on-transfer token. This feature is primarily for Orbit AnyTrust chains. |
| Validators | This is the number of validators for your chain, including their addresses. The first validator is auto-generated and immutable. Validators are crucial for maintaining the integrity of the chain and posting state assertions to the base chain. |
| Batch Poster | Responsible for posting transaction batches from your Orbit chain to the base chain. An address for this role is automatically generated, with the private key stored in a configuration file. |
In the Configure Validators section, specify the number of validators and their addresses for your chain. The initial validator's address is pre-generated and immutable, with its key stored in a JSON file. Validators ensure transaction integrity and state assertions on the base chain. They're added to an allow-list for validation and staking. Base contracts refer to your Orbit chain's L2 contracts, and base chain to the L2 chain they're deployed on.
In the Configure Batch Poster section, a batch poster address is auto-generated for posting transaction batches to the base contracts on the base chain. The address and its private key are also stored in a JSON configuration file. After configuring, proceed to review and deploy your Orbit chain.
After configuring your batch poster, proceed to the next step.
Step 4: Review & Deploy your Orbit chain
Now, deploy your chain's base contracts to Arbitrum Sepolia!
Click the Deploy button on the Review & Deploy page. Your wallet should prompt you to submit a transaction to the Arbitrum testnet. You'll have to pay a little gas; your wallet may denominate this in ETH; as long as you see your chosen Arbitrum testnet in the transaction details, this gas fee will be paid in testnet ETH.
Before proceeding, let's briefly review what just happened:
- You submitted a deployment transaction to an Orbit "factory" smart contract on the Arbitrum testnet, the public L2 chain that your local Orbit chain will settle transactions to.
- This Orbit smart contract then initialized your Orbit chain's base contracts with the values that you specified in the previous step, and deployed these base contracts to the Arbitrum testnet.
Your Orbit chain's base contracts are responsible for facilitating the exchange of information between your chain's node(s) and its base chain's nodes. This includes the batch posting of transactions from your Orbit chain to its base chain, the staking of tokens by your Orbit chain's validators the challenge mechanism, bridging mechanisms, and more.
Once your transaction is complete, continue to Step 4 to download your chain's configuration files and launch your chain.
Step 5: Download your chain's configuration files and launch your chain
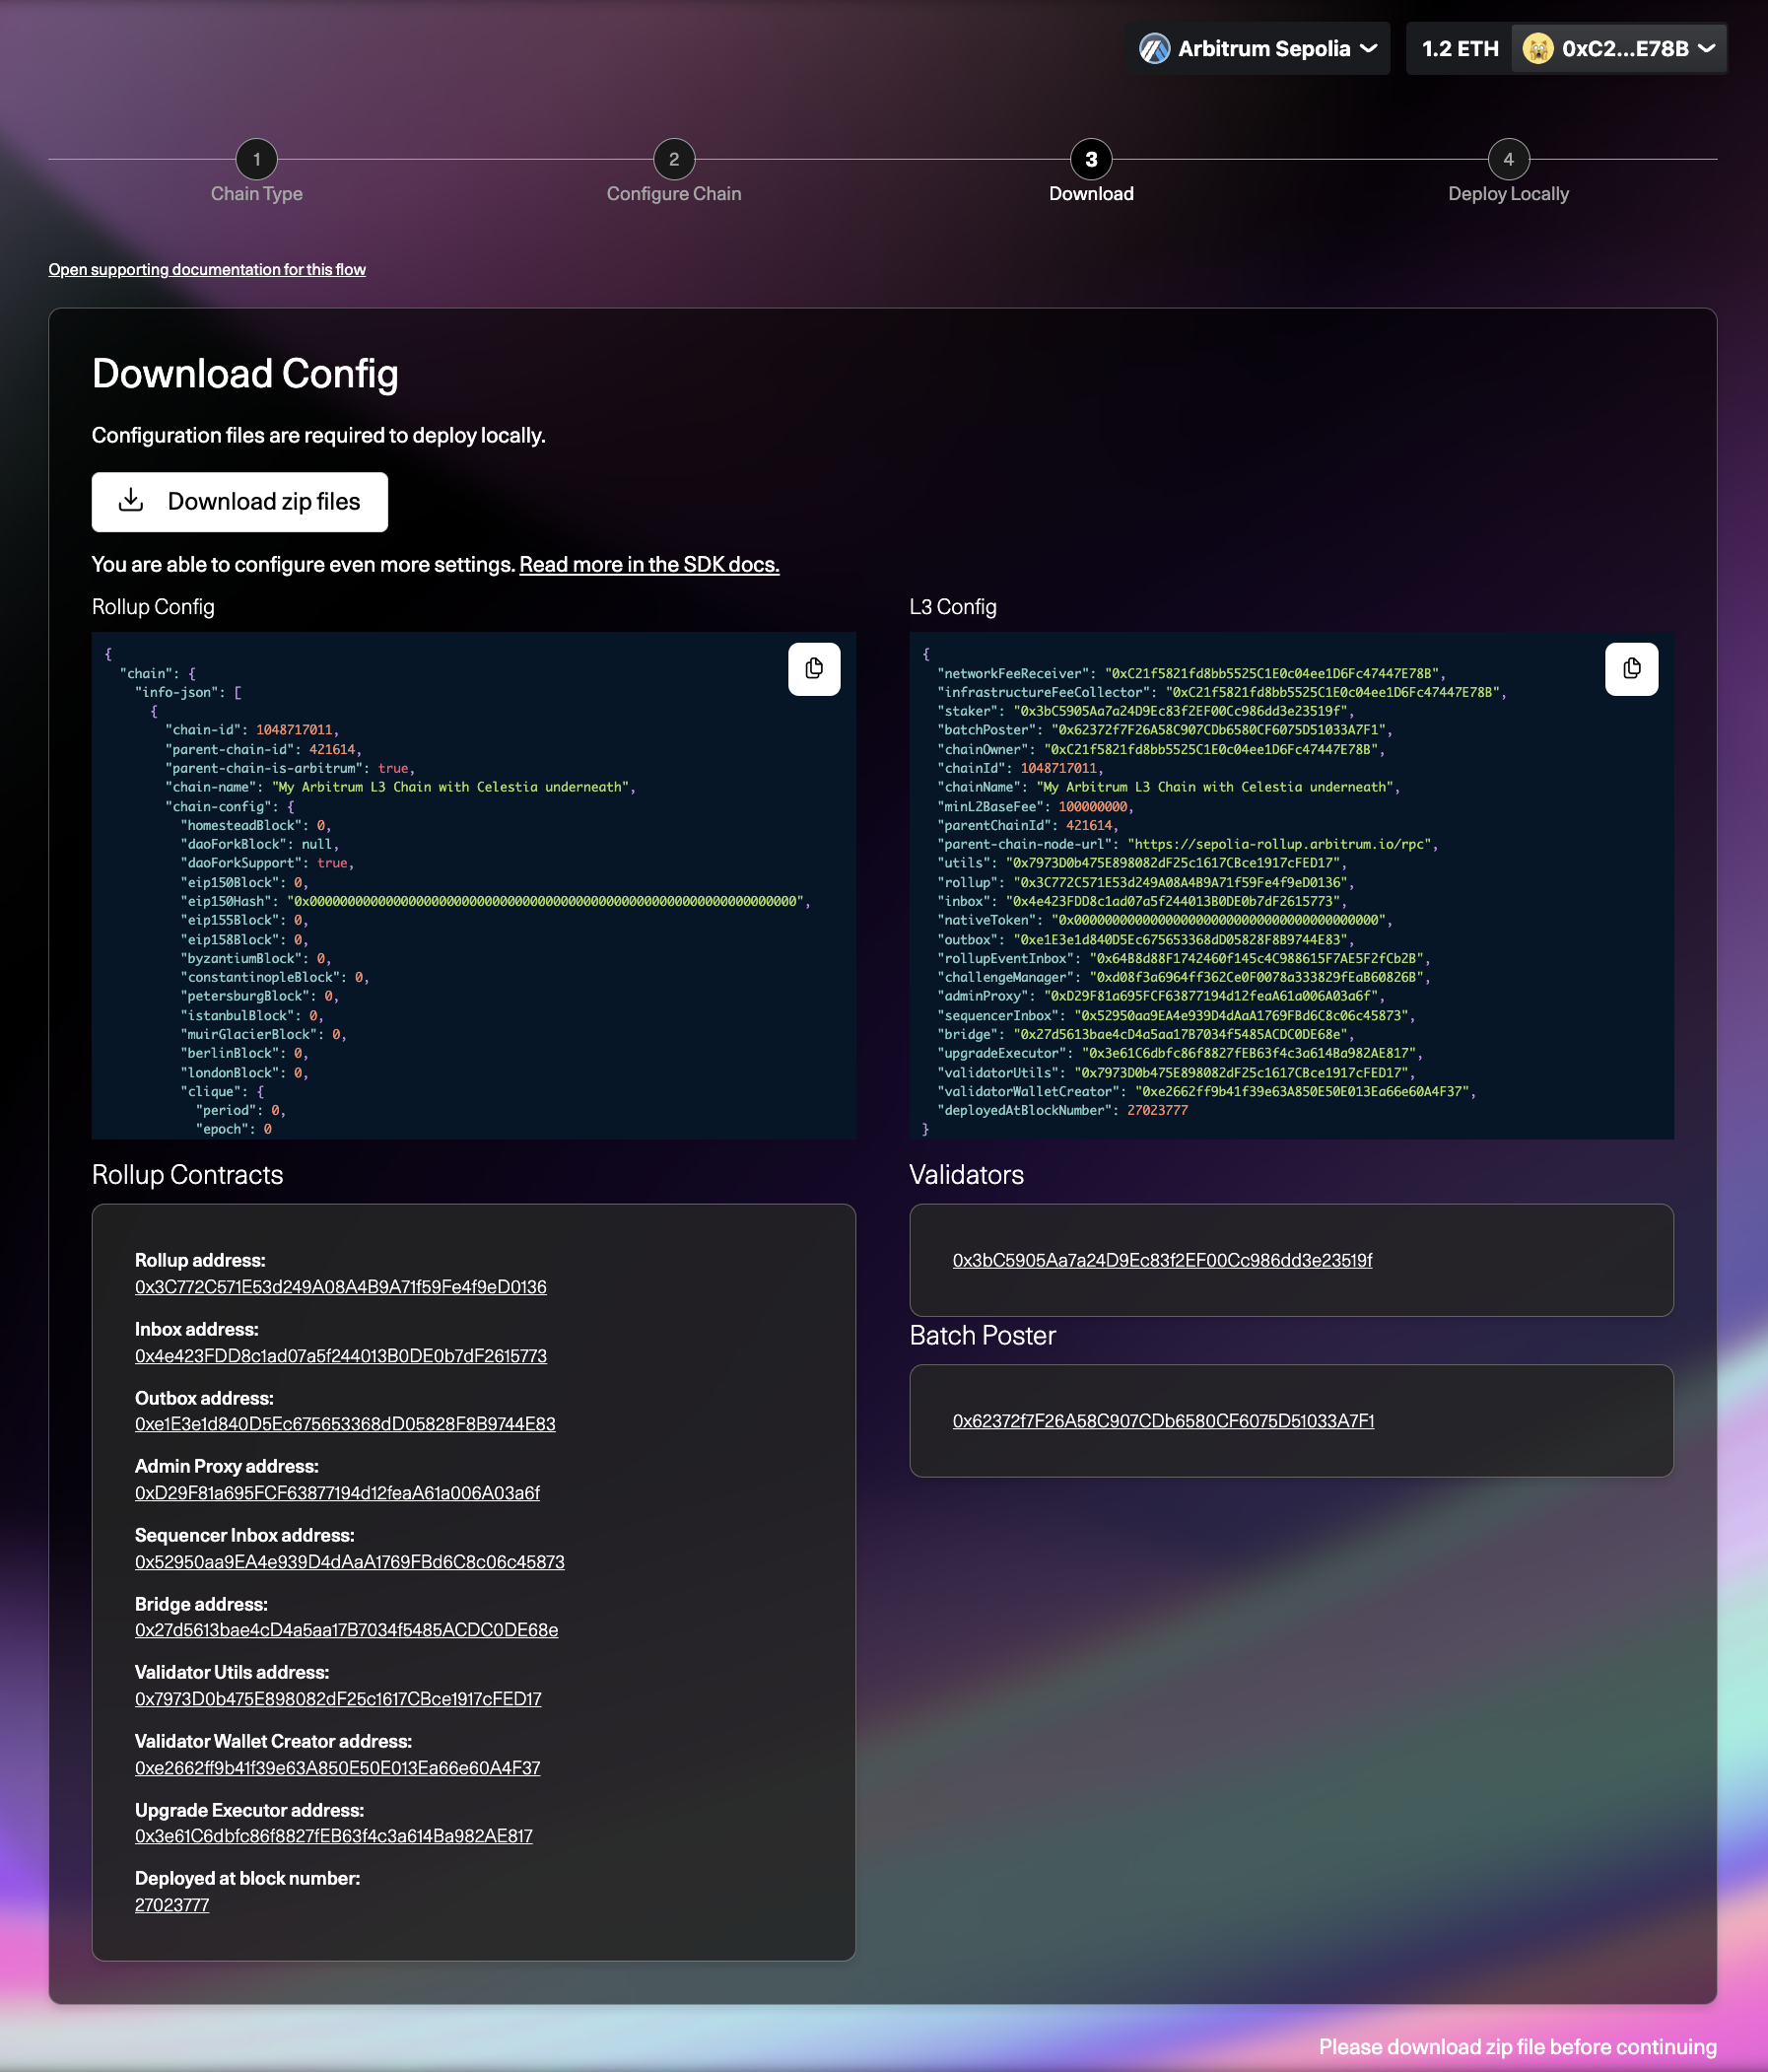
After configuring your chain, you will need to download the necessary configuration files to launch your chain. Click the Download zip files button to download both the Rollup Config and L3 Config in a single ZIP file.
Rollup Config: This is the
nodeConfig.jsonfile, encapsulating your chain's node configuration. It is crucial as it contains the private keys for your validator and batch poster, essential for signing transactions for RBlocks and batch postings to your chain's base contracts on the L2 chain.L3 Config: This is the
orbitSetupScriptConfig.jsonfile, which holds your chain's configuration, including configurations needed for your Token Bridge contracts.
Ensure to securely store these downloaded files as they contain sensitive information crucial for your chain's operation.

Step 6: Clone the setup script repository and add your configuration files
Clone the orbit-setup-script repository:
bashgit clone https://github.com/celestiaorg/orbit-setup-script.gitgit clone https://github.com/celestiaorg/orbit-setup-script.gitMove the
nodeConfig.jsonandorbitSetupScriptConfig.jsonfiles that you downloaded into theconfigdirectory in the root of your clonedorbit-setup-scriptrepository.Install dependencies by running
yarn installfrom the root of theorbit-setup-scriptrepository.
Step 7: Pick an L2 RPC URL for the Batch Poster
In order for the Batch Poster, which is responsible for posting batches of data, to subscribe to Blobstream's smart contract events, the node must use a WebSocket connection, since an HTTP one will not support subscriptions. This RPC URL is different from the parent-chain.connection.url object used in the node config, and is not necessary when running a full node. WebSocket (WSS) URLs which are essential for real-time data fetching and interaction with the Arbitrum Sepolia network.
To establish a WebSocket connection for your rollup to Arbitrum Sepolia, it's recommended to find an RPC provider with WSS connections from Arbitrum's docs.
For this example, we will make an account on Alchemy. Follow these steps to set up your account and obtain a WSS URL using Alchemy:
- Visit Alchemy's website and sign up for an account.
- Once logged in, create a new app by selecting the Arbitrum network, specifically targeting the Arbitrum Sepolia testnet.
- After creating your app, navigate to the "API key" section to find your WebSocket (WSS) URL.
- In the next step, use this WSS URL in your
nodeConfig.jsonunder thecelestia-cfg.eth-rpcobject to ensure your node can establish a WebSocket connection to the Arbitrum Sepolia network and successfully subscribe to Blobstream events.
Without a WSS connection, the Batch Poster won't be able to subscribe to Blobstream events, and thus will fall back to posting data to parent chain.
Step 8: Run your light node for Mocha testnet
First, be sure that your light node is running, using a command similar to:
TIP
If you are on Linux (or are not using Docker desktop), you may need to add the extra flags: --rpc.addr 0.0.0.0 and --rpc.port 26658 to your start command for your light node.
Additionally, you will need to add host.docker.internal as a host in your docker-compose.yml:
extra_hosts:
- "host.docker.internal:host-gateway"extra_hosts:
- "host.docker.internal:host-gateway"celestia light start --p2p.network mocha --core.ip <RPC_URL> \
--core.port 9090celestia light start --p2p.network mocha --core.ip <RPC_URL> \
--core.port 9090To set your light node's auth token, you will use the auth token that returns when you run:
celestia light auth admin --p2p.network mochacelestia light auth admin --p2p.network mochaSince the contracts deployed through the factories above are already configured to communicate with Blobstream, you now only have to configure your node accordingly. First understand the different variables that will be set in the config:
enable: set it to true if you are using Celestia DA 😁rpc: RPC endpoint for celestia-nodetendermint-rpc: a celestia-core endpoint from a full node (NOTE: only needed for a batch poster node)eth-rpc: Ethereum Client WSS RPC endpoint, only used when the node is a batch poster. The eth-rpc must be WSS. Otherwise, it won't be able to subscribe to events for Blobstream.namespace-id: namespace being used to post data to Celestiaauth-token: auth token for your Celestia Nodeis-poster: is the node with Celestia DA the batch poster, set to true if so.gas-price: how much to pay for gas (in uTIA)event-channel-size: size of the events channel used by the batch poster to wait for a range of headers that contains the header for the block in which it posted a blob, before posting the batch to the base layer for verification on Blobstream X.blobstreamx-address: address of the Blobstream X contract on the base chain.- Note that the
SequencerInboxcontract for each chain has a constant address for theBlobstreamXcontract, thus make sure that the Blobstream X address in theSequencerInboxbeing used for the templates inRollupCreatormatches the one in your config.
- Note that the
Now enable Celestia DA in your Arbitrum chain params in config/nodeConfig.json. If you'd like to use your own namespace, use a custom 10 byte value or random value using openssl rand -hex 10 for namespace-id:
WARNING
The Orbit contracts depend on the existing Blobstream X deployments. Before using these addresses, please verify the contract addresses on the official source below to avoid any issues due to incorrect addresses. This is crucial to protect against potential misuse by copy-paste errors.
"celestia-cfg": {
  "enable": true,
  "rpc": "http://host.docker.internal:26658",
  "tendermint-rpc": "http://consensus-full-mocha-4.celestia-mocha.com:26657",
  "eth-rpc": "wss://<YOUR_ETH_RPC_WSS_URL>",
  "namespace-id": "<YOUR_10_BYTE_NAMESPACE>",
  "auth-token": "<YOUR_AUTH_TOKEN>",
  "is-poster": true,
  "gas-price": 0.3,
  "event-channel-size": 100,
  "blobstreamx-address": "0xc3e209eb245Fd59c8586777b499d6A665DF3ABD2",
}"celestia-cfg": {
"enable": true,
"rpc": "http://host.docker.internal:26658",
"tendermint-rpc": "http://consensus-full-mocha-4.celestia-mocha.com:26657",
"eth-rpc": "wss://<YOUR_ETH_RPC_WSS_URL>",
"namespace-id": "<YOUR_10_BYTE_NAMESPACE>",
"auth-token": "<YOUR_AUTH_TOKEN>",
"is-poster": true,
"gas-price": 0.3,
"event-channel-size": 100,
"blobstreamx-address": "0xc3e209eb245Fd59c8586777b499d6A665DF3ABD2",
}See the compatibility matrix in the appendix to verify you're using the right versions.
Step 9: Run your chain's node and block explorer
Start Docker, then run docker-compose up -d from the root of the orbit-setup-script repository.
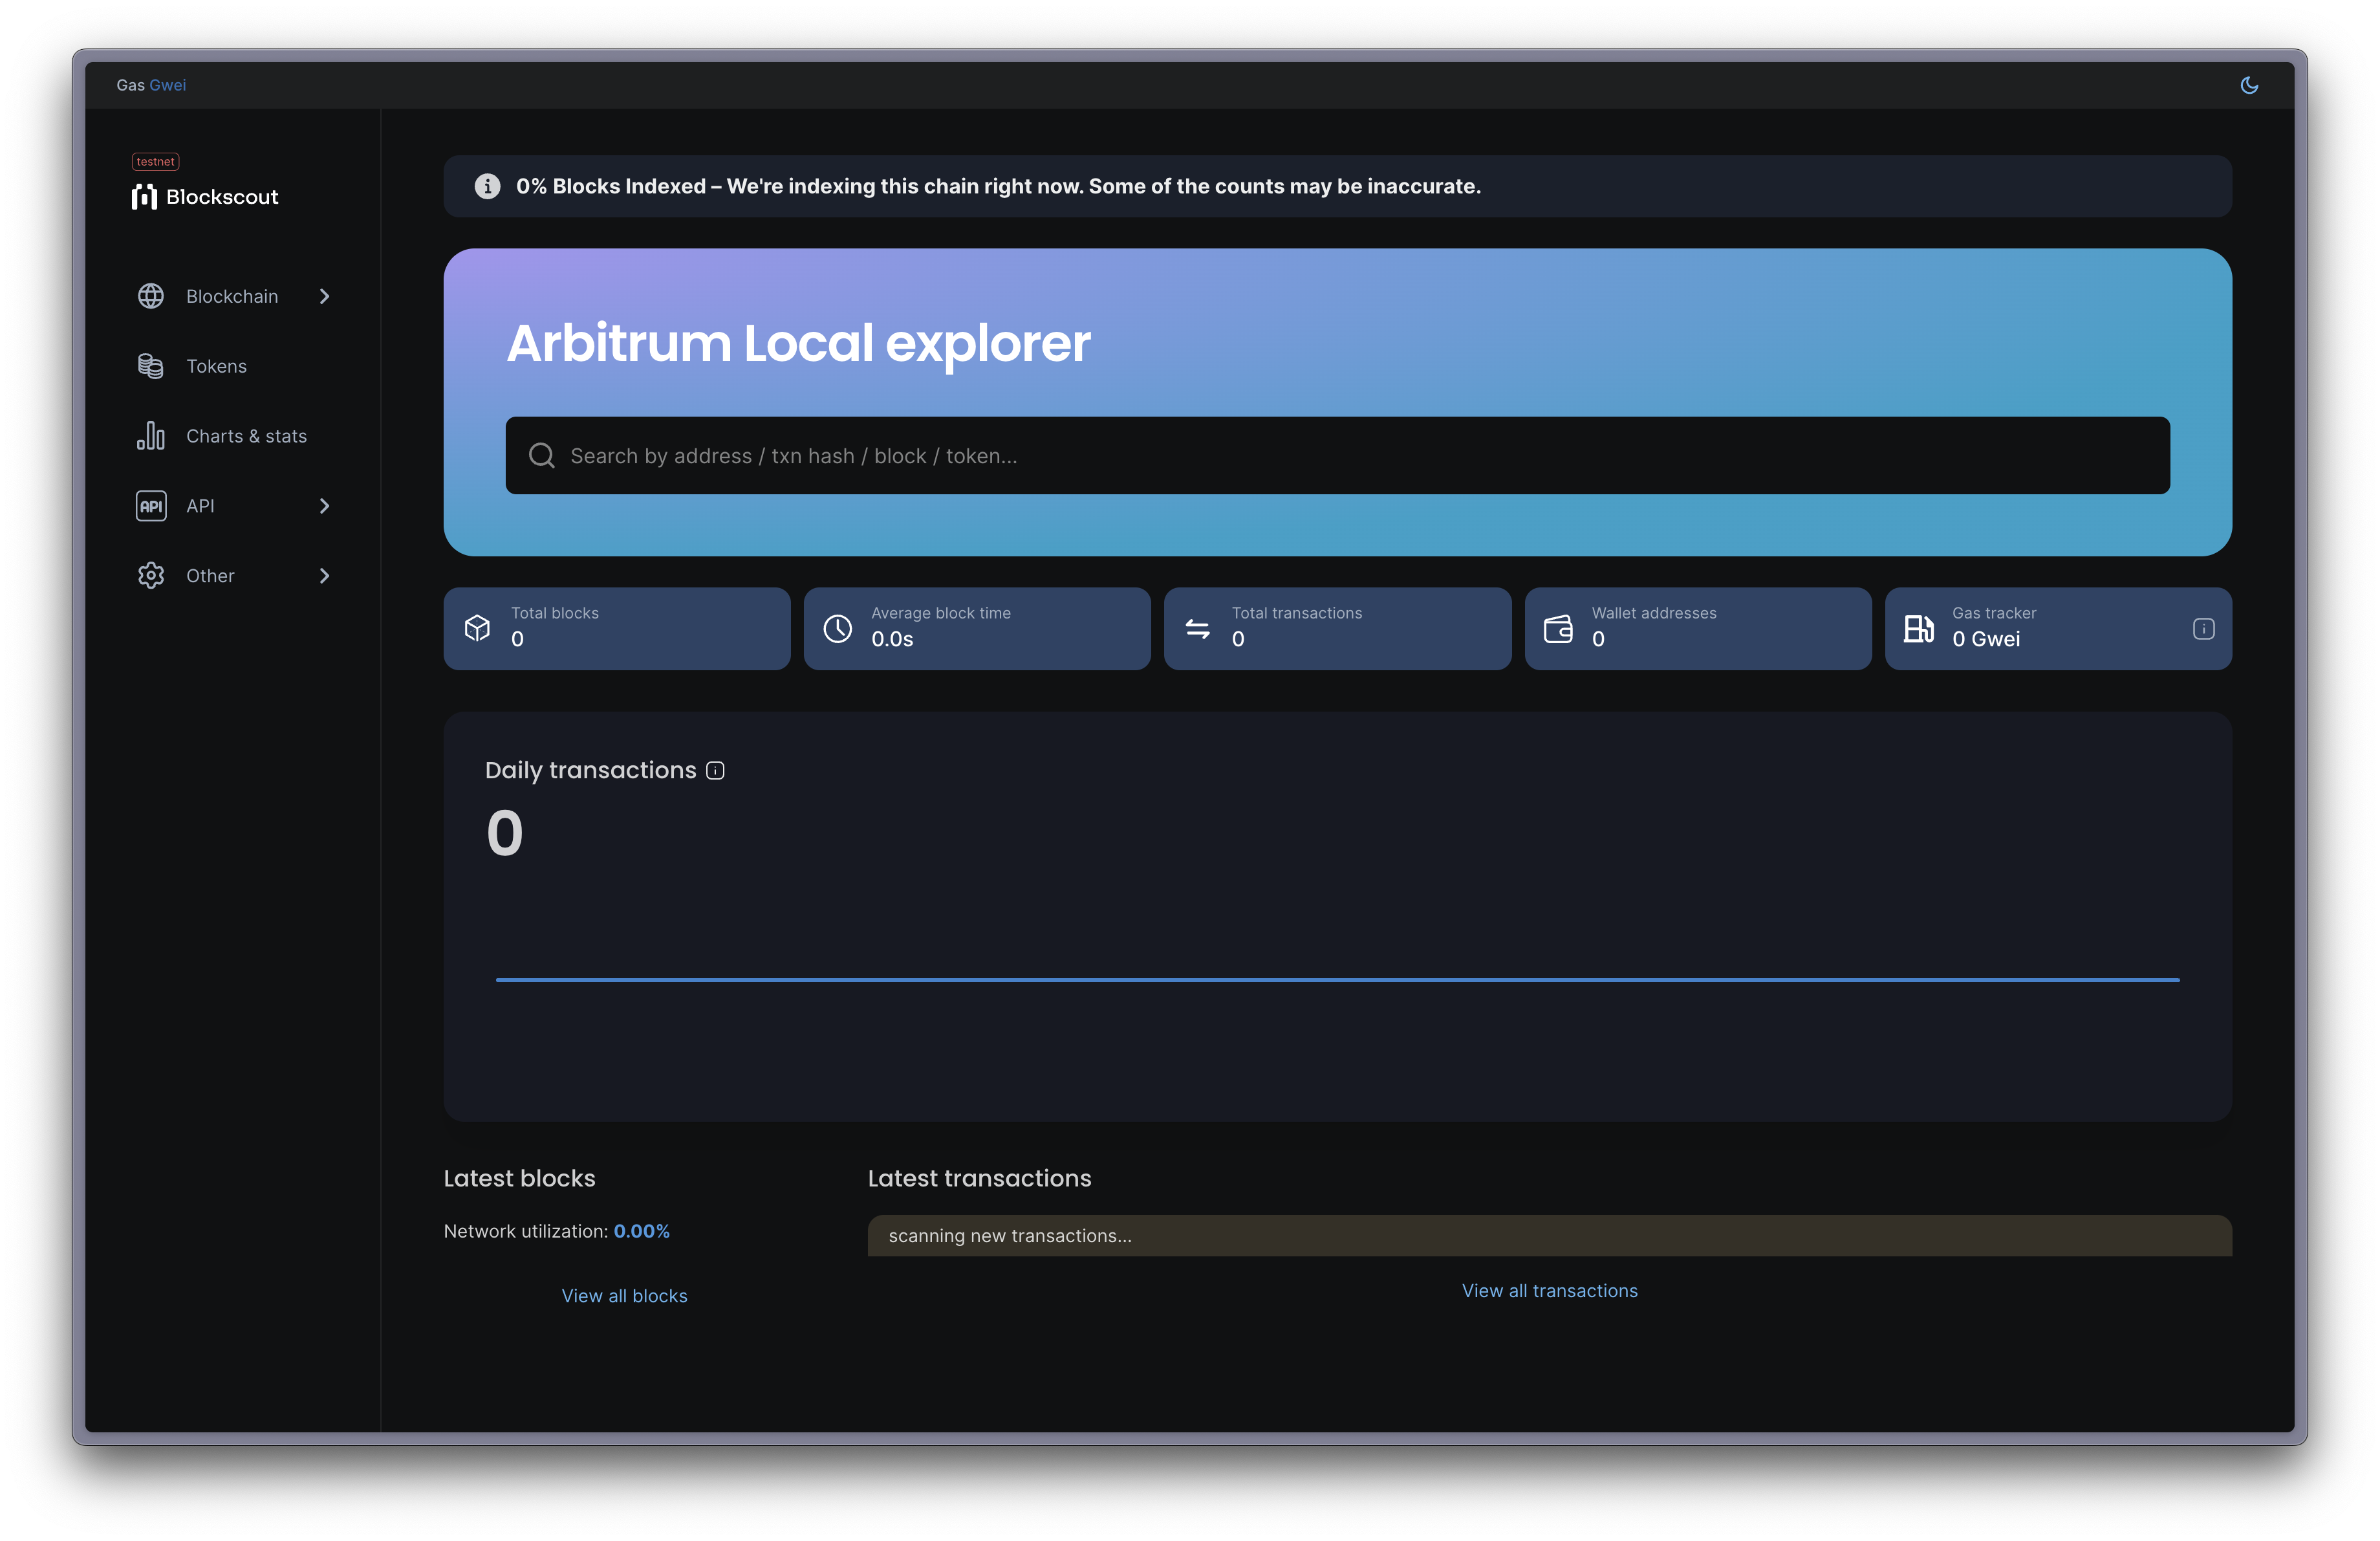
A Nitro node and BlockScout explorer instance will be started. Visit http://localhost/ to access your BlockScout explorer instance - this will allow you to view your chain's transactions and blocks, which can be useful for debugging.

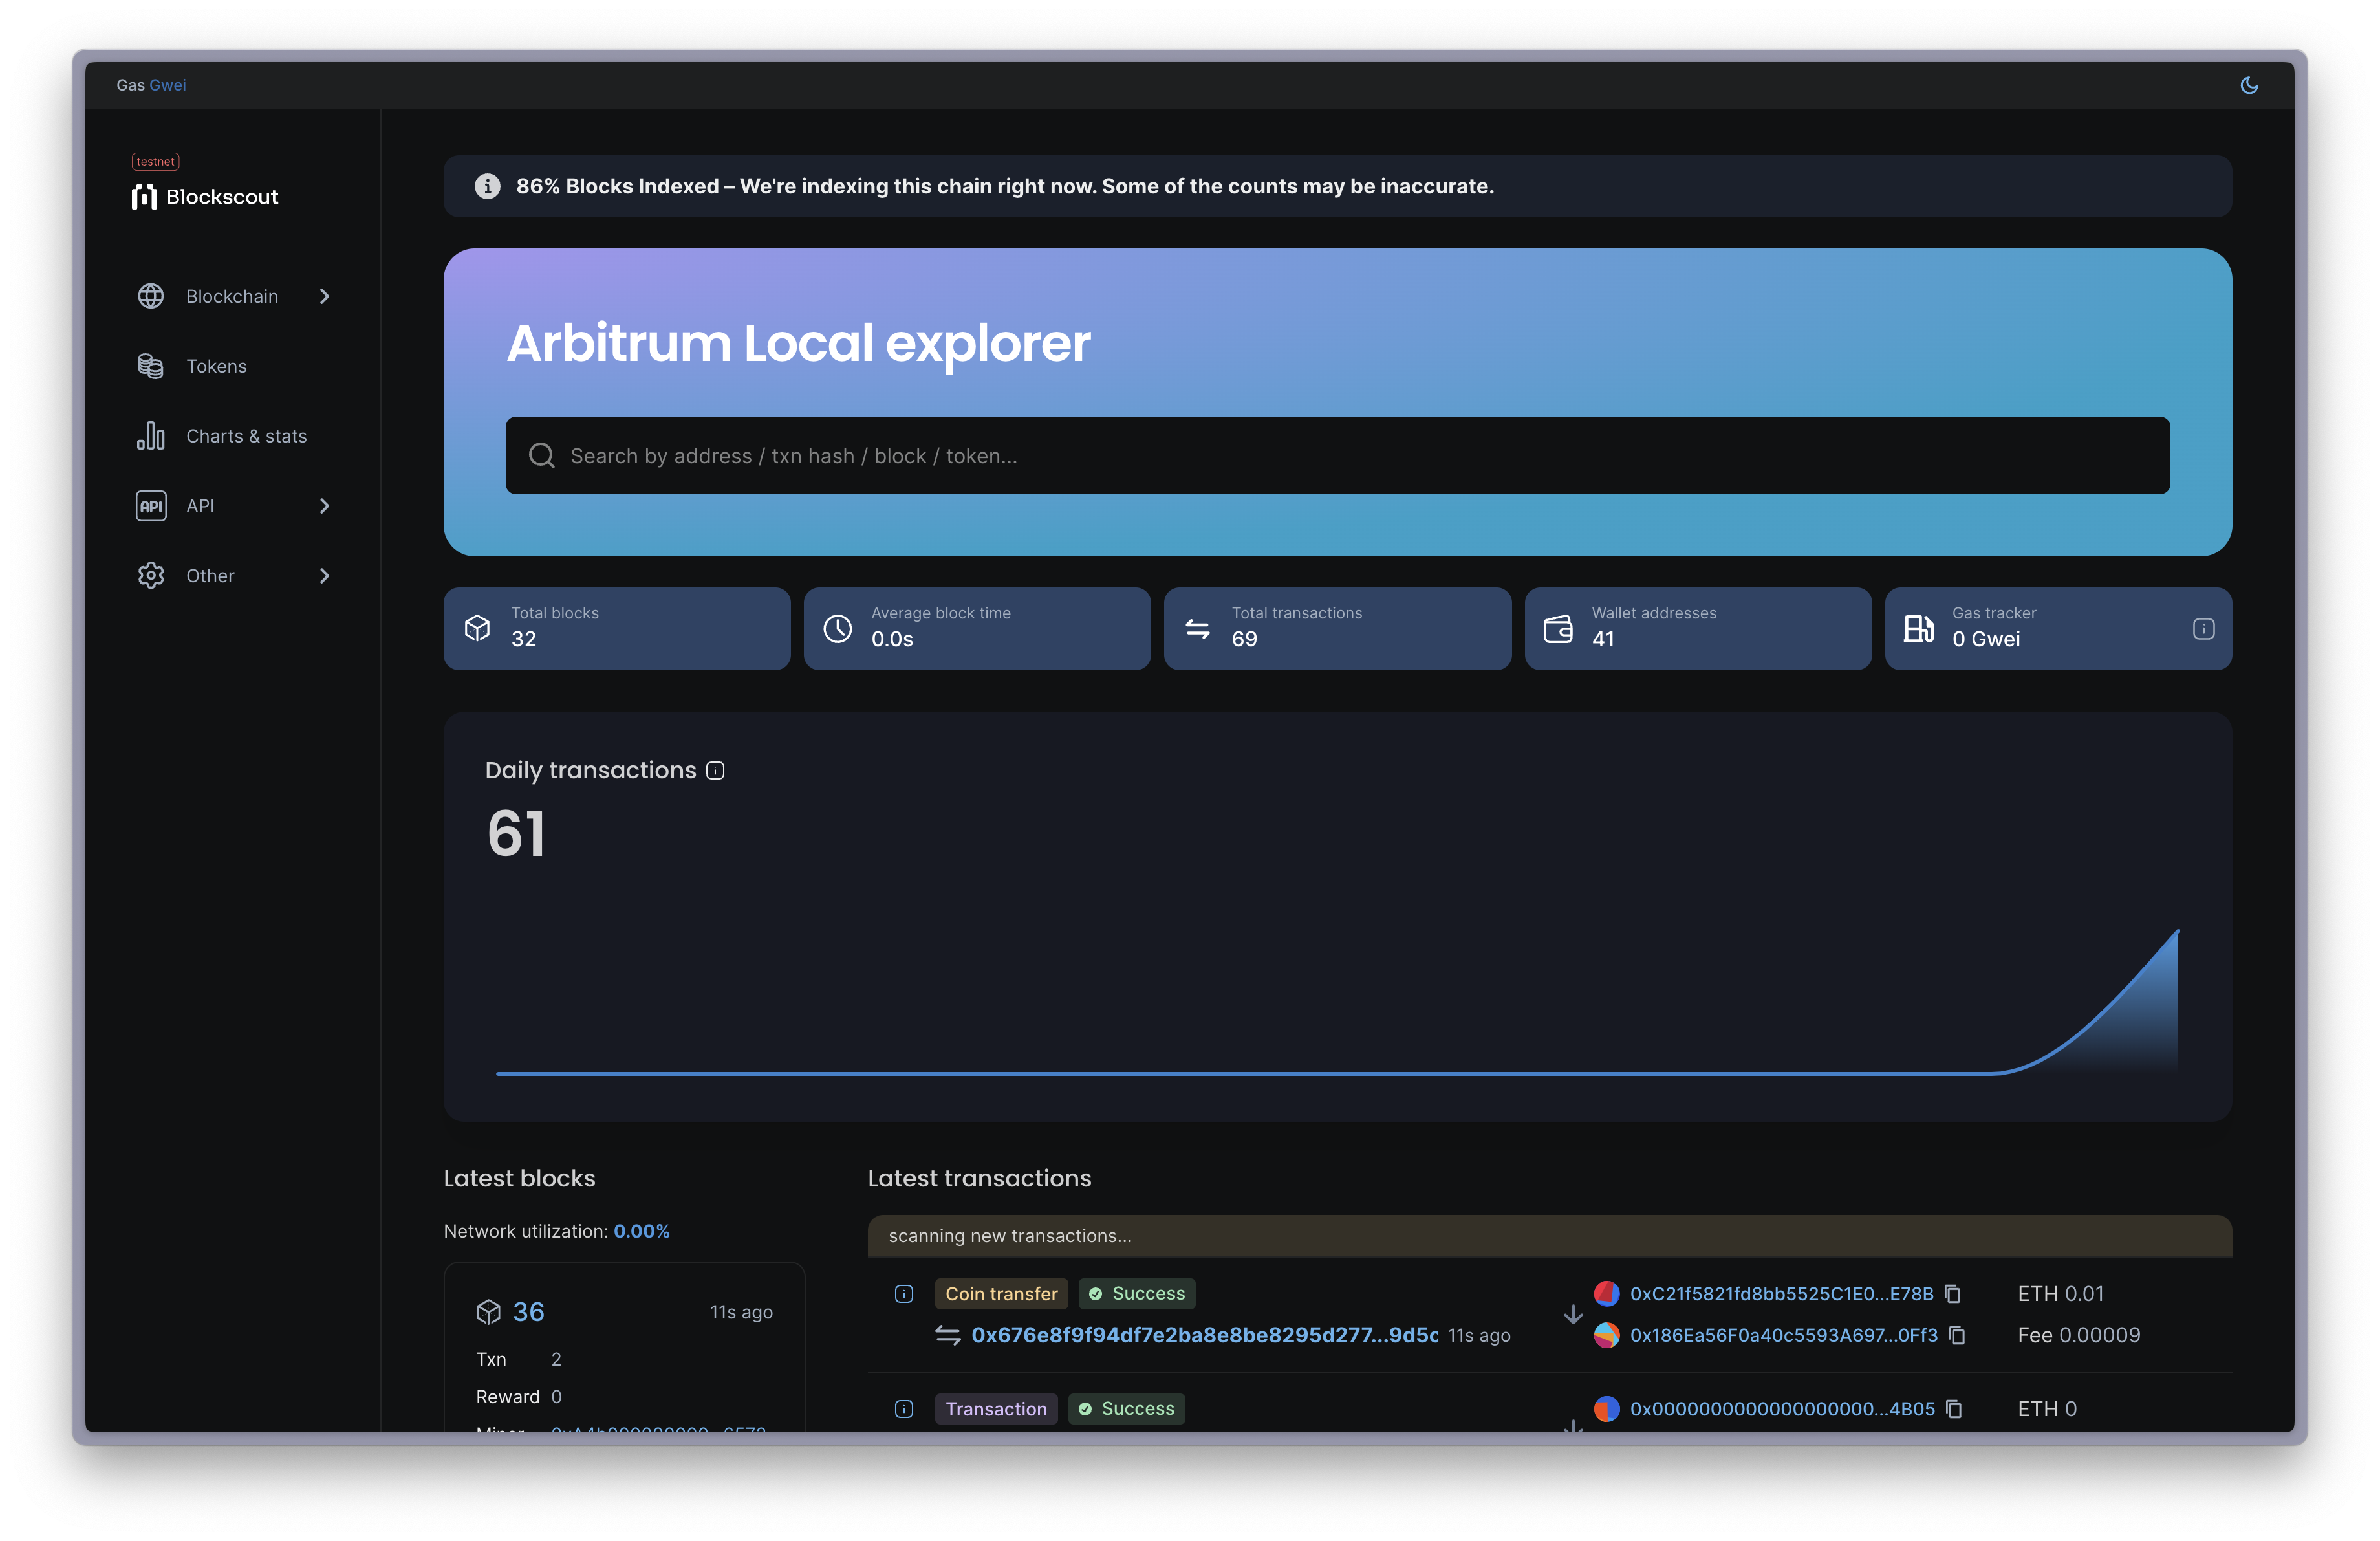
After you have some activity on your rollup, it will look more like this:

Step 10: Finish setting up your chain
The Offchain Labs team has provided a Hardhat script that handles the following tasks:
- Fund the batch-poster and validator (staker) accounts on your underlying L2 chain.
- Deposit ETH into your account on the chain using your chain's newly deployed bridge.
- Deploy your Token Bridge contracts on both L2 and local Orbit chains.
- Configure parameters on the chain.
To run this script, issue the following command from the root of the orbit-setup-script repository, replacing YourPrivateKey with the private key of the Owner account you used to deploy your chain's contracts, and replacing http://localhost:8449 with the RPC URL of your chain's node.
First, export your private key as a variable:
PRIVATE_KEY="YourPrivateKey" \
  L2_RPC_URL="https://sepolia-rollup.arbitrum.io/rpc" \
L3_RPC_URL="http://localhost:8449" yarn run setupPRIVATE_KEY="YourPrivateKey" \
L2_RPC_URL="https://sepolia-rollup.arbitrum.io/rpc" \
L3_RPC_URL="http://localhost:8449" yarn run setupSuccessful logs will appear similar to:
Funding batch-poster accounts on parent chain with 0.3 ETH
Transaction hash on parent chain: 0x6c7360a96165c570dcb7ce609d748d612c5fa5b76e229cd81ba5f5c93c00f805
Transaction was mined in block 28217647 on parent chain
Funding staker accounts on parent chain with 0.3 ETH
Transaction hash on parent chain: 0x59d2db6c5095b9e329c80211b7a761d20064379e3382d156b69e5cf3b5fe2fc7
Transaction was mined in block 28217653 on parent chain
Running Orbit Chain Native token deposit to Deposit ETH or native ERC20 token from parent chain to your account on Orbit chain ... 💰💰💰💰💰💰
Transaction hash on parent chain:  0x8dee6e88d3b62b258c1574cbb7005e1c3cf193b60a99b5c2fcfae00819b7ed82
0.4 ETHs are deposited to your account
Balance not changed yet. Waiting for another 30 seconds ⏰⏰⏰⏰⏰⏰
Balance of your account on Orbit chain increased by the native token you have just sent.
Running tokenBridgeDeployment or erc20TokenBridge script to deploy token bridge contracts on parent chain and your Orbit chain 🌉🌉🌉🌉🌉
Creating token bridge for rollup 0x7fbEB5BC73a11b438891022786feb2C624f275F0
Token bridge deployed in transaction 0x4888fdf44251d456bbfca92bfc6e180cfe0b096ffbea2f6da2a203a16902214f
Waiting for retryables...
Retryable #1: 0xc61382d5609ab0ece36b2776349c8bdceeafdd13dde9624cdf3d746fb4cf7d79
Retryable #2: 0xf31fd34f8a9d9057198d8b13e755e583766bd528459733d948d9ffbc980c9506
Done!
Weth gateway set in tx 0xf2ddc2dad90e7e2b20a772bf89f989224165659d50824b98d7340e12265abf01
Waiting for retryables...
Retryable #1: 0xf47dc66514fd78e4666e35abd12df7d1ae2c79f69f7dfedb8d98e4106142ab7c
Done!
network.json updated
Done!
Running l3Configuration script to configure your Orbit chain 📝📝📝📝📝
Setting the Minimum Base Fee for the Orbit chain
Minimum Base Fee is set on the block number 13 on the Orbit chain
Setting the  network fee receiver for the Orbit chain
network fee receiver is set on the block number 14 on the Orbit chain
Setting the infrastructure fee collector address for the Orbit chain
infrastructure fee collector address is set on the block number 15 on the Orbit chain
Getting L1 base fee estimate
L1 Base Fee estimate on L2 is 4989526079
Setting L1 base fee estimate on L3 to 5158076079
L1 base fee estimate is set on the block number 16 on the Orbit chain
All things done! Enjoy your Orbit chain. LFG 🚀🚀🚀🚀
Transferring ownership on L3, from rollup owner to upgrade executor 🔃🔃🔃
Adding Upgrade Executor contract to the chain owners
Executor has been added to chain owners on TX: 0x97b50f60b60d0e658fdbf185969db0a0327bd0ae9e57cd65af2a7f9be0eeb5b0
Executing removeChainOwner through the UpgradeExecutor contract
Transaction complete, rollup owner removed from chain owners on TX: 0x019850732270d8c436585c7921219252422228b5d0f559da0da219f0fa2b7216
✨  Done in 58.49s.
Funding batch-poster accounts on parent chain with 0.3 ETH
Transaction hash on parent chain: 0x6c7360a96165c570dcb7ce609d748d612c5fa5b76e229cd81ba5f5c93c00f805
Transaction was mined in block 28217647 on parent chain
Funding staker accounts on parent chain with 0.3 ETH
Transaction hash on parent chain: 0x59d2db6c5095b9e329c80211b7a761d20064379e3382d156b69e5cf3b5fe2fc7
Transaction was mined in block 28217653 on parent chain
Running Orbit Chain Native token deposit to Deposit ETH or native ERC20 token from parent chain to your account on Orbit chain ... 💰💰💰💰💰💰
Transaction hash on parent chain: 0x8dee6e88d3b62b258c1574cbb7005e1c3cf193b60a99b5c2fcfae00819b7ed82
0.4 ETHs are deposited to your account
Balance not changed yet. Waiting for another 30 seconds ⏰⏰⏰⏰⏰⏰
Balance of your account on Orbit chain increased by the native token you have just sent.
Running tokenBridgeDeployment or erc20TokenBridge script to deploy token bridge contracts on parent chain and your Orbit chain 🌉🌉🌉🌉🌉
Creating token bridge for rollup 0x7fbEB5BC73a11b438891022786feb2C624f275F0
Token bridge deployed in transaction 0x4888fdf44251d456bbfca92bfc6e180cfe0b096ffbea2f6da2a203a16902214f
Waiting for retryables...
Retryable #1: 0xc61382d5609ab0ece36b2776349c8bdceeafdd13dde9624cdf3d746fb4cf7d79
Retryable #2: 0xf31fd34f8a9d9057198d8b13e755e583766bd528459733d948d9ffbc980c9506
Done!
Weth gateway set in tx 0xf2ddc2dad90e7e2b20a772bf89f989224165659d50824b98d7340e12265abf01
Waiting for retryables...
Retryable #1: 0xf47dc66514fd78e4666e35abd12df7d1ae2c79f69f7dfedb8d98e4106142ab7c
Done!
network.json updated
Done!
Running l3Configuration script to configure your Orbit chain 📝📝📝📝📝
Setting the Minimum Base Fee for the Orbit chain
Minimum Base Fee is set on the block number 13 on the Orbit chain
Setting the network fee receiver for the Orbit chain
network fee receiver is set on the block number 14 on the Orbit chain
Setting the infrastructure fee collector address for the Orbit chain
infrastructure fee collector address is set on the block number 15 on the Orbit chain
Getting L1 base fee estimate
L1 Base Fee estimate on L2 is 4989526079
Setting L1 base fee estimate on L3 to 5158076079
L1 base fee estimate is set on the block number 16 on the Orbit chain
All things done! Enjoy your Orbit chain. LFG 🚀🚀🚀🚀
Transferring ownership on L3, from rollup owner to upgrade executor 🔃🔃🔃
Adding Upgrade Executor contract to the chain owners
Executor has been added to chain owners on TX: 0x97b50f60b60d0e658fdbf185969db0a0327bd0ae9e57cd65af2a7f9be0eeb5b0
Executing removeChainOwner through the UpgradeExecutor contract
Transaction complete, rollup owner removed from chain owners on TX: 0x019850732270d8c436585c7921219252422228b5d0f559da0da219f0fa2b7216
✨ Done in 58.49s.Find your PFB on Celenium by looking at the namespace or account you posted from.
See an example blob that was posted while making this guide.
Congratulations with Celestia underneath
Your local Orbit rollup is now running. You'll see an outputInfo.json file in the main directory of your script folder - this contains more information about your chain, including the addresses of your chain's base contracts.
In the next guides, learn how to run a full and validating full node or bridge in and out of your rollup.
Appendix
Extra resources in Arbitrum documentation:
Compatibility matrix
| Component | Version | Details |
|---|---|---|
| Nitro | v2.3.1-rc.1 | Includes the replay binary for the WASM root 0x10c65b27d5031ce2351c719072e58f3153228887f027f9f6d65300d2b5b30152. Read the overview for overall changes. |
| Contracts | v1.2.1 | Integrates Blobstream X functionality into nitro-contracts v1.2.1 |
| Orbit SDK | v0.8.2 Orbit SDK for Celestia DA | This is not compatible with Orbit SDK v0.8.2 or with the latest changes to nitro-contracts for the Atlas upgrade. The Orbit SDK itself is in Alpha. |
| celestia-node | v0.13.1 | This integration has only been tested with celestia-node 0.13.1 and only works with said version, and with future versions after that. Under the hood, the Nitro node uses this commit of celestia-openrpc. |
Blobstream X contract deployments
The Orbit contracts depend on the following Blobstream X deployments. The current deployments, which can be found at 0xc3e209eb245Fd59c8586777b499d6A665DF3ABD2 in both chains, relays headers from the Mocha-4 testnet to the chains below:
- Arbitrum Sepolia
- Base Sepolia
Arbitrum Sepolia
- RollupCreator:
0x79751B011BCc20F413a2c4E3AF019b6E2a9738B9 - TokenBridgeCreator:
0xaAe3A04931345Df5AC6e784bB6bDeb29B1fF0286 - TokenBridgeRetryableSender:
0x22a6580faECA49cF86Cbb2F18f2B7f98031FC6Ad - Find additional Arbitrum Sepolia deployments below
Base Sepolia
- RollupCreator:
0x1Bb8ADd5e878b12Fa37756392642eB94C53A1Cf4 - TokenBridgeCreator:
0xAa3b8B63cCCa3c98b948FD1d6eD875d378dE2C6c - TokenBridgeRetryableSender:
0x4270889AdcB82338C5FF5e64B45c0A3d31CFd08C - Find additional Base Sepolia deployments below
Arbitrum Sepolia additional deployments
| Contract | Address |
|---|---|
| Bridge | 0x95FEA00e689e8D1CBa909836E1Ef1b941D5f21b1 |
| SequencerInbox | 0x95CBDa89325db5529eAF1813E181f66B83A7d65a |
| Inbox | 0x3681Cbb0E95AB50b63F2FC524FbBcC78adEfBd33 |
| RollupEventInbox | 0x61e154128b6a1400ea8090B4431B4aA1DBb80Cc4 |
| Outbox | 0x5187a92539bB4A2befe1fc078745c84AB6d37171 |
| ERC20Bridge | 0xD0a6699Fc7519966685181c80BF98D35aFa1fC95 |
| SequencerInbox | 0x2588867F19E2DE51f90F0aB852C7Ad11228e3d83 |
| ERC20Inbox | 0x6cB49605f10831749c6090AD09918bC61439bacE |
| ERC20RollupEventInbox | 0x7fC4D9A24949680faD666FeEe7cD6a100E39C4F0 |
| ERC20Outbox | 0xA773e19DC9e822933A7e72Df9c87eD1578701D29 |
| BridgeCreator | 0x3Bc040EAca40b91FA06cf55Ea91842FaC88b1AF4 |
| OneStepProver0 | 0x5810F0916BAE1067Ca1efcc00AaaF30301af001c |
| OneStepProverMemory | 0xaC3427E621C6F10dC2ABdAB00188D92690503914 |
| OneStepProverMath | 0xFB612fb83959b8ACD3E49540B29C93c5A67e05f1 |
| OneStepProverHostIo | 0x630093954CbF19Fe4532A2edD0bD3B10dEcA7A4D |
| OneStepProofEntry | 0x53DEA3A90Fd6C82840a1f7224F799D622f142Df4 |
| ChallengeManager | 0x01B5905B154F21a393F5B5a0C6d15B53a493C05e |
| RollupAdminLogic | 0xe371AFcb8437bF61bd831EF57Be7A2496D88488B |
| RollupUserLogic | 0xE24a60b758b51b0a3dA5E8F4F6ddf1cd0aFF646C |
| ValidatorUtils | 0x7973D0b475E898082dF25c1617CBce1917cFED17 |
| ValidatorWalletCreator | 0xe2662ff9b41f39e63A850E50E013Ea66e60A4F37 |
| RollupCreator | 0x79751B011BCc20F413a2c4E3AF019b6E2a9738B9 |
| DeployHelper | 0xd2D353916B34a877793628049c99858f04123eE1 |
Base Sepolia additional deployments
| Contract | Address |
|---|---|
| Bridge | 0xb6052122545AACD2BDda0Ca9FA56416bD968cDbc |
| SequencerInbox | 0xcd9FCa5015b5ce2B06a2266e4a5dd54D9ca39F1a |
| Inbox | 0x44B412b291fEf00398501B2cA353EA912AD0fe13 |
| RollupEventInbox | 0x51D196e07a27DBA0F4461Dd6CC26108424F196f7 |
| Outbox | 0x5A48aDf22f526eBD06e3e8856cFEa2490923CC55 |
| ERC20Bridge | 0x9abC41fEfAe7E7543a01FA837AeC909F96147280 |
| SequencerInbox | 0x8f97Cb7c643Acd7f79f3B13841b24a243dA51242 |
| ERC20Inbox | 0x40f8c63e0a20B399bCd9631A22E57BB988a9400e |
| ERC20RollupEventInbox | 0x3B6e845fb9f0c8Ee4E9F6D44781f6547d9c6359a |
| ERC20Outbox | 0xc99eEA0B8e67D5b2226AB6D37882DAAf6dd7593b |
| BridgeCreator | 0xC7535F078CB3880a0FD5E54FA7A3B4EAf09b3924 |
| OneStepProver0 | 0xf889a3174Fddd9f78E6cd250Ebf4c16F1bDd1b6a |
| OneStepProverMemory | 0x61254e43e5c1e9E801F9C56B47a9ac3EADF6d1E9 |
| OneStepProverMath | 0x55527d53fdA37Dbf1924482b40AcF8625E1cAA5B |
| OneStepProverHostIo | 0x03B43F7B61Fa100611191F481Ef48aa1fc98F434 |
| OneStepProofEntry | 0x89b7c7970c13BB587893a70697AD6d2A335b6A15 |
| ChallengeManager | 0x04CAe899Fc0B7Ef45c529f8Bf075D54F6fB70eD9 |
| RollupAdminLogic | 0x99E9D2F04352B42C18F1DA5Dd93a970F82C08aFe |
| RollupUserLogic | 0x1ae3A8DC1e7eFD37F418B2987D3DF74c5a917a8B |
| ValidatorUtils | 0x1cc4551922C069A9aDE06756BF14bF0410eA44fF |
| ValidatorWalletCreator | 0x78f8B2941ddE5a8A312814Ebd29c2E2A36f25E91 |
| RollupCreator | 0x1Bb8ADd5e878b12Fa37756392642eB94C53A1Cf4 |
| DeployHelper | 0x20d8153AaCC4E6D29558fa3916BfF422BEDE9B5E |