Setting up a Celestia light node
This tutorial will guide you through setting up a Celestia light node, which will allow you to perform data availability sampling (DAS) on Celestia's data availability (DA) network.
Overview of light nodes
Light nodes ensure data availability. This is the most common way to interact with Celestia networks.
Light nodes have the following behavior:
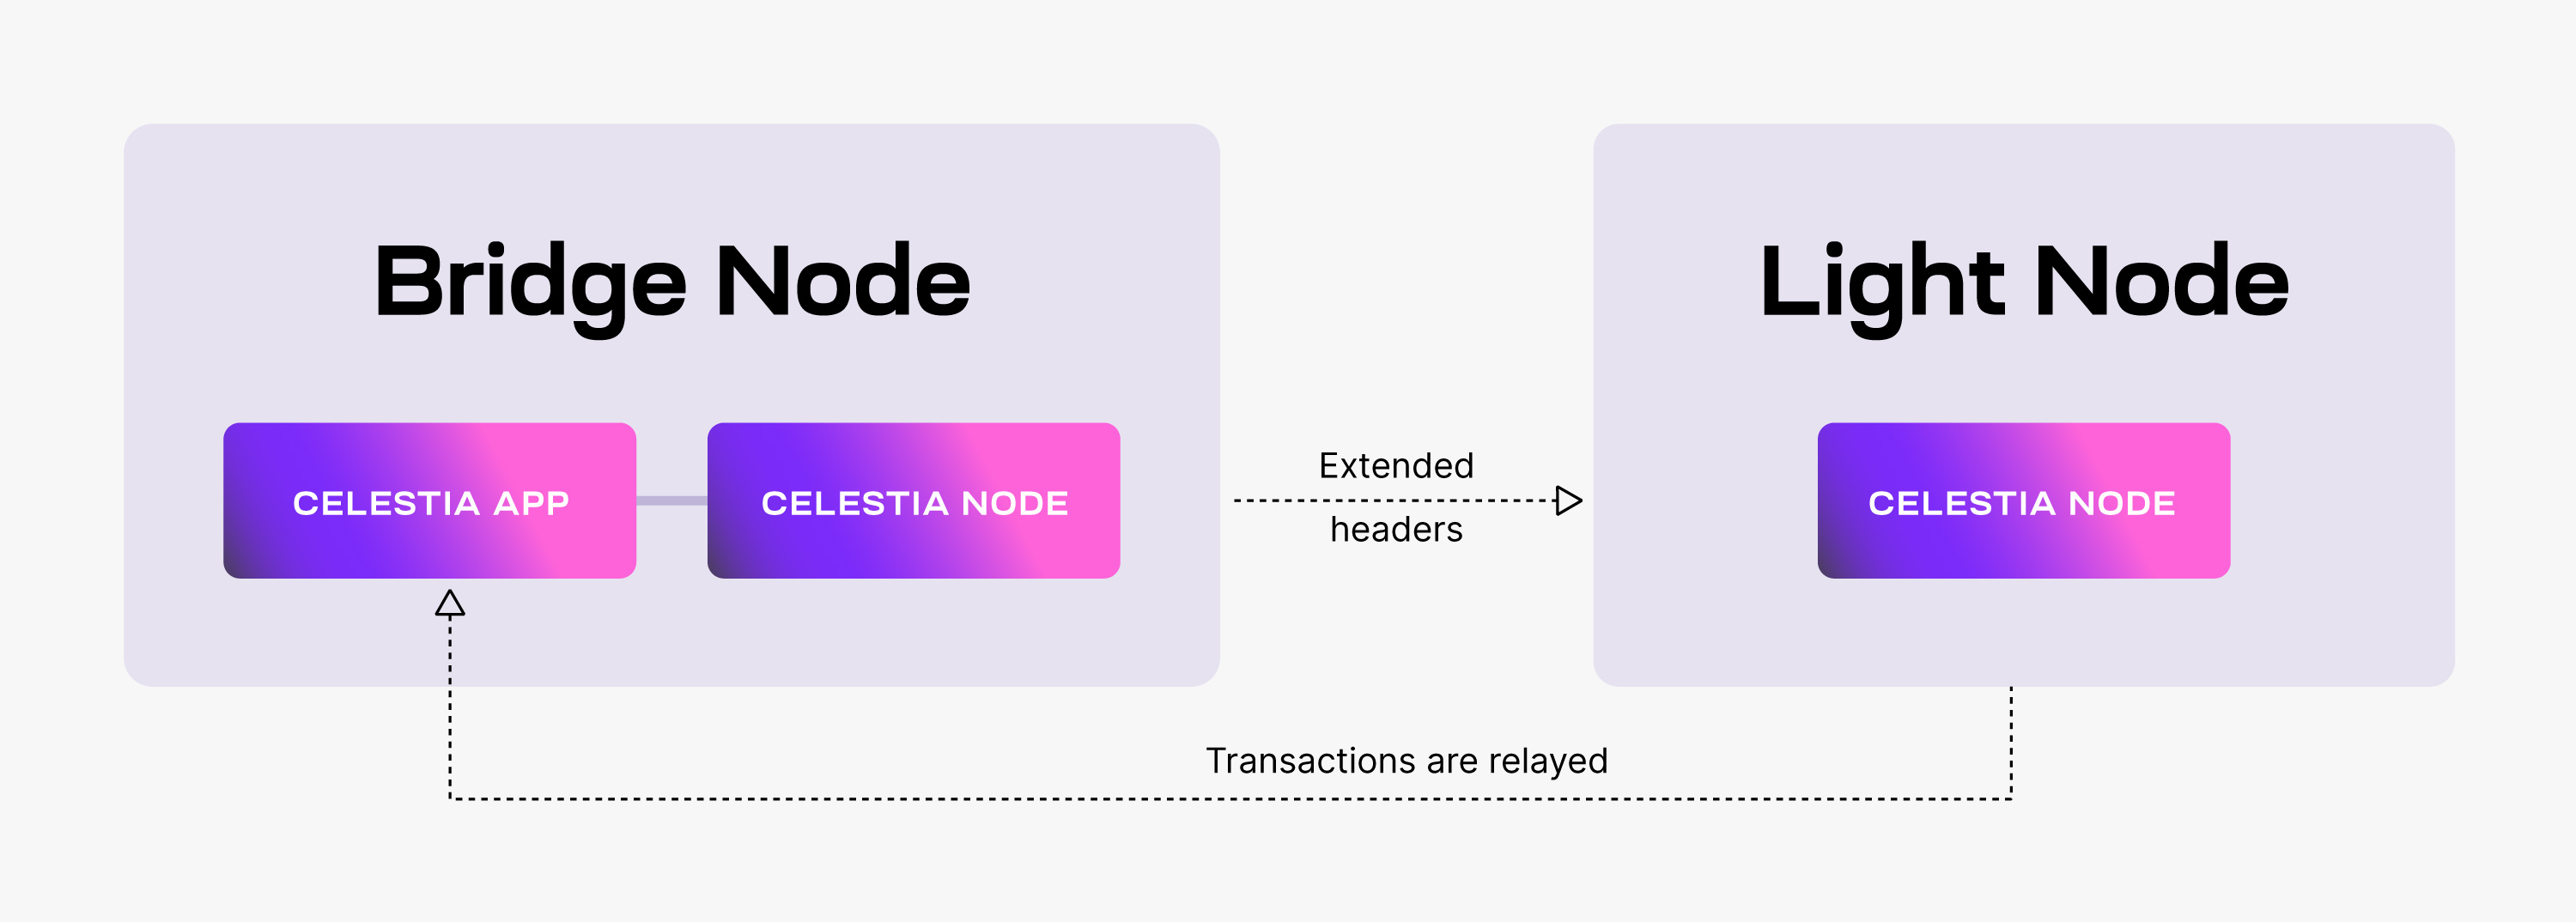
- They listen for
ExtendedHeaders, i.e. wrapped “raw” headers, that notify Celestia nodes of new block headers and relevant DA metadata. - They perform DAS on the received headers
Hardware requirements
The following minimum hardware requirements are recommended for running a light node:
- Memory: 500 MB RAM (minimum)
- CPU: Single Core
- Disk: 50 GB SSD Storage
- Bandwidth: 56 Kbps for Download/56 Kbps for Upload
Setting up your light node
This tutorial was performed on an Ubuntu Linux 20.04 (LTS) x64 instance machine.
Set up dependencies on the setting up environment page.
Install celestia-node
Install the celestia binary by building and installing celestia-node.
Initialize the light node
Run the following command:
celestia light initcelestia light initcelestia light init --p2p.network mochacelestia light init --p2p.network mochacelestia light init --p2p.network arabicacelestia light init --p2p.network arabicaThe output in your terminal will show the location of your node store and config. It will also show confirmation that the node store has been initialized.
Start the light node
Start the light node with a connection to a validator node's gRPC endpoint (which is usually exposed on port 9090):
In order for access to the ability to get and submit state-related information, such as the ability to submit PayForBlobs transactions, or query for the node's account balance, a gRPC endpoint of a validator (core) node must be passed as directed below.
Refer to the ports section of the celestia-node troubleshooting page for information on which ports are required to be open on your machine.
To start the light node with a connection to a validator node's gRPC endpoint (which is usually exposed on port 9090):
celestia light start --core.ip <URI> --p2p.network <network>celestia light start --core.ip <URI> --p2p.network <network>TIP
You do not need to declare a network for Mainnet Beta. Refer to the chain ID section on the troubleshooting page for more information
Using an RPC of your own, or one from the list on the Mocha testnet page or list on the Arabica devnet page, start your node.
For example, your command might look something like this for Mocha:
celestia light start --core.ip rpc-mocha.pops.one --p2p.network mochacelestia light start --core.ip rpc-mocha.pops.one --p2p.network mochaOr for Arabica:
celestia light start --core.ip validator-1.celestia-arabica-11.com \
    --p2p.network arabica
celestia light start --core.ip validator-1.celestia-arabica-11.com \
--p2p.network arabicaKeys and wallets
You can create your key for your node by running the following command with the cel-key utility in the celestia-node directory:
./cel-key add <key-name> --keyring-backend test \
    --node.type light --p2p.network <network>
./cel-key add <key-name> --keyring-backend test \
--node.type light --p2p.network <network>You can start your light node with the key created above by running the following command:
celestia light start --keyring.accname my_celes_key \
    --core.ip consensus.lunaroasis.net
celestia light start --keyring.accname my_celes_key \
--core.ip consensus.lunaroasis.netcelestia light start --keyring.accname my_celes_key \
--core.ip rpc-mocha.pops.one --p2p.network mochacelestia light start --keyring.accname my_celes_key \
--core.ip rpc-mocha.pops.one --p2p.network mochacelestia light start --keyring.accname my_celes_key \
--core.ip validator-1.celestia-arabica-11.com \
--p2p.network arabicacelestia light start --keyring.accname my_celes_key \
--core.ip validator-1.celestia-arabica-11.com \
--p2p.network arabicaOnce you start the light node, a wallet key will be generated for you. You will need to fund that address with testnet tokens to pay for PayForBlob transactions.
You can find the address using the RPC CLI or by running the following command in the celestia-node directory:
./cel-key list --node.type light --keyring-backend test \
    --p2p.network <network>
./cel-key list --node.type light --keyring-backend test \
--p2p.network <network>Testnet tokens
You have two networks to get testnet tokens from:
You can request funds to your wallet address using the following command in Discord:
$request <CELESTIA-ADDRESS>$request <CELESTIA-ADDRESS>Where <CELESTIA-ADDRESS> is the celestia1****** address generated when you created the wallet.
Optional: run the light node with a custom key
In order to run a light node using a custom key:
- The custom key must exist inside the celestia light node directory at the correct path (default:
~/.celestia-light/keys/keyring-test) - The name of the custom key must be passed upon
start, like so:
celestia light start --core.ip <URI> \
    --keyring.accname <name-of-custom-key> \
celestia light start --core.ip <URI> \
--keyring.accname <name-of-custom-key> \celestia light start --core.ip <URI> \
--keyring.accname <name-of-custom-key> \
--p2p.network arabicacelestia light start --core.ip <URI> \
--keyring.accname <name-of-custom-key> \
--p2p.network arabicacelestia light start --core.ip <URI> \
--keyring.accname <name-of-custom-key> \
--p2p.network mochacelestia light start --core.ip <URI> \
--keyring.accname <name-of-custom-key> \
--p2p.network mochaOptional: start light node with SystemD
Follow the tutorial on setting up the light node as a background process with SystemD.
Data availability sampling
With your light node running, you can check out this tutorial on submitting PayForBlob transactions.