# Celestia documentation full context
> Full cleaned markdown export of the Celestia documentation for LLM and agent ingestion.
---
Title: Integrate with Blobstream contracts
URL: https://docs.celestia.org/build/blobstream/integrate-contracts.md
Source: app/build/blobstream/integrate-contracts/page.mdx
---
# Integrate with Blobstream contracts
## Getting started
### Prerequisites
Make sure to have the following installed:
- [Foundry](https://github.com/foundry-rs/foundry)
### Installing Blobstream contracts
Install the Blobstream contracts repo as a dependency:
```bash
forge install celestiaorg/blobstream-contracts --no-commit
```
> **Note:** The minimum Solidity compiler version for using the Blobstream contracts is `0.8.19`.
### Example usage
Example minimal Solidity contract for a stub ZK rollup that leverages the Blobstream contract to check that data has been posted to Celestia:
```solidity
// SPDX-License-Identifier: Apache-2.0
pragma solidity ^0.8.19;
import "blobstream-contracts/IDAOracle.sol";
import "blobstream-contracts/DataRootTuple.sol";
import "blobstream-contracts/lib/tree/binary/BinaryMerkleProof.sol";
contract MyRollup {
IDAOracle immutable blobstream;
bytes32[] public rollup_block_hashes;
constructor(IDAOracle _blobstream) {
blobstream = _blobstream;
}
function submitRollupBlock(
bytes32 _rollup_block_hash,
bytes calldata _zk_proof,
uint256 _blobstream_nonce,
DataRootTuple calldata _tuple,
BinaryMerkleProof calldata _proof
) public {
// Verify that the data root tuple (analog. block header) has been
// attested to by the Blobstream contract.
require(
blobstream.verifyAttestation(_blobstream_nonce, _tuple, _proof)
);
// Verify the ZKP.
// _tuple.dataRoot is a public input, leaves (shares) are private inputs.
require(verifyZKP(_rollup_block_hash, _zk_proof, _tuple.dataRoot));
// Everything checks out, append rollup block hash to list.
rollup_block_hashes.push(_rollup_block_hash);
}
function verifyZKP(
bytes32 _rollup_block_hash,
bytes calldata _zk_proof,
bytes32 _data_root
) private pure returns (bool) {
return true;
}
}
```
## Data structures
Each [`DataRootTuple`](https://github.com/celestiaorg/blobstream-contracts/blob/master/src/DataRootTuple.sol) is a tuple of block height and data root. It is analogous to a Celestia block header. `DataRootTuple`s are relayed in batches, committed to as a `DataRootTuple`s root (i.e. a Merkle root of `DataRootTuple`s).
The [`BinaryMerkleProof`](https://github.com/celestiaorg/blobstream-contracts/blob/master/src/lib/tree/binary/BinaryMerkleProof.sol) is an [RFC-6962](https://www.rfc-editor.org/rfc/rfc6962.html)-compliant Merkle proof. Since `DataRootTuple`s are Merkleized in a binary Merkle tree, verifying the inclusion of a `DataRootTuple` against a `DataRootTuple`s root requires verifying a Merkle inclusion proof.
## Interface
The [`IDAOracle`](https://github.com/celestiaorg/blobstream-contracts/blob/master/src/IDAOracle.sol) (**D**ata **A**vailability **O**racle Interface) interface allows L2 contracts on Ethereum to query the Blobstream contract for relayed `DataRootTuple`s. The single interface method `verifyAttestation` verifies a Merkle inclusion proof that a `DataRootTuple` is included under a specific batch (indexed by batch nonce). In other words, analogously it verifies that a specific block header is included in the canonical Celestia chain.
## Querying the proof
To prove that the data was published to Celestia, check out the [proof queries documentation](/build/blobstream/proof-queries) to understand how to query the proofs from Celestia consensus nodes and make them usable in the Blobstream verifier contract.
## Verifying data inclusion for fraud proofs
A high-level overview of how a fraud-proof based L2 would interact with Blobstream can be found in the [inclusion proofs documentation](https://github.com/celestiaorg/blobstream-contracts/blob/master/docs/inclusion-proofs.md).
The [`DAVerifier`](https://github.com/celestiaorg/blobstream-contracts/blob/master/src/lib/verifier/DAVerifier.sol) library is available at `blobstream-contracts/lib/verifier/DAVerifier.sol`, and provides functions to verify the inclusion of individual (or multiple) shares against a `DataRootTuple`. The library is stateless, and allows to pass an `IDAOracle` interface as a parameter to verify inclusion against it.
In the `DAVerifier` library, we find functions that help with data inclusion verification and calculating the square size of a Celestia block. These functions work with the Blobstream smart contract, using different proofs to check and confirm the data's availability. Let's take a closer look at these functions:
- [`verifySharesToDataRootTupleRoot`](https://github.com/celestiaorg/blobstream-contracts/blob/3a552d8f7bfbed1f3175933260e6e440915d2da4/src/lib/verifier/DAVerifier.sol#L80-L124): This function verifies that the shares, which were posted to Celestia, were committed to by the Blobstream smart contract. It checks that the data root was committed to by the Blobstream smart contract and that the shares were committed to by the rows roots.
- [`verifyRowRootToDataRootTupleRoot`](https://github.com/celestiaorg/blobstream-contracts/blob/3a552d8f7bfbed1f3175933260e6e440915d2da4/src/lib/verifier/DAVerifier.sol#L133-L155): This function verifies that a row/column root, from a Celestia block, was committed to by the Blobstream smart contract. It checks that the data root was committed to by the Blobstream smart contract and that the row root commits to the data root.
- [`verifyMultiRowRootsToDataRootTupleRoot`](https://github.com/celestiaorg/blobstream-contracts/blob/3a552d8f7bfbed1f3175933260e6e440915d2da4/src/lib/verifier/DAVerifier.sol#L164-L194): This function verifies that a set of rows/columns, from a Celestia block, were committed to by the Blobstream smart contract. It checks that the data root was committed to by the Blobstream smart contract and that the rows roots commit to the data root.
- [`computeSquareSizeFromRowProof`](https://github.com/celestiaorg/blobstream-contracts/blob/3a552d8f7bfbed1f3175933260e6e440915d2da4/src/lib/verifier/DAVerifier.sol#L204-L215): This function computes the Celestia block square size from a row/column root to data root binary Merkle proof. It is the user's responsibility to verify that the proof is valid and was successfully committed to using the `verifyRowRootToDataRootTupleRoot()` method.
- [`computeSquareSizeFromShareProof`](https://github.com/celestiaorg/blobstream-contracts/blob/3a552d8f7bfbed1f3175933260e6e440915d2da4/src/lib/verifier/DAVerifier.sol#L224-L229): This function computes the Celestia block square size from a shares to row/column root proof. It is the user's responsibility to verify that the proof is valid and that the shares were successfully committed to using the `verifySharesToDataRootTupleRoot()` method.
For an overview of a demo rollup implementation, head to [the next section](/build/blobstream/integrate-offchain).
## Deployed contracts
You can interact with the SP1 Blobstream contracts today. The
SP1 Blobstream Solidity smart contracts are currently deployed on
the following chains:
| Contract | EVM network | Contract address | Attested data on Celestia | Link to Celenium |
| -------------- | ---------------------- | ------------------------------------------------------------------------------------------------------------------------------------------------ | ------------------------------------------------ | -------------------------------------------------------------------------------------- |
| SP1 Blobstream | Ethereum Mainnet | [`0x7Cf3876F681Dbb6EdA8f6FfC45D66B996Df08fAe`](https://etherscan.io/address/0x7Cf3876F681Dbb6EdA8f6FfC45D66B996Df08fAe#events) | [Mainnet Beta](/operate/networks/mainnet-beta) | [Deployment on Celenium](https://celenium.io/blobstream?network=ethereum&page=1) |
| SP1 Blobstream | Arbitrum One | [`0xA83ca7775Bc2889825BcDeDfFa5b758cf69e8794`](https://arbiscan.io/address/0xA83ca7775Bc2889825BcDeDfFa5b758cf69e8794#events) | [Mainnet Beta](/operate/networks/mainnet-beta) | [Deployment on Celenium](https://celenium.io/blobstream?network=arbitrum&page=1) |
| SP1 Blobstream | Base | [`0xA83ca7775Bc2889825BcDeDfFa5b758cf69e8794`](https://basescan.org/address/0xA83ca7775Bc2889825BcDeDfFa5b758cf69e8794#events) | [Mainnet Beta](/operate/networks/mainnet-beta) | [Deployment on Celenium](https://celenium.io/blobstream?network=base&page=1) |
| SP1 Blobstream | Sepolia | [`0xf0c6429ebab2e7dc6e05dafb61128be21f13cb1e`](https://sepolia.etherscan.io/address/0xf0c6429ebab2e7dc6e05dafb61128be21f13cb1e#events) | [Mocha testnet](/operate/networks/mocha-testnet) | [Deployment on Celenium](https://mocha.celenium.io/blobstream?network=ethereum&page=1) |
| SP1 Blobstream | Arbitrum Sepolia | [`0xc3e209eb245Fd59c8586777b499d6A665DF3ABD2`](https://sepolia.arbiscan.io/address/0xc3e209eb245Fd59c8586777b499d6A665DF3ABD2#events) | [Mocha testnet](/operate/networks/mocha-testnet) | [Deployment on Celenium](https://mocha.celenium.io/blobstream?network=arbitrum&page=1) |
| SP1 Blobstream | Base Sepolia | [`0xc3e209eb245Fd59c8586777b499d6A665DF3ABD2`](https://sepolia.basescan.org/address/0xc3e209eb245Fd59c8586777b499d6A665DF3ABD2#events) | [Mocha testnet](/operate/networks/mocha-testnet) | [Deployment on Celenium](https://mocha.celenium.io/blobstream?network=base&page=1) |
| SP1 Blobstream | Holesky | [`0x315A044cb95e4d44bBf6253585FbEbcdB6fb41ef`](https://holesky.etherscan.io/address/0x315A044cb95e4d44bBf6253585FbEbcdB6fb41ef) | [Mocha testnet](/operate/networks/mocha-testnet) | N/A |
| SP1 Blobstream | ZKSync Gateway Staging | [`0x3a038D77A9b4eBBc8A7482B438BCff11c3591792`](https://explorer.era-gateway-stage.zksync.dev/address/0x3a038D77A9b4eBBc8A7482B438BCff11c3591792) | [Mocha testnet](/operate/networks/mocha-testnet) | N/A |
---
Title: Integrate with Blobstream client
URL: https://docs.celestia.org/build/blobstream/integrate-offchain.md
Source: app/build/blobstream/integrate-offchain/page.mdx
---
# Integrate with Blobstream client
## Blobstream demo rollup
Rollups can use the Blobstream for DA by posting their data to Celestia and then proving that it was posted on Ethereum. This is done identically to how any rollup or user would post data to Celestia, and then the validators sign over additional commitments that are relayed to Ethereum via a light client relay (aka Blobstream!). This demo will outline a very simple Blobstream rollup to illustrate at a high level what this could look like.
> **Note:** This is an outline, not an implementation! Please do not expect to copy and paste this code.
## Defining a chain
The first step to starting a new chain is to define the structure of the commitments that each block consists of.
```go
type Block struct {
// Data is the data of a block that is submitted to Celestia.
Data `json:"Data"`
// Header is the set of commitments over a block that is submitted to
// Ethereum.
Header `json:"Header"`
}
// Data is the data of a block that is submitted to Celestia.
type Data struct {
Txs []json.RawMessage `json:"txs"`
}
// Header is the set of commitments over a block that is submitted to Ethereum.
type Header struct {
Height uint64 `json:"height"`
Namespace []byte `json:"namespace"`
PreviousHash []byte `json:"previous_hash"`
Span Span `json:"span"`
SequencerSignature Signature `json:"sequencer_signature,omitempty"`
}
```
Note the Celestia-specific structures in the header such as the `Namespace` and the Blobstream-specific structure called the `Span`. The goal of these structures is to locate the data in the Celestia block so that we can prove that data's inclusion via Blobstream if needed. Read more in the [namespace specifications](https://celestiaorg.github.io/celestia-app/namespace.html), and you can think of this like a chain ID. Learn more [information about `shares`](https://celestiaorg.github.io/celestia-app/shares.html), which are small chunks of the encoded Celestia block. We use the same encoding here so that the commitments to the rollup block match those committed to by validators in the Celestia data root.
The `Span` could take many forms, but in this demo we will use the following:
```go
// Span describes the location of the rollup block data that is posted to
// Celestia. This is important for other nodes to be able to prove that data in
// the Celestia block. This can be thought of as a pointer to some data in the
// Celestia block.
type Span struct {
// CelestiaHeight is the height of the Celestia block that contains the
// rollup block data.
CelestiaHeight uint64 `json:"celestia_height"`
// DataShareStart is the index of the first share of the rollup block data.
DataShareStart uint64 `json:"share_start"`
// DataShareLen is length in shares of the rollup block data. This is used
// to identify all of the rollup block data in a Celestia block.
DataShareLen uint64 `json:"share_end"`
}
```
We can then define the blockchain as a collection of blocks and some additional information about the chain such as the sequencer address.
```go
type Blockchain struct {
Blocks []Block
SequencerAddress []byte
Namespace []byte
}
```
## Rollup sequencer
The rollup sequencer is responsible for creating blocks and, in this demo, writing that data to Celestia and Ethereum. The rollup full node is responsible for reading that data from Celestia and Ethereum and verifying that it follows the protocol rules of that rollup.
Therefore, we can start by first defining the reading and writing interactions rollup nodes will have with both the Celestia and Ethereum networks. The actual implementations of these interfaces are left as exercises to the reader. Assume that those implementations of these interfaces are verifying the respective chain. For the connection to Celestia, this would likely mean connecting to a Celestia light node, which can detect faults in consensus such as hidden data. For the connection to Ethereum, this would likely mean running and connecting to a full node.
More information on the RPC that is exposed by a Celestia light node can be found [in the Node API docs](/build/rpc/node-api/). Additionally, if you need more information on how to run a light node, you can [check out the documentation](/operate/data-availability/light-node/quickstart).
```go
// CelestiaLightNodeClient summarizes the actions that a rollup that uses
// Blobstream for DA would need from a Celestia light node. Note that the actual
// connection to this light node is arbitrary, but would likely involve an RPC
// connection to a Celestia light node.
type CelestiaLightNodeClient interface {
GetBlockData(Span) (Data, error)
SubmitBlockData(Data) (Span, error)
}
// EthereumClient summarizes the actions that a rollup that uses Blobstream for
// DA would need from an Ethereum client.
type EthereumClient interface {
// GetLatestRollupHeight returns the height of the latest rollup block by
// querying the appropriate contract on Ethereum.
LatestRollupHeight() (uint64, error)
// GetHeader returns the rollup header of a specific height.
GetHeader(uint64) (Header, error)
// SubmitHeader submits a header to the rollup bridge contract on Ethereum.
SubmitHeader(Header) error
}
```
Note that here we are waiting for the head to be posted to Ethereum, however it would likely be better to simply download that header from p2p network or directly from the sequencer instead.
For the purposes of this demo, we will be using a single centralized sequencer, which can be defined by simply wrapping the fullnode to isolate the logic to create blocks.
A rollup fullnode will just consist of some representation of a blockchain along with clients to read from with Celestia and Ethereum.
```go
type Fullnode struct {
Blockchain
CelestiaLightNodeClient
EthereumClient
}
// Sequencer wraps the demo Fullnode struct to add specific functionality for
// producing blocks.
type Sequencer struct {
Fullnode
}
```
### Committing to data
Typical blockchains commit to the transactions included in each block using a Merkle root. Rollups that use Blobstream for DA need to use the commitments that are relayed to the Blobstream contracts.
For optimistic rollups, this could be as simple as referencing the data in the Celestia block, not unlike using a pointer in memory. This is what is done below via a `Span` in the [creating blocks](#creating-blocks) section. We keep track of where the data is located in the Celestia block and the sequencer signs over that location in the header. If the sequencer commits to non-existent data or an invalid state root, then the invalid transaction is first proved to be included in the `Span` before the rest of the fraud proof process is followed. Find more information [in the inclusion proofs documentation](https://github.com/celestiaorg/blobstream-contracts/blob/v3.0.0/docs/inclusion-proofs.md#blobstream-fraud-proofs).
For zk rollups, this would involve creating an inclusion proof to the data root tuple root in the Blobstream contracts, and then verifying that proof in the zk proof used to verify state. Find more information in the [data root inclusion proof documentation](https://github.com/celestiaorg/blobstream-contracts/blob/master/docs/inclusion-proofs.md#1-data-root-inclusion-proof).
Also see the documentation for the [data square layout](https://github.com/celestiaorg/celestia-app/blob/v1.1.0/specs/src/specs/data_square_layout.md) and the [shares](https://github.com/celestiaorg/celestia-app/blob/main/specs/src/shares.md) of the Celestia block to see how the data is encoded in Celestia.
### Creating blocks
The first step in creating a block is to post the block data to Celestia. Upon confirmation of the data being included in a block, the actual location of the data in Celestia can be determined. This data is used to create a `Span` which is included in the header and signed over by the sequencer. This `Span` can be used by contracts on Ethereum that use the Blobstream contracts to prove some specific data was included.
```go
func (s *Sequencer) ProduceBlock(txs []json.RawMessage) (Block, error) {
data := Data{Txs: txs}
span, err := s.CelestiaLightNodeClient.SubmitBlockData(data)
if err != nil {
return Block{}, err
}
var lastBlock Block
if len(s.Blocks) > 0 {
lastBlock = s.Blocks[len(s.Blocks)-1]
}
header := Header{
Height: uint64(len(s.Blocks) + 1),
PreviousHash: lastBlock.Header.Hash(),
Namespace: s.Namespace,
Span: span,
}
signature := s.key.Sign(header.SignBytes())
header.SequencerSignature = signature
block := Block{
Data: data,
Header: header,
}
s.AddBlock(block)
return block, nil
}
```
Note that the sequencer here is not yet posting headers to Ethereum. This is because the sequencer is waiting for the commitments from the Celestia validator set (the data root tuple roots) to be relayed to the contracts. Once the contracts are updated, the sequencer can post the header to Ethereum.
```go
func (s *Sequencer) UpdateHeaders() error {
latestRollupHeight, err := s.EthereumClient.LatestRollupHeight()
if err != nil {
return err
}
for i := latestRollupHeight; i <= uint64(len(s.Blocks)+1); i++ {
err := s.EthereumClient.SubmitHeader(s.Blocks[i].Header)
if err != nil {
return err
}
}
return nil
}
```
## Rollup fullnode
### Downloading the block
There are a few different mechanisms that could be used to download blocks. The simplest solution and what is outlined above is for `Fullnodes` to wait until the blocks and the headers are posted to the respective chains, and then download each as they are posted. It would also be possible to gossip the headers ahead of time, and download the rollup blocks from Celestia instead of waiting for the headers to be posted to Ethereum. It's also possible to download the headers and the block data like a normal blockchain via a gossiping network and only fall back to downloading the data and headers from Celestia and Ethereum if the gossiping network is unavailable or the sequencer is malicious.
```go
func (f *Fullnode) AddBlock(b Block) error {
// Perform validation of the block
if b.Header.Height != uint64(len(f.Blocks)+1) {
return fmt.Errorf("failure to add block: expected block height %d, got %d", len(f.Blocks)+1, b.Header.Height)
}
// Check the sequencer's signature
if !b.Header.SequencerSignature.IsValid(f.SequencerAddress) {
return fmt.Errorf("failure to add block: invalid sequencer signature")
}
f.Blocks = append(f.Blocks, b)
return nil
}
func (f *Fullnode) GetLatestBlock() error {
nextHeight := uint64(len(f.Blocks) + 1)
// Download the next header from Ethereum before we download the block data
// from Celestia. Note that we could alternatively download the header
// directly from the sequencer instead of waiting.
header, err := f.EthereumClient.GetHeader(nextHeight)
if err != nil {
return err
}
data, err := f.CelestiaLightNodeClient.GetBlockData(header.Span)
if err != nil {
return err
}
return f.AddBlock(
Block{
Data: data,
Header: header,
},
)
}
```
This outline of a Blobstream rollup isn't doing execution or state transitions induced by the transactions, however that step would occur here. If fraud is detected, the fraud proof process would begin. The only difference between the fraud proof process of a normal optimistic rollup and a rollup that uses Blobstream for DA is that the full node would first prove the fraudulent transaction was committed to by the Sequencer using the `Span` in the header before proceeding with the normal process.
## More documentation
### Proving inclusion via Blobstream
[Blobstream inclusion proof docs](https://github.com/celestiaorg/blobstream-contracts/blob/v3.0.0/docs/inclusion-proofs.md) and the [verifier helper](https://github.com/celestiaorg/blobstream-contracts/blob/v3.0.0/src/lib/verifier/DAVerifier.sol) contracts.
### Submitting block data to Celestia using client tx
As linked above, use the [Celestia Node API](/build/rpc/node-api) or [check out the tutorial](/build/post-retrieve-blob/client/go/) to submit the data to Celestia.
### Posting headers to Ethereum
How headers are posted to Ethereum is entirely dependent upon how the rollup light client contracts work. For examples of interacting with the Ethereum blockchain programmatically, please see the [go-ethereum book](https://goethereumbook.org/en/transactions/) or one of the many other resources for [submitting transactions](https://github.com/ethereumbook/ethereumbook/blob/first_edition_first_print/06transactions.asciidoc) or [writing contracts](https://github.com/ethereumbook/ethereumbook/blob/first_edition_first_print/07smart-contracts-solidity.asciidoc).
---
Title: Blobstream proofs queries
URL: https://docs.celestia.org/build/blobstream/proof-queries.md
Source: app/build/blobstream/proof-queries/page.mdx
---
# Blobstream proofs queries
## Prerequisites
- Access to a Celestia consensus full node RPC endpoint (or full node). The node doesn't need to be a validating node in order for the proofs to be queried. A full node is enough.
## Querying the proofs
To prove PFBs, blobs or shares, we can use the Celestia consensus node's RPC to query proofs for them:
### 1. Data root inclusion proof
To prove the data root is committed to by the Blobstream smart contract, we will need to provide a Merkle proof of the data root tuple to a data root tuple root. This can be created using the [`data_root_inclusion_proof`](https://github.com/celestiaorg/celestia-core/blob/c3ab251659f6fe0f36d10e0dbd14c29a78a85352/rpc/client/http/http.go#L492-L511) query.
This [endpoint](https://github.com/celestiaorg/celestia-core/blob/793ece9bbd732aec3e09018e37dc31f4bfe122d9/rpc/openapi/openapi.yaml#L1045-L1093) allows querying a data root to data root tuple root proof. It takes a block `height`, a starting block, and an end block, then it generates the binary Merkle proof of the `DataRootTuple`, corresponding to that `height`, to the `DataRootTupleRoot` which is committed to in the Blobstream contract.
Example request: `/data_root_inclusion_proof?height=15&start=10&end=20`
Which queries the proof of the height `15` to the data commitment defined by the range `[10, 20)`.
Example response:
```json
{
"jsonrpc": "2.0",
"id": -1,
"result": {
"proof": {
"total": "10",
"index": "5",
"leaf_hash": "vkRaRg7FGtZ/ZhsJRh/Uhhb3U6dPaYJ1pJNEfrwq5HE=",
"aunts": [
"nmBWWwHpipHwagaI7MAqM/yhCDb4cz7z4lRxmVRq5f8=",
"nyzLbFJjnSKOfRZur8xvJiJLA+wBPtwm0KbYglILxLg=",
"GI/tJ9WSwcyHM0r0i8t+p3hPFtDieuYR9wSPVkL1r2s=",
"+SGf6MfzMmtDKz5MLlH+y7mPV9Moo2x5rLjLe3gbFQo="
]
}
}
}
```
> **Note:** The values are base64 encoded. For these to be usable with the solidity smart contract, they need to be converted to `bytes32`. Check the next section for more information.
### 2. Transaction inclusion proof
To prove that a rollup transaction is part of the data root, we will need to provide two proofs: (1) a namespace Merkle proof of the transaction to (2) a row root. This could be done via proving the shares that contain the transaction to the row root using a namespace Merkle proof. And, a binary Merkle proof of the row root to the data root.
These proofs can be generated using the [`ProveShares`](https://github.com/celestiaorg/celestia-core/blob/c3ab251659f6fe0f36d10e0dbd14c29a78a85352/rpc/client/http/http.go#L526-L543) query.
This [endpoint](https://github.com/celestiaorg/celestia-core/blob/793ece9bbd732aec3e09018e37dc31f4bfe122d9/rpc/core/tx.go#L175-L213) allows querying a shares proof to row roots, then a row roots to data root proofs. It takes a block `height`, a starting share index and an end share index which define a share range. Then, two proofs are generated:
- An NMT proof of the shares to the row roots
- A binary Merkle proof of the row root to the data root
> **Note:** If the share range spans multiple rows, then the proof can contain multiple NMT and binary proofs.
Example request: `/prove_shares?height=15&startShare=0&endShare=1`
Which queries the proof of shares `[0,1)` in block `15`.
Example response:
```json
{
"jsonrpc": "2.0",
"id": -1,
"result": {
"data": [
"AAAAAAAAAAAAAAAAAAAAAAAAAAAAAAAAAAAAAAQBAAABXAAAACbaAgrOAgqgAQqdAQogL2NlbGVzdGlhLmJsb2IudjEuTXNnUGF5Rm9yQmxvYnMSeQovY2VsZXN0aWExdWc1ZWt0MmNjN250dzRkdG1zZDlsN3N0cTBzN3Z5ZTd5bTJyZHISHQAAAAAAAAAAAAAAAAAAAAAAAAASExIyQkMkMoiZGgKXAiIgrfloW1M/Y33zlD2luveDELZzr9cF92+2eTaImIWhN9pCAQASZwpQCkYKHy9jb3Ntb3MuY3J5cHRvLnNlY3AyNTZrMS5QdWJLZXkSIwohA36hewmW/AXtrw6S+QsNUzFGfeg37Da6igoP2ZQcK+04EgQKAggBGAISEwoNCgR1dGlhEgUyMTAwMBDQ6AwaQClYLQPNrFoD6H8mgmwxjFeNhwhRu39EcrVKMFkNQ8+HHuodhdOQIG/8DXEmrBwrpwj6hi+3uEsZ+0p5vrf3v8sSAQEaBElORFgAAAAAAAAAAAAAAAAAAAAAAAAAAAAAAAAAAAAAAAAAAAAAAAAAAAAAAAAAAAAAAAAAAAAAAAAAAAAAAAAAAAAAAAAAAAAAAAAAAAAAAAAAAAAAAAAAAAAAAAAAAAAAAAAAAAAAAAAAAAAAAAAAAAAAAAAAAAAAAAAAAAAAAAA="
],
"share_proofs": [
{
"end": 1,
"nodes": [
"AAAAAAAAAAAAAAAAAAAAAAAAABITEjJCQyQyiJkAAAAAAAAAAAAAAAAAAAAAAAAAEhMSMkJDJDKImbiwnpOdwIZBFr0UiFhPKwGy/XIIjL+gqm0fqxIw0z0o",
"/////////////////////////////////////////////////////////////////////////////3+fuhlzUfKJnZD8yg/JOtZla2V3g2Q7y+18iH5j0Uxk"
]
}
],
"namespace_id": "AAAAAAAAAAAAAAAAAAAAAAAAAAAAAAAAAAAABA==",
"row_proof": {
"row_roots": [
"000000000000000000000000000000000000000000000000000000000400000000000000000000000000000000000000121312324243243288993946154604701154F739F3D1B5475786DDD960F06D8708D4E870DA6501C51750"
],
"proofs": [
{
"total": "8",
"index": "0",
"leaf_hash": "300xzO8TiLwPNuREY6OJcRKzTHQ4y6yy6qH0wAuMMrc=",
"aunts": [
"ugp0sV9YNEI5pOiYR7RdOdswwlfBh2o3XiRsmMNmbKs=",
"3dMFZFaWZMTZVXhphF5TxlCJ+CT3EvmMFOpiXFH+ID4=",
"srl59GiTSiwC9LqdYASzFC6TvusyY7njX8/XThp6Xws="
]
}
],
"start_row": 0,
"end_row": 0
},
"namespace_version": 0
}
}
```
> **Note:** The values are base64 encoded. For these to be usable with the solidity smart contract, they need to be converted to `bytes32`. Check the next section for more information.
## Converting the proofs to be usable in the DAVerifier contract
The `DAVerifier` smart contract takes the following proof format:
```solidity
/// @notice Contains the necessary parameters to prove that some shares, which were posted to
/// the Celestia network, were committed to by the Blobstream smart contract.
struct SharesProof {
// The shares that were committed to.
bytes[] data;
// The shares proof to the row roots. If the shares span multiple rows, we will have multiple nmt proofs.
NamespaceMerkleMultiproof[] shareProofs;
// The namespace of the shares.
Namespace namespace;
// The rows where the shares belong. If the shares span multiple rows, we will have multiple rows.
NamespaceNode[] rowRoots;
// The proofs of the rowRoots to the data root.
BinaryMerkleProof[] rowProofs;
// The proof of the data root tuple to the data root tuple root that was posted to the Blobstream contract.
AttestationProof attestationProof;
}
/// @notice Contains the necessary parameters needed to verify that a data root tuple
/// was committed to, by the Blobstream smart contract, at some specific nonce.
struct AttestationProof {
// the attestation nonce that commits to the data root tuple.
uint256 tupleRootNonce;
// the data root tuple that was committed to.
DataRootTuple tuple;
// the binary Merkle proof of the tuple to the commitment.
BinaryMerkleProof proof;
}
```
To construct the `SharesProof`, we will need the proof that we queried above, and it goes as follows:
### data
This is the raw shares that were submitted to Celestia in the `bytes` format. If we take the example blob that was submitted in the [`RollupInclusionProofs.t.sol`](https://github.com/celestiaorg/blobstream-contracts/blob/3a552d8f7bfbed1f3175933260e6e440915d2da4/src/lib/verifier/test/RollupInclusionProofs.t.sol#L64-L65), we can convert it to bytes using the `abi.encode(...)` as done for [this variable](https://github.com/celestiaorg/blobstream-contracts/blob/3a552d8f7bfbed1f3175933260e6e440915d2da4/src/lib/verifier/test/RollupInclusionProofs.t.sol#L384-L402). This can be gotten from the above result of the [transaction inclusion proof](#2-transaction-inclusion-proof) query in the field `data`, which is in `base64` encoded then be converted to hex to be used as described.
### shareProofs
This is the shares proof to the row roots. These can contain multiple proofs if the shares containing the blob span across multiple rows. To construct them, we will use the result of the [transaction inclusion proof](#2-transaction-inclusion-proof) section:
```json
"share_proofs": [
{
"start": ...,
"end": ...,
"nodes": [
"...",
"..."
]
}
],
```
> **Note:** If any of the fields is empty, then it will not be in the response. For example, if the `start` field is `0`, it will be omitted in the response.
While the `NamespaceMerkleMultiproof` being:
```solidity
/// @notice Namespace Merkle Tree Multiproof structure. Proves multiple leaves.
struct NamespaceMerkleMultiproof {
// The beginning key of the leaves to verify.
uint256 beginKey;
// The ending key of the leaves to verify.
uint256 endKey;
// List of side nodes to verify and calculate tree.
NamespaceNode[] sideNodes;
}
```
So, we can construct the `NamespaceMerkleMultiproof` with the following mapping:
- `beginKey` in the Solidity struct **==** `start` in the query response
- `endKey` in the Solidity struct **==** `end` in the query response
- `sideNodes` in the Solidity struct **==** `nodes` in the query response
The `NamespaceNode`, which is the type of the `sideNodes`, is defined as follows:
```solidity
/// @notice Namespace Merkle Tree node.
struct NamespaceNode {
// Minimum namespace.
Namespace min;
// Maximum namespace.
Namespace max;
// Node value.
bytes32 digest;
}
```
So, we construct a `NamespaceNode` via taking the values from the `nodes` field in the query response, we convert them from base64 to `hex`, then we use the following mapping:
- `min` == the first 29 bytes in the decoded value
- `max` == the second 29 bytes in the decoded value
- `digest` == the remaining 32 bytes in the decoded value
The `min` and `max` are `Namespace` type which is:
```solidity
/// @notice A representation of the Celestia-app namespace ID and its version.
/// See: https://celestiaorg.github.io/celestia-app/specs/namespace.html
struct Namespace {
// The namespace version.
bytes1 version;
// The namespace ID.
bytes28 id;
}
```
So, to construct them, we separate the 29 bytes in the decoded value to:
- first byte: `version`
- remaining 28 bytes: `id`
An example of doing this can be found in the [RollupInclusionProofs.t.sol](https://github.com/celestiaorg/blobstream-contracts/blob/3a552d8f7bfbed1f3175933260e6e440915d2da4/src/lib/verifier/test/RollupInclusionProofs.t.sol#L465-L477) test.
### namespace
Which is the namespace used by the rollup when submitting data to Celestia. As described above, it can be constructed as follows:
```solidity
/// @notice A representation of the Celestia-app namespace ID and its version.
/// See: https://celestiaorg.github.io/celestia-app/specs/namespace.html
struct Namespace {
// The namespace version.
bytes1 version;
// The namespace ID.
bytes28 id;
}
```
Via taking the `namespace` value from the `prove_shares` query response, decoding it from base64 to hex, then:
- first byte: `version`
- remaining 28 bytes: `id`
An example can be found in the [RollupInclusionProofs.t.sol](https://github.com/celestiaorg/blobstream-contracts/blob/3a552d8f7bfbed1f3175933260e6e440915d2da4/src/lib/verifier/test/RollupInclusionProofs.t.sol#L488) test.
### rowRoots
Which are the roots of the rows where the shares containing the Rollup data are localized. These can be taken from the `prove_shares` query response:
```json
"row_proof":
{
"row_roots":
[
"..."
],
},
```
The values inside the `row_roots` are already in hex, and the Solidity type of the `rowRoots` is `NamespaceNode`. So, we will construct them similar to the `sideNodes` of the [shareProofs](#shareproofs). Except that no base64 conversion is needed.
### rowProofs
These are the proofs of the rows to the data root. They are of type `BinaryMerkleProof`:
```solidity
/// @notice Merkle Tree Proof structure.
struct BinaryMerkleProof {
// List of side nodes to verify and calculate tree.
bytes32[] sideNodes;
// The key of the leaf to verify.
uint256 key;
// The number of leaves in the tree
uint256 numLeaves;
}
```
To construct them, we take the response of the `prove_shares` query:
```json
"row_proof": {
"row_roots": [
"..."
],
"proofs": [
{
"total": "...",
"index": "...",
"leaf_hash": "...",
"aunts": [
"...",
"..."
]
}
],
```
and do the following mapping:
- `key` in the Solidity struct **==** `index` in the query response
- `numLeaves` in the Solidity struct **==** `total` in the query response
- `sideNodes` in the Solidity struct **==** `aunts` in the query response
The type of the `sideNodes` is a `bytes32`. So, we take the values in the query response, we convert them from base64 to hex, then we create the values.
An example can be found in the [RollupInclusionProofs.t.sol](https://github.com/celestiaorg/blobstream-contracts/blob/3a552d8f7bfbed1f3175933260e6e440915d2da4/src/lib/verifier/test/RollupInclusionProofs.t.sol#L479-L484) test.
### attestationProof
This is the proof of the data root to the data root tuple root, which is committed to in the Blobstream contract:
```solidity
/// @notice Contains the necessary parameters needed to verify that a data root tuple
/// was committed to, by the Blobstream smart contract, at some specific nonce.
struct AttestationProof {
// the attestation nonce that commits to the data root tuple.
uint256 tupleRootNonce;
// the data root tuple that was committed to.
DataRootTuple tuple;
// the binary Merkle proof of the tuple to the commitment.
BinaryMerkleProof proof;
}
```
- `tupleRootNonce`: the nonce at which Blobstream committed to the batch containing the block containing the data.
- `tuple`: the `DataRootTuple` of the block:
```solidity
/// @notice A tuple of data root with metadata. Each data root is associated
/// with a Celestia block height.
/// @dev `availableDataRoot` in
/// https://github.com/celestiaorg/celestia-specs/blob/master/src/specs/data_structures.md#header
struct DataRootTuple {
// Celestia block height the data root was included in.
// Genesis block is height = 0.
// First queryable block is height = 1.
uint256 height;
// Data root.
bytes32 dataRoot;
}
```
which comprises a `dataRoot`, i.e. the block containing the Rollup data data root, and the `height` which is the `height` of that block.
- `proof`: the `BinaryMerkleProof` of the data root tuple to the data root tuple root. Constructing it is similar to constructing the row roots to data root proof in the [rowProofs](#rowproofs) section.
An example can be found in the [RollupInclusionProofs.t.sol](https://github.com/celestiaorg/blobstream-contracts/blob/3a552d8f7bfbed1f3175933260e6e440915d2da4/src/lib/verifier/test/RollupInclusionProofs.t.sol#L488) test.
If the `dataRoot` or the `tupleRootNonce` is unknown during the verification:
- `dataRoot`: can be queried using the `/block?height=15` query (`15` in this example endpoint), and taking the `data_hash` field from the response.
- `tupleRootNonce`: can be retrieved using a `gRPC` query to the app to the [`/qgb/v1/data_commitment/range/height`](https://github.com/celestiaorg/celestia-app/blob/c517bd27c4e0b3d6e4521a7d2946662cb0f19f1d/proto/celestia/qgb/v1/query.proto#L51-L56) endpoint. An example can be found in the [`verify`](https://github.com/celestiaorg/celestia-app/blob/c517bd27c4e0b3d6e4521a7d2946662cb0f19f1d/x/blobstream/client/verify.go#L245-L251) command.
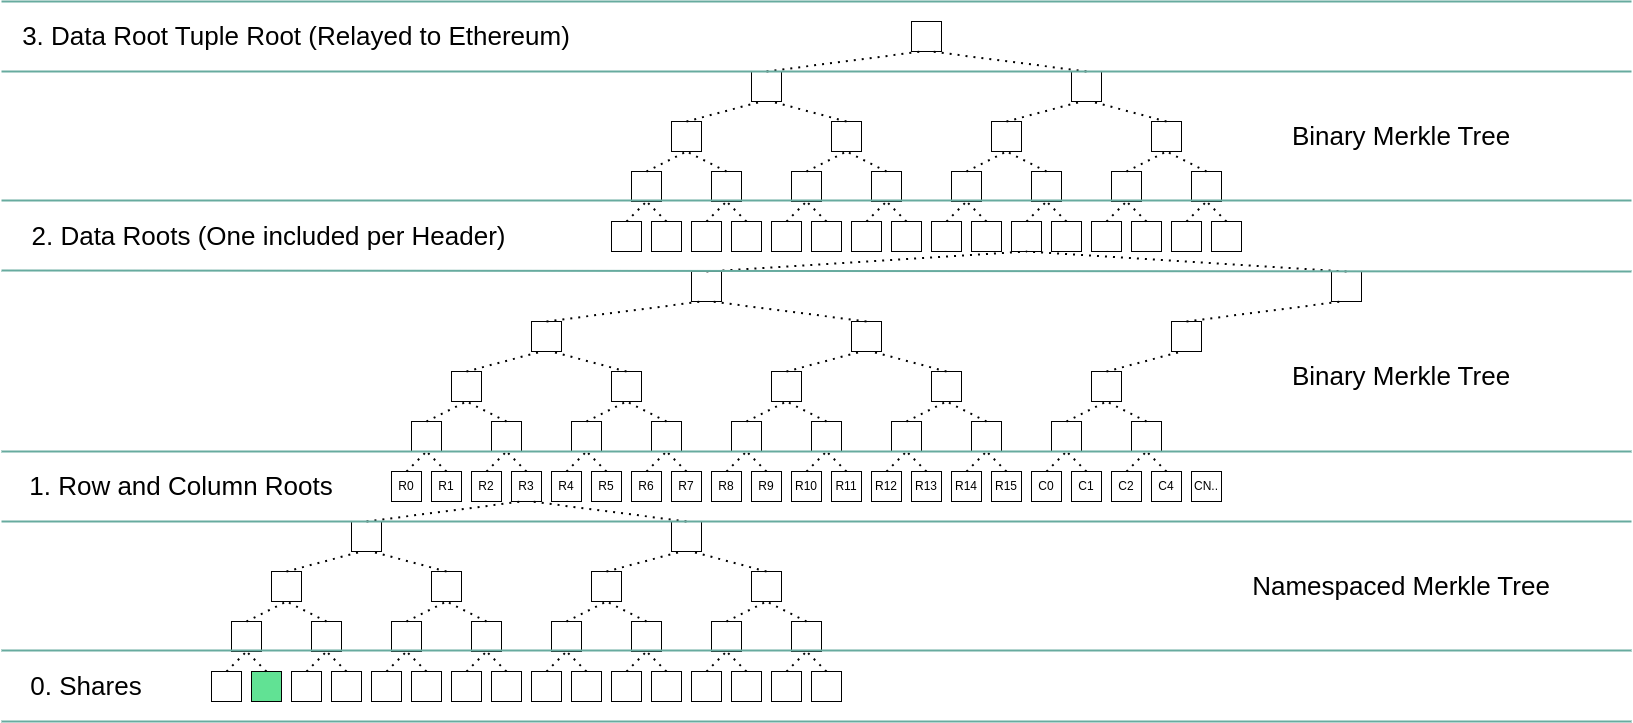
## High-level diagrams
The two diagrams below summarize how a single share is committed to in Blobstream. The share is highlighted in green. `R0`, `R1`, etc represent the respective row and column roots, the blue and pink gradients are erasure encoded data. More details on the square layout can be found [in the data square layout](https://github.com/celestiaorg/celestia-app/blob/v1.1.0/specs/src/specs/data_square_layout.md) and [data structures](https://github.com/celestiaorg/celestia-app/blob/v1.1.0/specs/src/specs/data_structures.md#erasure-coding) portion of the specs.
### The Celestia square
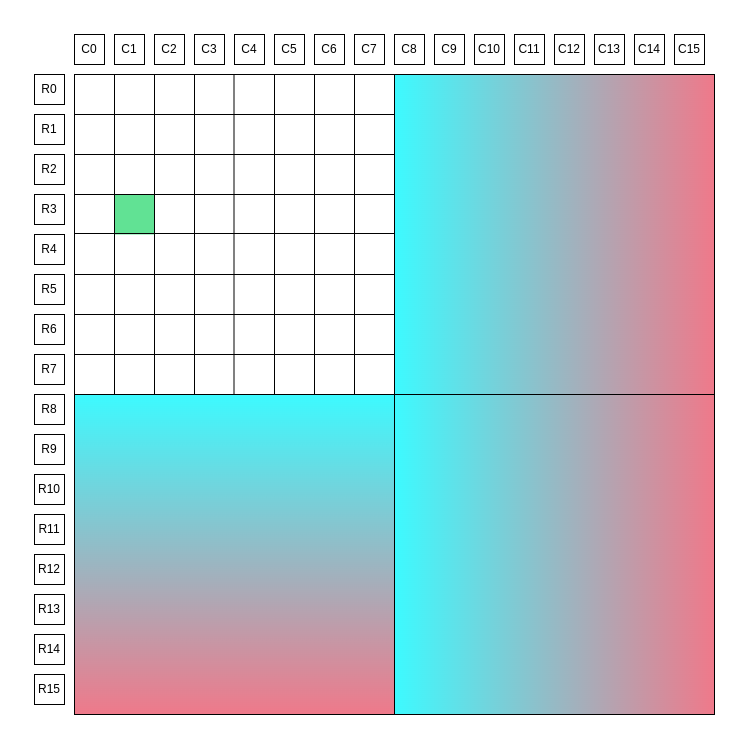
### The commitment scheme
## Conclusion
After creating all the proofs, and verifying them:
1. Verify inclusion proof of the transaction to Celestia data root
2. Prove that the data root tuple is committed to by the Blobstream smart contract
We can be sure that the data was published to Celestia.
> **Note:** The above proof constructions are implemented in Solidity, and may require different approaches in other programming languages.
---
Title: Go client tutorial
URL: https://docs.celestia.org/build/post-retrieve-blob/client/go.md
Source: app/build/post-retrieve-blob/client/go/page.mdx
---
# Go client tutorial
The Celestia Go client lets you submit and retrieve data from the Celestia network without running your own node. This tutorial shows you how to get started with the basics.
## What you can do
- **Submit blobs**: Store data on Celestia's data availability layer
- **Retrieve blobs**: Get data back from the network
- **Check balance**: See your account's token balance
- **Read-only mode**: Just retrieve data without submitting
## Prerequisites
- Go 1.25.1 or later
- A Celestia account (created automatically)
- Testnet tokens from the [Mocha faucet](/operate/networks/mocha-testnet#mocha-testnet-faucet)
## Quick setup
## Running the tutorial
## Understanding the code
### Key components
- **Keyring**: Manages your Celestia account keys
- **Client**: Connects to Celestia nodes for read/write operations
- **Namespace**: Groups related data together (like a folder)
- **Blob**: The data structure you submit to the network
- **Commitment**: A hash that uniquely identifies your blob
### Connection types
| Purpose | Node type | Example URL |
| ----------- | ----------------------- | --------------------------------------------- |
| Read data | DA JSON-RPC | `http://localhost:26658` |
| Submit data | Consensus node gRPC | `localhost:9090` |
### Read-only mode
To only retrieve data (no submission), remove the `SubmitConfig` from your client configuration:
```go
cfg := client.Config{
ReadConfig: client.ReadConfig{
BridgeDAAddr: daURL,
},
// No SubmitConfig for read-only
}
```
## Advanced features
### Submitting multiple blobs
You can submit multiple blobs in a single transaction. All blobs are included atomically at the same block height, which is useful for grouping related data together.
```go
func submitMultipleBlobs(ctx context.Context, c *client.Client) error {
ctx, cancel := context.WithTimeout(ctx, 2*time.Minute)
defer cancel()
// Create namespace
ns, err := share.NewV0Namespace([]byte("tutorial"))
if err != nil {
return err
}
// Create multiple blobs (can use same namespace, or different namespaces)
blob1, err := blob.NewBlob(share.ShareVersionZero, ns, []byte("First blob"), nil)
if err != nil {
return err
}
blob2, err := blob.NewBlob(share.ShareVersionZero, ns, []byte("Second blob"), nil)
if err != nil {
return err
}
blob3, err := blob.NewBlob(share.ShareVersionZero, ns, []byte("Third blob"), nil)
if err != nil {
return err
}
// Submit all blobs in a single transaction
height, err := c.Blob.Submit(ctx, []*blob.Blob{blob1, blob2, blob3}, nil)
if err != nil {
return err
}
fmt.Printf("✓ All 3 blobs submitted at block %d\n", height)
// Retrieve each blob using its unique commitment
retrieved1, _ := c.Blob.Get(ctx, height, ns, blob1.Commitment)
retrieved2, _ := c.Blob.Get(ctx, height, ns, blob2.Commitment)
retrieved3, _ := c.Blob.Get(ctx, height, ns, blob3.Commitment)
fmt.Printf("✓ Retrieved: %s, %s, %s\n",
string(retrieved1.Data()),
string(retrieved2.Data()),
string(retrieved3.Data()))
return nil
}
```
**Key points:**
- All blobs in the array are included in a single `PayForBlobs` transaction
- They all appear at the same block height
- Each blob can have a different namespace
- Retrieve blobs individually using their namespace and commitment
### Transaction submission modes
Celestia supports three transaction submission modes controlled by `TxWorkerAccounts` in your client configuration. This setting affects how transactions are queued and submitted, impacting throughput and ordering guarantees.
#### Default mode (TxWorkerAccounts = 0)
This is the default behavior (same as the basic tutorial). Transactions are submitted immediately without a queue:
```go
cfg := client.Config{
ReadConfig: client.ReadConfig{
BridgeDAAddr: daURL,
EnableDATLS: daTLS,
},
SubmitConfig: client.SubmitConfig{
DefaultKeyName: "my_key",
Network: p2p.Network("mocha-4"),
CoreGRPCConfig: client.CoreGRPCConfig{
Addr: coreGRPC,
TLSEnabled: coreTLS,
},
// TxWorkerAccounts defaults to 0 (immediate submission)
},
}
```
**Characteristics:**
- Transactions enter the mempool immediately
- No queuing or waiting for confirmations
- Potential sequence number conflicts if submitting multiple transactions quickly
- Same behavior as versions prior to v0.28.2
#### Queued mode (TxWorkerAccounts = 1)
Enable synchronous, ordered submission by setting `TxWorkerAccounts` to `1`:
```go
cfg.SubmitConfig.TxWorkerAccounts = 1
```
**Characteristics:**
- Each transaction queues until the previous one is confirmed
- Preserves strict ordering of transactions based on submission time
- Works with both sequential and concurrent submission patterns
- Avoids sequence mismatch errors
- Throughput: approximately 1 PayForBlobs transaction every other block
**Example:** Submitting 5 blobs in queued mode:
```go
import (
"golang.org/x/sync/errgroup"
)
func submitBlobsQueued(ctx context.Context, c *client.Client) error {
// Create 5 blobs
blobs := make([]*blob.Blob, 5)
namespaces := make([]share.Namespace, 5)
commitments := make([][]byte, 5)
for i := 0; i < 5; i++ {
nsBytes := make([]byte, 10)
copy(nsBytes, fmt.Sprintf("blob-%d", i))
ns, _ := share.NewV0Namespace(nsBytes)
namespaces[i] = ns
blobs[i], _ = blob.NewBlob(share.ShareVersionZero, ns,
[]byte(fmt.Sprintf("Data %d", i)), nil)
commitments[i] = blobs[i].Commitment
}
heights := make([]uint64, 5)
var g errgroup.Group
for i := 0; i < 5; i++ {
idx := i
g.Go(func() error {
height, err := c.Blob.Submit(ctx, []*blob.Blob{blobs[idx]}, nil)
if err != nil {
return err
}
heights[idx] = height
fmt.Printf("Blob %d submitted at height %d\n", idx+1, height)
return nil
})
}
if err := g.Wait(); err != nil {
return err
}
// Retrieve and verify all blobs
for i := 0; i < 5; i++ {
retrieved, err := c.Blob.Get(ctx, heights[i], namespaces[i], commitments[i])
if err != nil {
return err
}
fmt.Printf("✓ Blob %d retrieved: %s\n", i+1, string(retrieved.Data()))
}
return nil
}
```
**Expected output:**
```
Blob 3 submitted at height 1234567 // First to call Submit()
Blob 1 submitted at height 1234568 // Second to call Submit()
Blob 5 submitted at height 1234569 // Third to call Submit()
Blob 2 submitted at height 1234570 // Fourth to call Submit()
Blob 4 submitted at height 1234571 // Fifth to call Submit()
✓ Blob 1 retrieved: Data 0
✓ Blob 2 retrieved: Data 1
✓ Blob 3 retrieved: Data 2
✓ Blob 4 retrieved: Data 3
✓ Blob 5 retrieved: Data 4
```
Note: With concurrent submission, blobs may print in any order, but their heights will always reflect their submission order (first submitted = lowest height).
#### Parallel mode (TxWorkerAccounts > 1)
For high-throughput applications that don't require sequential ordering, enable parallel submission:
```go
cfg.SubmitConfig.TxWorkerAccounts = 8 // Creates 8 parallel lanes
```
**How it works:**
- Creates `TxWorkerAccounts` parallel submission lanes
- Each lane is a subaccount automatically created and funded from your default account
- Example: `TxWorkerAccounts = 8` creates 7 subaccounts + 1 default account = 8 parallel lanes
- Enables at least 8 PayForBlobs transactions per block
**Important:** To actually utilize parallel lanes, you must submit blobs concurrently (using goroutines). Each `Blob.Submit()` call blocks until the transaction is confirmed, so sequential calls will still be processed sequentially even with `TxWorkerAccounts > 1`. Concurrent submission allows multiple transactions to be processed simultaneously across different parallel lanes.
**Example:** Submitting 8 blobs concurrently in parallel mode:
```go
import (
"golang.org/x/sync/errgroup"
)
func submitBlobsParallel(ctx context.Context, c *client.Client) error {
// Create 8 blobs
blobs := make([]*blob.Blob, 8)
namespaces := make([]share.Namespace, 8)
commitments := make([][]byte, 8)
for i := 0; i < 8; i++ {
nsBytes := make([]byte, 10)
copy(nsBytes, fmt.Sprintf("parallel-%d", i))
ns, _ := share.NewV0Namespace(nsBytes)
namespaces[i] = ns
blobs[i], _ = blob.NewBlob(share.ShareVersionZero, ns,
[]byte(fmt.Sprintf("Parallel data %d", i)), nil)
commitments[i] = blobs[i].Commitment
}
heights := make([]uint64, 8)
var g errgroup.Group
for i := 0; i < 8; i++ {
idx := i
g.Go(func() error {
height, err := c.Blob.Submit(ctx, []*blob.Blob{blobs[idx]}, nil)
if err != nil {
return err
}
heights[idx] = height
fmt.Printf("Blob %d submitted at height %d\n", idx+1, height)
return nil
})
}
if err := g.Wait(); err != nil {
return err
}
// Retrieve and verify all blobs
for i := 0; i < 8; i++ {
retrieved, err := c.Blob.Get(ctx, heights[i], namespaces[i], commitments[i])
if err != nil {
return err
}
fmt.Printf("✓ Blob %d retrieved: %s\n", i+1, string(retrieved.Data()))
}
return nil
}
```
**Expected output (unordered):**
```
Blob 1 submitted at height 1234567
Blob 2 submitted at height 1234567 // Same block!
Blob 3 submitted at height 1234568
Blob 4 submitted at height 1234567 // Same block as 1 and 2!
Blob 5 submitted at height 1234568
Blob 6 submitted at height 1234568
Blob 7 submitted at height 1234569
Blob 8 submitted at height 1234568
✓ Blob 1 retrieved: Parallel data 0
✓ Blob 2 retrieved: Parallel data 1
✓ Blob 3 retrieved: Parallel data 2
✓ Blob 4 retrieved: Parallel data 3
✓ Blob 5 retrieved: Parallel data 4
✓ Blob 6 retrieved: Parallel data 5
✓ Blob 7 retrieved: Parallel data 6
✓ Blob 8 retrieved: Parallel data 7
```
**Important considerations:**
**Retrieving blobs from parallel submission:**
Since you don't know which subaccount submitted each blob, retrieve them using namespace, height, and commitment:
```go
// Store these when submitting
height, err := c.Blob.Submit(ctx, []*blob.Blob{myBlob}, nil)
commitment := myBlob.Commitment
namespace := myBlob.Namespace()
// Later, retrieve using stored values
retrieved, err := c.Blob.Get(ctx, height, namespace, commitment)
```
**Subaccount management:**
- Subaccounts are automatically created and funded from your default account
- They are named `parallel-worker-1`, `parallel-worker-2`, etc. in your keyring
- Subaccounts are reused across node restarts if `TxWorkerAccounts` value remains the same
- If you decrease `TxWorkerAccounts`, only the first N workers are used
- If you increase `TxWorkerAccounts`, additional workers are created
#### Comparison table
| Mode | TxWorkerAccounts | Ordering | Throughput | Use case |
| -------- | ---------------- | -------------- | ---------------- | ---------------------------------------- |
| Default | 0 | Not guaranteed | Immediate | Simple applications, single transactions |
| Queued | 1 | Guaranteed | ~1 tx per block | Applications requiring strict ordering |
| Parallel | >1 | Not guaranteed | ≥N txs per block | High-throughput, unordered workflows |
## Next steps
- **Production**: Use `keyring.BackendFile` instead of `keyring.BackendTest`
- **Security**: Enable TLS with authentication tokens for production
- **Advanced**: Read the [full client documentation](https://github.com/celestiaorg/celestia-node/blob/main/api/client#readme)
## Troubleshooting
Common errors and solutions:
### Connection errors
**`failed to initialize [share|header|blob] client`**
- Check that your `CELE_DA_URL` is correct and accessible
- Verify the bridge node is running and reachable
- Ensure TLS settings match your node configuration
**`couldn't connect to core endpoint`**
- Verify your `CELE_CORE_GRPC` address is correct
- Check that the consensus node is running
- Ensure firewall rules allow the connection
### Configuration errors
**`default key name should not be empty`**
- Ensure `DefaultKeyName` is set in your `SubmitConfig`
**`keyring is nil`**
- Pass a valid keyring to `client.New()` (cannot be `nil`)
### Blob submission errors
**`blob: not found`**
- The blob doesn't exist at the specified height/namespace/commitment
- Verify the height, namespace, and commitment are correct
**`not allowed namespace ... were used to build the blob`**
- The namespace is reserved or invalid
- Use `share.NewV0Namespace()` with valid user namespaces
**`account for signer ... not found`**
- The account has not been funded yet
- Fund your account at the [Mocha faucet](/operate/networks/mocha-testnet#mocha-testnet-faucet)
**`failed to submit blobs due to insufficient gas price`**
- The estimated or configured gas price is too low
- Either increase `MaxGasPrice` in `TxConfig` or let the client estimate
- Check network congestion (gas prices may be elevated)
**`context deadline exceeded`**
- Network timeout occurred
- Increase the context timeout: `context.WithTimeout(ctx, 5*time.Minute)`
- Check network connectivity to the node
---
Title: Rust client
URL: https://docs.celestia.org/build/post-retrieve-blob/client/rust.md
Source: app/build/post-retrieve-blob/client/rust/page.mdx
---
# Rust client
The [Lumina Rust client](https://github.com/celestiaorg/lumina/tree/main/client) provides a high-level API for interacting with a Celestia node over RPC and gRPC. It builds on top of the lower-level `celestia-rpc` and `celestia-grpc` crates and exposes a unified `Client` that supports both **read-only** and **submit** modes.
In read-only mode, the client connects to a node via RPC (and optionally gRPC) to query headers, blobs, and state.
In submit mode, it additionally uses gRPC and a local signer to build, sign, and broadcast transactions such as transfers and PayForBlobs.
The crate re-exports common Celestia types (namespaces, blobs, app versions, etc.) and is designed to be the easiest way for Rust applications to integrate with Celestia nodes for data retrieval, blob submission, and general chain interaction. ([lib.rs][1], [docs.rs][2])
[1]: https://lib.rs/crates/celestia-client "celestia-client, in Rust // Lib.rs"
[2]: https://docs.rs/celestia-client/latest/celestia_client/ "celestia-client, in Rust // Docs.rs"
---
Title: Overview to posting and retrieving blobs on Celestia
URL: https://docs.celestia.org/build/post-retrieve-blob/overview.md
Source: app/build/post-retrieve-blob/overview/page.mdx
---
# Overview to posting and retrieving blobs on Celestia
This section will show you how to post and retrieve blobs on Celestia using the transaction client in Golang and Rust.
There are two transaction clients available:
| Option | What you need | Endpoints to set | Guides |
| ---------- | ----------------------------------- | --------------------------------- | --------------------------------------------------------- |
| **Golang** | Local keyring handled by the client | **2** — DA bridge RPC + Core gRPC | [Go client tutorial](/build/post-retrieve-blob/client/go) |
| **Rust** | Local keyring handled by the client | **2** — DA bridge RPC + Core gRPC | [Rust client](/build/post-retrieve-blob/client/rust) |
---
Title: About Private Blockspace
URL: https://docs.celestia.org/build/private-blockspace/about.md
Source: app/build/private-blockspace/about/page.mdx
---
# About Private Blockspace
The highest-stakes onchain markets—including perpetual exchanges, order books, and institutional rails—depend on information that cannot be public. Positions, balances, liquidations, and routing logic are inherently sensitive. Yet pushing that data offchain reintroduces trusted operators and weakens the core promise of being onchain: **independent auditing, verifiability, and safe exits when it matters most.**
**Private Blockspace** is Celestia’s approach to solving this problem: keep sensitive state **confidential**, while still making it **publicly accountable**.
Private Blockspace enables networks to publish **encrypted state to Celestia**, allowing anyone to verify data availability and protocol commitments **without revealing the underlying contents**. The result is **private systems with public verifiability guarantees**—fault-resistant, auditable, and designed to support safe exit mechanisms.
At a high level, Private Blockspace adds an encryption + proof layer between your application and Celestia’s data availability layer. This layer is implemented as the **Private Blockspace Proxy**: a lightweight service that encrypts, proves, and routes data **without modifying existing Celestia integrations**.
## Submitting a blob
The Private Blockspace Proxy acts as an intermediary between your JSON-RPC client and the Celestia network.
When you submit a blob:
1. The proxy encrypts the data.
2. The proxy generates a proof inside a zkVM attesting to correct encryption and any configured “anchors” about the plaintext.
3. The proxy stores the job result in a local database and returns an acknowledgement while processing continues.
4. Once the proof completes, the result is cached so identical submissions can return immediately.
5. The proxy submits the verifiably encrypted blob to Celestia via `blob.Submit`.
From the client’s perspective, posting encrypted data feels like a single RPC call, while the proxy handles encryption, verifiability, and coordination with Celestia behind the scenes.
```mermaid
sequenceDiagram
participant JSON RPC Client
participant Proxy
participant Celestia Node
JSON RPC Client->>+Proxy: blob.Submit(blobs, options) {AUTH_TOKEN in header}
Proxy->>Proxy: Job Processing... {If no DB entry, start new zkVM Job}
Proxy->>-JSON RPC Client: Response{"Call back"}
Proxy->>Proxy: ...Job runs to completion...
JSON RPC Client->>+Proxy: blob.Submit(blobs, options) {AUTH_TOKEN in header}
Proxy->>Proxy: Query Job DB Done! {Job Result cached}
Proxy->>Celestia Node: blob.Submit(V. Encrypt. blobs, options)
Celestia Node->>Proxy: Response{Inclusion Block Height}
Proxy->>-JSON RPC Client: Response{Inclusion Block Height}
```
## Retrieving a blob
When retrieving a blob, the proxy behaves as a transparent relay:
1. The client calls `blob.Get(height, namespace, commitment)`.
2. The proxy forwards the request to a Celestia node.
3. The proxy receives the raw blob response.
4. The proxy attempts to deserialize and decrypt using the configured encryption key.
If the blob was encrypted through the proxy, decryption succeeds and the proxy returns the original plaintext bytes. If it was not, the proxy passes the response through unchanged.
This ensures compatibility with both encrypted and unencrypted blobs, so existing clients can adopt Private Blockspace incrementally.
```mermaid
sequenceDiagram
participant JSON RPC Client
participant Proxy
participant Celestia Node
JSON RPC Client->>+Proxy: blob.Get(height, namespace, commitment)
Proxy->>Celestia Node:
Celestia Node->>Proxy: Response{namespace,data, share_version,commitment,index}
Proxy->>Proxy: *Try* deserialize & decrypt
Proxy->>-JSON RPC Client: *Success* -> Response{...,decrypted bytes,...}
Proxy->>JSON RPC Client: *Failure* ->
```
## Verifiable Encryption (VE)
With normal encryption, ciphertext should be indistinguishable from random noise. That property is what keeps data private—but it also makes it difficult to prove _anything_ about encrypted data without decrypting it.
Private Blockspace uses **Verifiable Encryption (VE)** to bridge this gap.
VE enables proofs of _select properties_ of fully encrypted data **without decryption**. For example, a system can prove statements like:
- “This encrypted blob contains a Merkle proof whose root is `0xabc123…`”
- “This ciphertext was produced using the expected algorithm, key format, and nonce rules”
- “The plaintext hashes to a specific commitment”
This is accomplished by running encryption inside a zkVM, producing a proof that encryption was executed correctly while also exposing application-defined “anchors” (such as hashes or commitment checks) that remain safe to reveal.
**Outcome:** anyone can verify availability and correctness constraints, while only authorized parties can decrypt the underlying contents.
## Key exchange and management strategies
A critical design question in Private Blockspace is key management:
> If keys are withheld, then the data is effectively withheld.
Private Blockspace is designed to support different key exchange and reconstruction strategies depending on your application requirements and threat model.
### Account-centric model
A proposed account-centric model enforces that **all account state is published and available**, while also being encrypted such that only the intended party (or parties) can decrypt.
Key properties of this approach:
- **User-defined encryption keys:** users define keys for encrypting their own account state, ensuring they can always decrypt their data and enabling forward secrecy.
- **Conditional selective disclosure:** users can allow decryption by specific parties using standard public key cryptography, key exchange protocols, and/or threshold schemes.
- **User-initiated protocol progression:** applications can allow users to progress the protocol themselves by proving correct state transitions onchain, enabling “forced” state updates such as withdrawals.
This model is designed to support systems that remain private during normal operation, while still enabling safe exits and recovery paths under application-defined conditions.
## Use cases
Private Blockspace is designed for applications where **privacy is required**, but **public accountability cannot be sacrificed**.
### Accountable offchain exchanges
Operators of offchain or hybrid exchanges can keep internal state private while still being required (by protocol design) to prove state availability and commitments publicly.
This improves fault tolerance and auditability without forcing users to trust an opaque operator for safe exits.
**In production: Hibachi**
Hibachi is the first independent deployment using Private Blockspace for a fast perps exchange. Hibachi publishes verifiably encrypted exchange state to Celestia, keeping balances and positions private while making data availability and correctness publicly verifiable.
### Trust-minimized data marketplaces
Private Blockspace can also support trust-minimized private data markets:
- sellers publish verifiably encrypted data to Celestia
- buyers verify availability and integrity before payment—without seeing the plaintext
- payment is enforced only once availability is proven
This shifts trust away from intermediaries and toward verification, producing private exchange workflows that are auditable and fault-resistant by design.
## References and further reading
- [Private Blockspace Proxy repo on GitHub](https://github.com/celestiaorg/private-blockspace-proxy/)
- [Verifiable Encryption (VE) in depth](https://github.com/celestiaorg/private-blockspace-proxy/blob/main/doc/verifiable_encryption.md)
- [Forum post: Account-centric model](https://forum.celestia.org/t/account-user-centric-private-blockspace/2155)
---
Title: Private blockspace quickstart
URL: https://docs.celestia.org/build/private-blockspace/quickstart.md
Source: app/build/private-blockspace/quickstart/page.mdx
---
# Private blockspace quickstart
Private blockspace encrypts your blob data before it’s posted to Celestia using a lightweight proxy.
In this quickstart, you’ll use hosted Celestia nodes (like QuickNode) instead of running your own.
## Troubleshooting
| Error message | Cause | Fix |
| --- | --- | --- |
| `TLS_CERTS_PATH required` | Missing or commented-out cert vars | Generate certs (see above). |
| `account not found` | Unfunded signer | Use [Mocha faucet](https://faucet.celestia-mocha.com). |
| `blob: not found` | Wrong commitment | Run `blob.GetAll` to find the real one. |
| `grpc-status header missing` | Invalid gRPC URL | Must be `https://:9090`, no token. |
## ✅ You’re done
You’re running **private blockspace** end-to-end using hosted infrastructure.
✅ No local Celestia node
✅ Fully containerized
✅ Encrypted data posted to Celestia
---
Title: Client Libraries
URL: https://docs.celestia.org/build/rpc/clients.md
Source: app/build/rpc/clients/page.mdx
---
# Client Libraries
Celestia Node API can be accessed through various client libraries in different programming languages.
## Official Clients
### Golang Client
Official Go implementation of the Celestia Node RPC client and Transaction Client
- **Repository**: [celestiaorg/celestia-node @ /api/client](https://github.com/celestiaorg/celestia-node/tree/main/api/client)
- **Tutorial**: [Go Client Tutorial](/build/post-retrieve-blob/client/go/) - Learn how to submit and retrieve blobs without running your own node
### Rust Client
Official Rust implementation of the Celestia Node RPC client (Lumina)
- **Repository**: [celestiaorg/lumina](https://github.com/celestiaorg/lumina)
- **Tutorial**: [Rust Client Tutorial](/build/post-retrieve-blob/client/rust/) - Submit and retrieve blobs using the Lumina Rust client
## Community Clients
### Python Client
Community-maintained Python client for the Celestia Node RPC API
- **Repository**: [grumpyp/celestia-node-client-py](https://github.com/grumpyp/celestia-node-client-py)
### TypeScript Client
Community-maintained TypeScript/JavaScript client for the Celestia Node RPC API
- **Repository**: [ashishbhintade/cntsc](https://github.com/ashishbhintade/cntsc)
## Getting Started
Each client library provides methods to interact with the Celestia Node RPC API. Choose the language that best fits your project requirements.
For API reference and method documentation, see the [Node API](/build/rpc/node-api) section.
---
Title: Node API
URL: https://docs.celestia.org/build/rpc/node-api.md
Source: app/build/rpc/node-api/page.mdx
---
# Node API
## Celestia Node API
The Celestia Node API is the collection of RPC methods that can be used to interact with the services provided by Celestia Data Availability Nodes. Node API uses auth tokens to control access to this API.
Celestia node RPC reference for blob, blobstream, da, das, fraud, header, node, p2p, share, and state packages. Includes methods like blob.Get, blob.GetAll, blob.GetProof, blob.Submit, share.GetShare, share.GetRange, share.GetNamespaceData, share.GetEDS, share.SharesAvailable, state.SubmitPayForBlob, state.Balance, state.Transfer, header.NetworkHead, header.GetByHeight, header.Subscribe, p2p.Peers, p2p.Connect, p2p.Info, da.Submit, da.Validate, da.GetProofs, das.SamplingStats, node.AuthNew, node.Info, blobstream.GetDataRootTupleInclusionProof, fraud.Subscribe.
---
Title: Arbitrum Nitro with Celestia DA
URL: https://docs.celestia.org/build/stacks/nitro-das-server.md
Source: app/build/stacks/nitro-das-server/page.mdx
---
# Arbitrum Nitro with Celestia DA
## Overview
The Arbitrum Nitro integration with Celestia enables Orbit chains to use Celestia for data availability instead of Arbitrum AnyTrust. The implementation uses a sidecar architecture where a separate `celestia-server` handles Celestia-specific operations via RPC.
## How it works
Nitro's batch poster coordinates with the Celestia DAS server to store batch data:
1. **Batch posting**: The [`MaybePostSequencerBatch`](https://github.com/celestiaorg/nitro/blob/v3.6.8/arbnode/batch_poster.go#L1675) method checks if a DAS writer is configured and acquires a lock before posting
2. **Data storage**: The DAS writer calls the Celestia server's [`Store`](https://github.com/celestiaorg/nitro-das-celestia/blob/main/daserver/celestia.go#L302) method, which:
- Creates a blob from the batch data
- Submits it to Celestia with retry logic and gas price adjustment
- Returns a `BlobPointer` containing block height, share indices, and data commitments
3. **Verification**: During disputes, Blobstream (default: SP1 Blobstream) confirms batch availability on Celestia, supporting fraud proofs through the hash oracle trick
## Key features
- **Sidecar architecture**: Processing logic handled by separate `celestia-server`, keeping Nitro nodes lightweight
- **Fallback support**: Native fallback mechanism with configurable `da-preference` parameter (e.g., `["celestia", "anytrust"]`)
- **Preimage oracle**: Validators populate preimage mappings with Celestia hashes for fraud proof support
- **Robust submission**: Automatic retry with gas price adjustment for network congestion
## Resources
- [Nitro fork repository](https://github.com/celestiaorg/nitro)
- [Celestia DAS server](https://github.com/celestiaorg/nitro-das-celestia)
---
Title: How to run op-alt-da with AWS KMS
URL: https://docs.celestia.org/build/stacks/op-alt-da/aws-kms-guide.md
Source: app/build/stacks/op-alt-da/aws-kms-guide/page.mdx
---
# How to run op-alt-da with AWS KMS
## Overview
This guide walks through running [op-alt-da](https://github.com/celestiaorg/op-alt-da) (da-server) using a Celestia key stored in Amazon Web Services (AWS) key management service (KMS). You will use the localstack, a mock of AWS, to learn how to run the da-server. Once you've done this, you can log in to AWS and use your private key in [prod](#production-aws).
## Prerequisites
- Docker
- Go 1.21+
- A Celestia RPC endpoint from [Quicknode](https://quicknode.com/)
## Getting started
## Production (AWS)
For production AWS KMS usage:
1. Create a KMS keypair in AWS with key spec `ECC_SECG_P256K1` and key usage `SIGN_VERIFY`.
2. Create an alias for your key (e.g., `alias/op-alt-da/my_celes_key`). Per AWS requirements, the alias name must start with `alias/`.
3. Configure your IAM policy with the minimum required permissions:
```json
{
"Version": "2012-10-17",
"Statement": [
{
"Effect": "Allow",
"Action": [
"kms:GetPublicKey",
"kms:Sign"
],
"Resource": "arn:aws:kms:REGION:ACCOUNT_ID:key/KEY_ID"
}
]
}
```
4. Update your `config.toml`:
```toml
[celestia]
keyring_backend = "awskms"
default_key_name = "alias/op-alt-da/my_celes_key"
[celestia.awskms]
region = "us-east-2"
endpoint = ""
```
Note: Leave `endpoint` empty for production AWS. The `default_key_name` must include the full alias path (e.g., `alias/my_celes_key` or `alias/op-alt-da/my_celes_key`).
---
Title: Introduction
URL: https://docs.celestia.org/build/stacks/op-alt-da/introduction.md
Source: app/build/stacks/op-alt-da/introduction/page.mdx
---
# Introduction
## Overview
The OP Stack integration with Celestia enables rollups to post transaction data to Celestia instead of Ethereum, while still settling on Ethereum. This reduces costs and improves scalability by using Celestia as a modular data availability layer.
## How it works
The `op-batcher` component batches rollup blocks and submits them to Celestia rather than posting calldata to Ethereum:
1. **Data submission**: The batcher calls [`publishTxToL1`](https://github.com/ethereum-optimism/optimism/blob/develop/op-batcher/batcher/driver.go#L931) which retrieves batch data from the channel manager
2. **Celestia storage**: For Celestia-enabled chains, [`celestia_storage.Put`](https://github.com/celestiaorg/op-alt-da/blob/main/celestia_storage.go#L200) submits the blob to Celestia using a configured namespace
3. **Commitment recording**: A commitment identifier (version byte + blob ID) is generated and recorded on Ethereum
4. **Data retrieval**: When `op-node` needs data, it reads the commitment from Ethereum, then fetches the actual blob from Celestia
## Celestia fork differences
The [Celestia fork](https://github.com/celestiaorg/optimism/blob/celestia-develop/op-batcher/batcher/driver.go#L1092) of OP Stack includes:
- Direct blob submission to Celestia with namespace-based organization
- Fallback mechanisms for DA failures (supporting both blob data and calldata alternatives)
- Commitment-based references using Celestia block heights
## Resources
- [op-alt-da repository](https://github.com/celestiaorg/op-alt-da)
- [Celestia OP Stack fork](https://github.com/celestiaorg/optimism)
---
Title: App
URL: https://docs.celestia.org/index.md
Source: app/page.mdx
---
Celestia docs
Celestia is the modular blockchain powering unstoppable apps with full-stack
control.
---
Title: Audits
URL: https://docs.celestia.org/learn/audits.md
Source: app/learn/audits/page.mdx
---
# Audits
This page provides a comprehensive list of audits conducted on various Celestia software, including OP Stack, Nitro, celestia-app, Blobstream, and more. Each audit is linked to its respective report.
| Software | Auditor | Link |
| -------------------------- | ---------------- | -------------------------------------------------------------------------------------------------------------------------- |
| OP Stack | OtterSec | [Link](https://docs.celestia.org/audits/Celestia_OP_Stack_Audit.pdf) |
| Nitro | OtterSec | [Link](https://github.com/celestiaorg/nitro/blob/celestia-v2.3.3/audits/celestia/arbitrum_nitro_celestia_audit_report.pdf) |
| v2 celestia-app Lemongrass | Informal Systems | [Link](https://github.com/celestiaorg/celestia-app/blob/main/docs/audit/informal-systems-v2.pdf) |
| v3 celestia-app | Informal Systems | [Link](https://github.com/celestiaorg/celestia-app/blob/main/docs/audit/informal-systems-authored-blobs.pdf) |
| Blobstream SP1 | OtterSec | [Link](https://docs.celestia.org/audits/SP1_Blobstream_Ottersec_Audit.pdf) |
| Blobstream SP1 | Multiple | [Link](https://github.com/succinctlabs/sp1/tree/dev/audits) |
| Blobstream X | Informal Systems | [Link](https://docs.celestia.org/audits/Blobstream_X-Informal_Systems_Audit.pdf) |
| Blobstream X | OtterSec | [Link](https://docs.celestia.org/audits/Blobstream_X-OtterSec_Audit.pdf) |
| Blobstream X | Veridise | [Link](https://docs.celestia.org/audits/Blobstream_X-Veridise_Audit.pdf) |
| Blobstream X | Zellic | [Link](https://docs.celestia.org/audits/Blobstream_X-Zellic_Audit.pdf) |
| Shwap | OtterSec | [Link](https://docs.celestia.org/audits/celestia_shwap_audit_final.pdf) |
| High throughput recovery | Informal Systems | [Link](https://github.com/celestiaorg/celestia-app/blob/main/docs/audit/informal-systems-recovery.pdf) |
---
Title: Blobstream
URL: https://docs.celestia.org/learn/blobstream.md
Source: app/learn/blobstream/page.mdx
---
# Blobstream
[Blobstream](https://blog.celestia.org/introducing-blobstream/)
allows Ethereum developers to build high-throughput L2s using Celestia,
the first DA layer with Data Availability Sampling.
This section covers Blobstream and how validators on Celestia can run it.
If you're looking to learn more, you can view
[the `orchestrator-relayer` repository](https://github.com/celestiaorg/orchestrator-relayer),
and [read more about Blobstream](https://github.com/celestiaorg/blobstream-contracts#how-it-works).
## Overview
Blobstream consists of two components: an [orchestrator](/operate/blobstream/orchestrator)
and a [relayer](/operate/blobstream/relayer).
In the following diagram, we show how a layer 2 would post data to
Celestia and then verify that it was published in the target EVM chain.
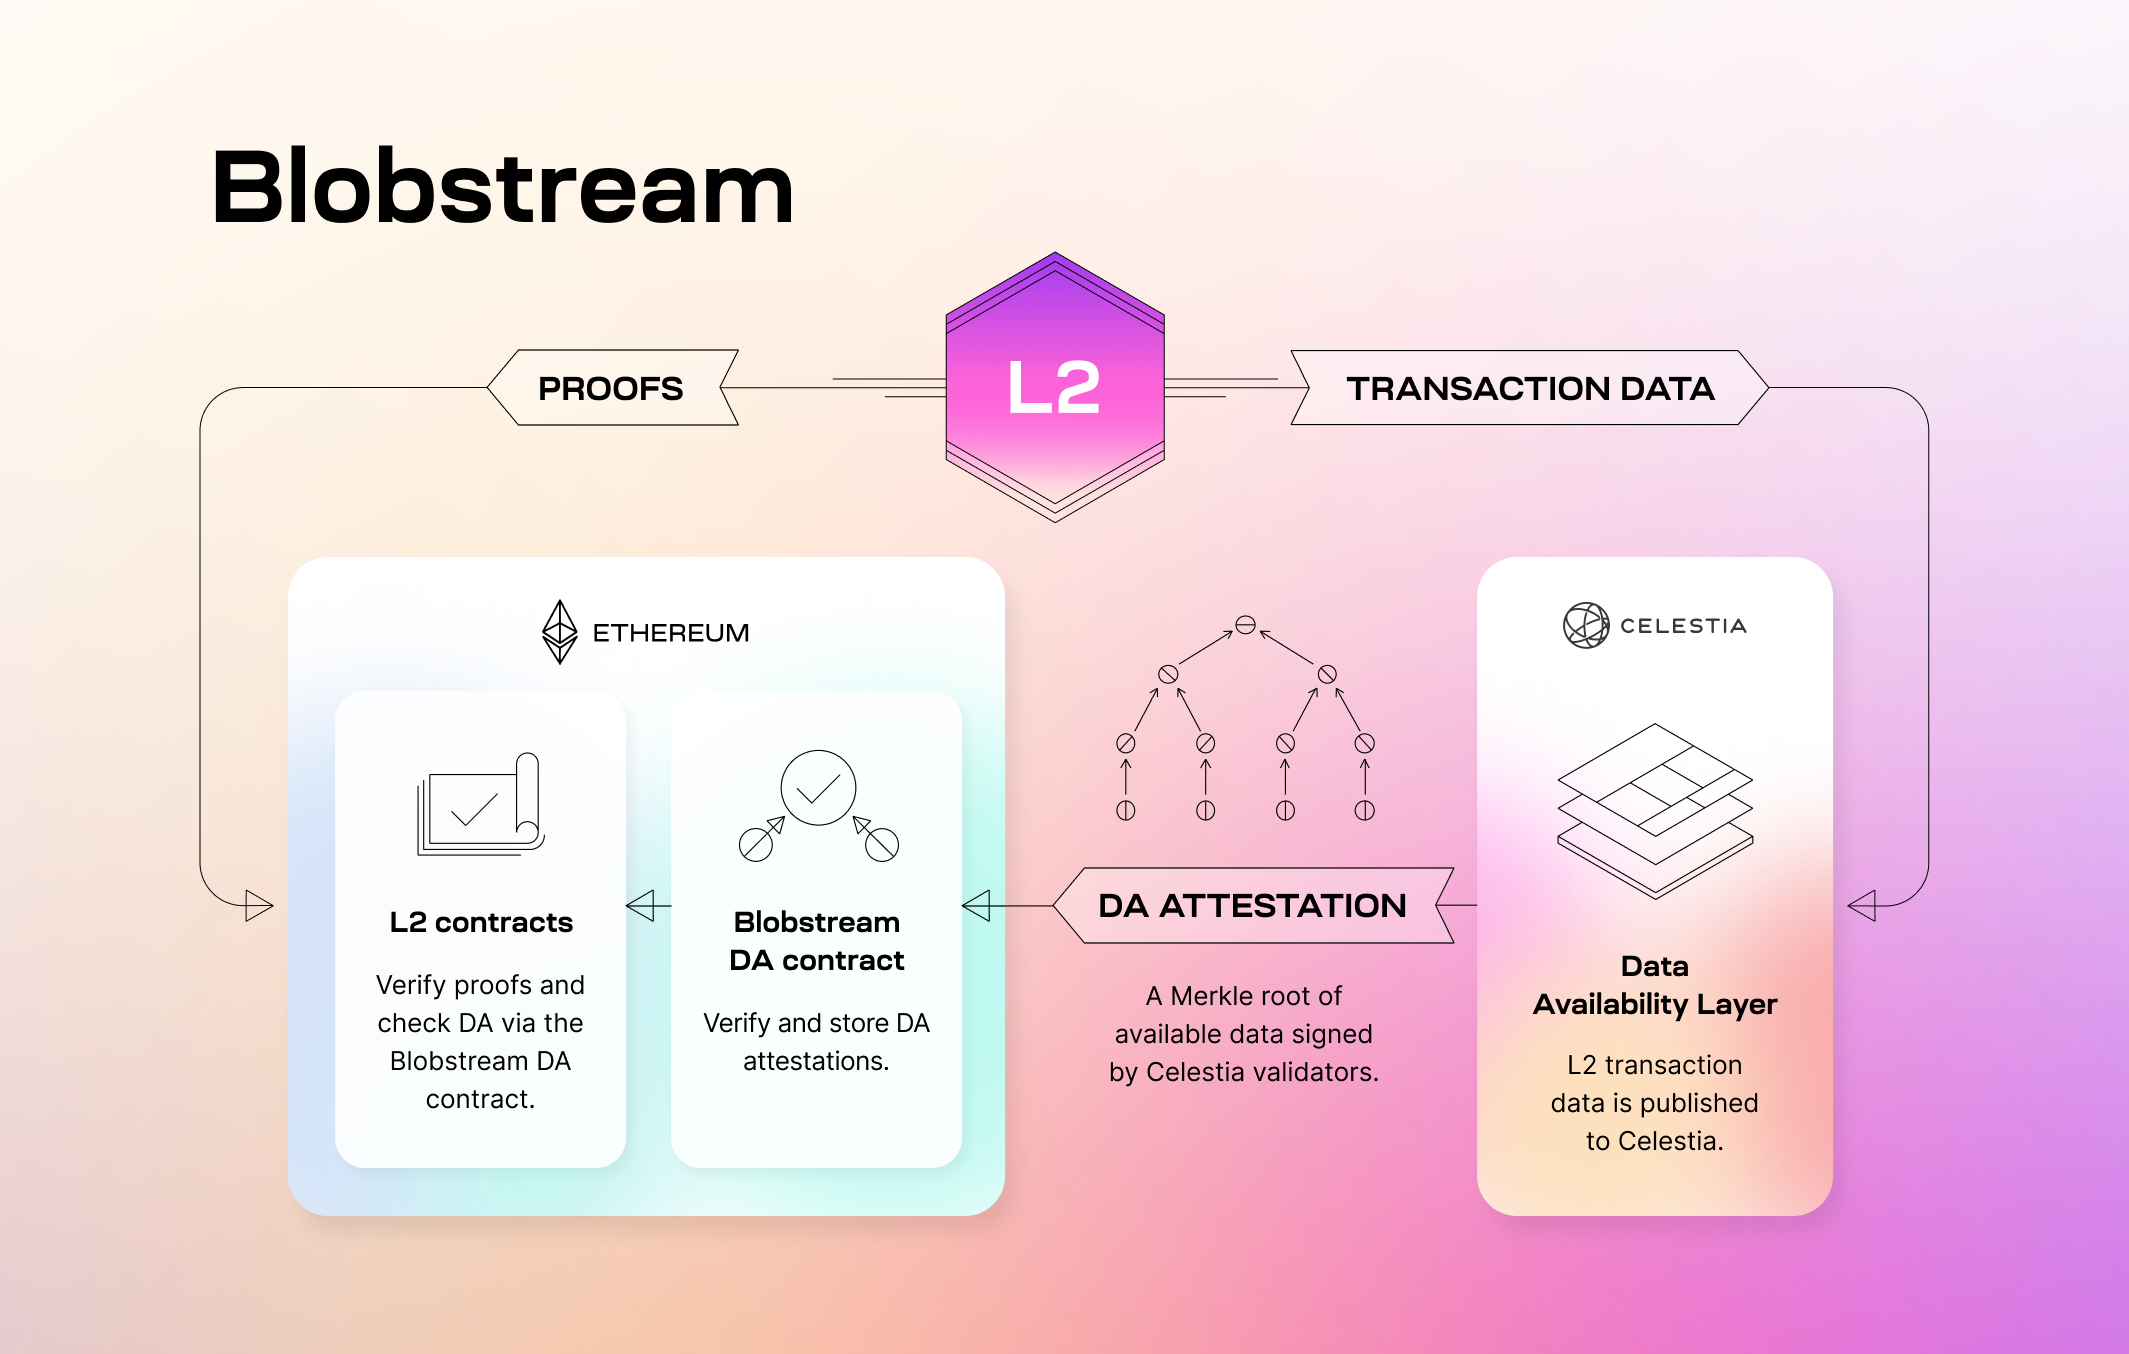
Data is first attested to by the Celestia validator set—they sign commitments to the data. Then, these signatures are relayed to the target EVM chain (in this case, Ethereum). Finally, the layer 2, or any party, can verify that the data was published to Celestia directly on the EVM chain via the Blobstream smart contract. You can reference [the Blobstream smart contract](https://github.com/celestiaorg/blobstream-contracts/blob/v3.0.0/src/Blobstream.sol).
The specification of Blobstream `Valset`s, which track the Celestia validator set changes, can be found in [ADR 002](https://github.com/celestiaorg/celestia-app/blob/main/docs/architecture/adr-002-qgb-valset.md).
Blobstream data commitments, which represent commitments over sets of blocks defined by a data commitment window, are discussed more in-depth in [ADR 003](https://github.com/celestiaorg/celestia-app/blob/main/docs/architecture/adr-003-qgb-data-commitments.md).
The orchestrator is part of the validator setup and works as follows:
- **Celestia App**: Creates an attestation on the state machine level that needs to be signed
- **The orchestrator**: Queries the attestation, signs it, then submits the signature to the Blobstream P2P network
The diagram below illustrates this process:
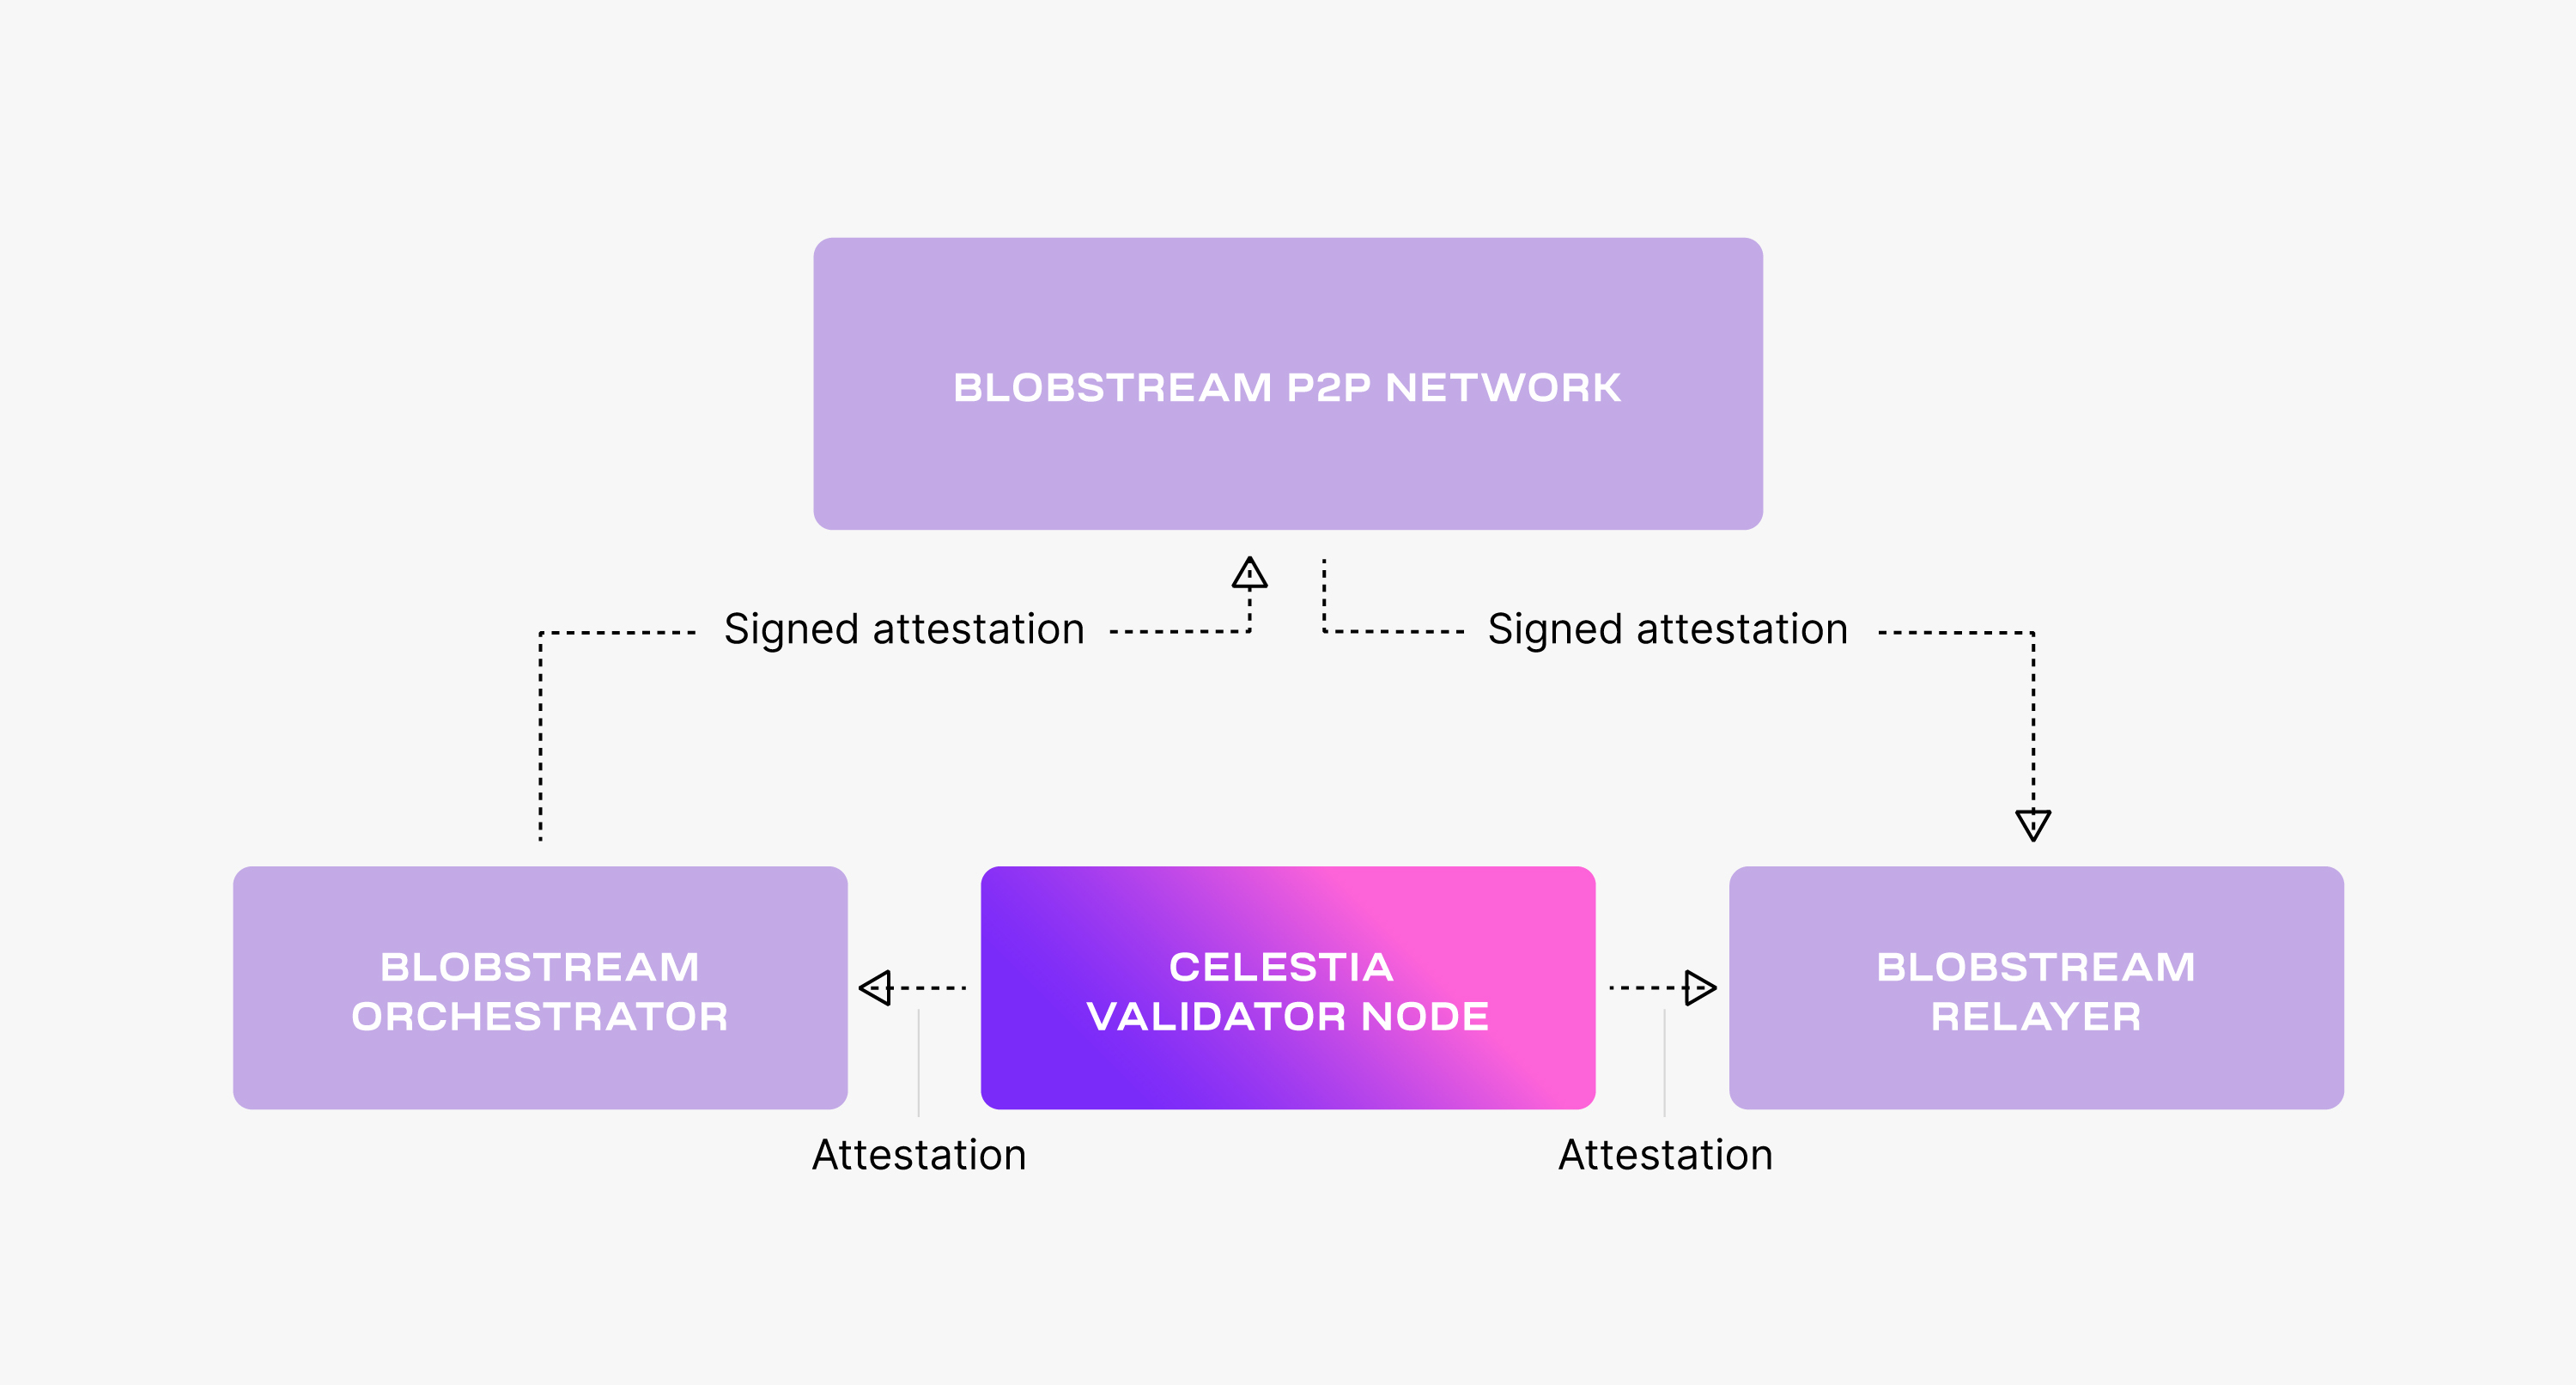
The relayer submits the attestations' signatures from the Blobstream P2P network to the target EVM chain.
> **Note:** If the contract is still not deployed, it needs to be deployed before it's used by the relayer. Check the [deployment documentation](/operate/blobstream/deploy-contract) for more details.
The diagram below illustrates the relayer process:
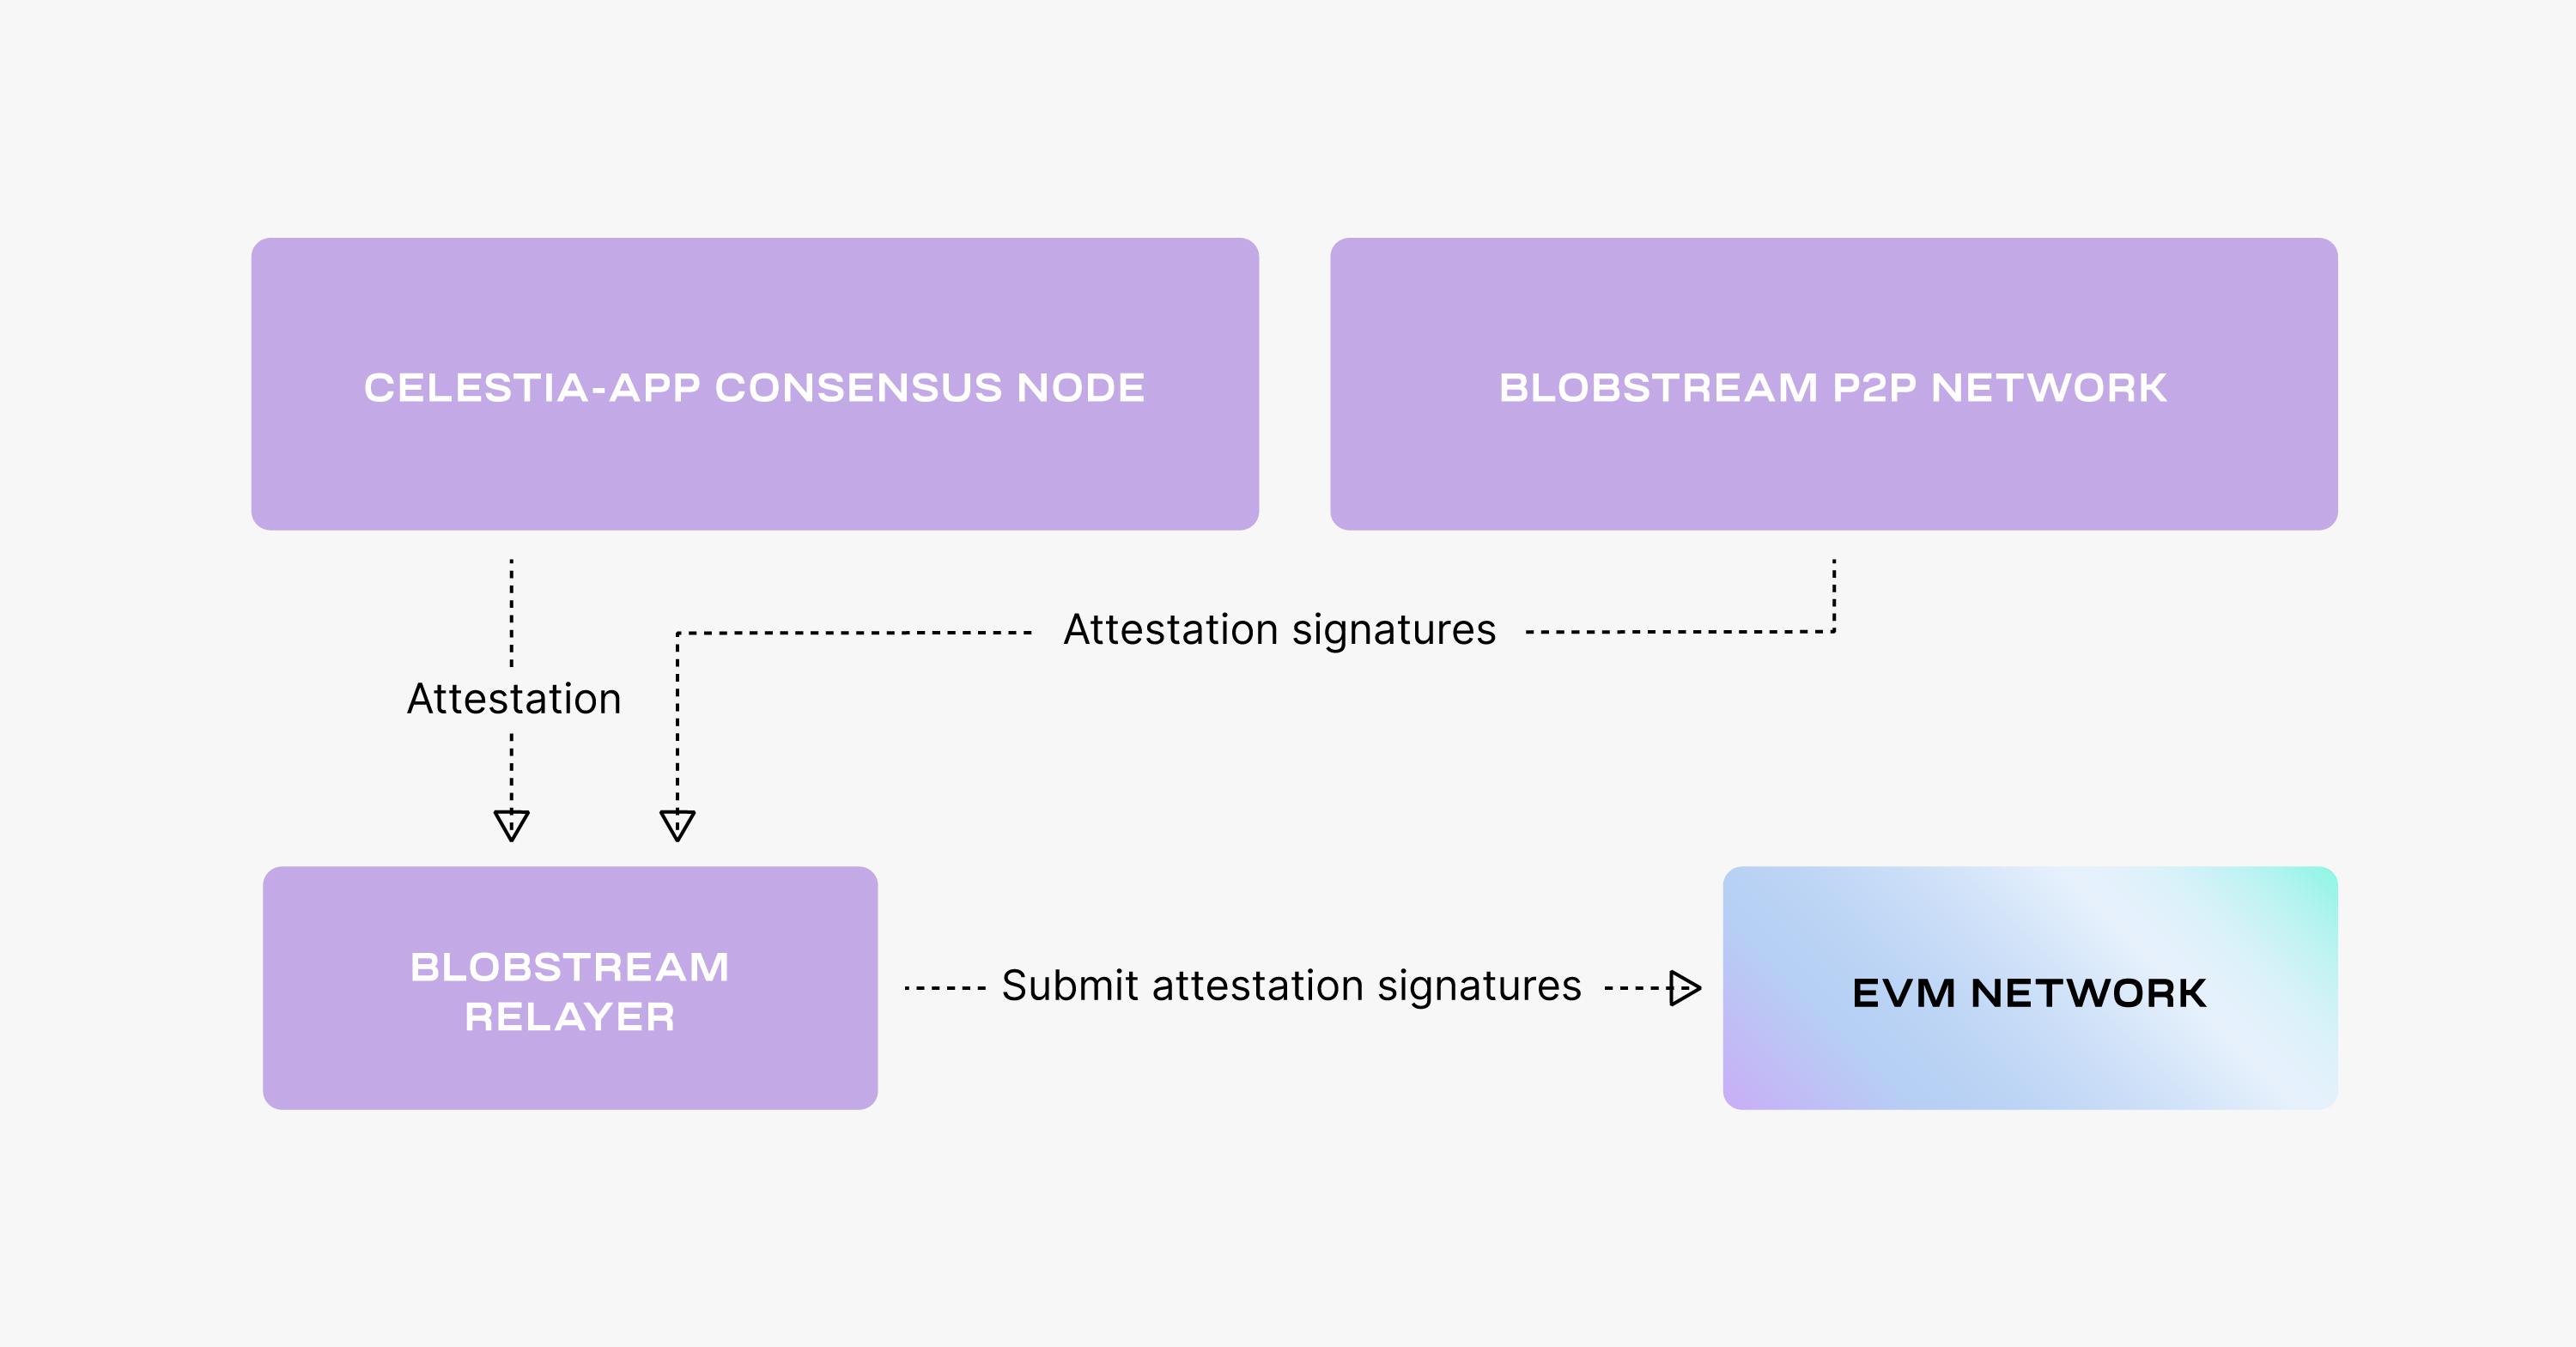
You can learn more about the mechanics behind the relayer in [ADR 004](https://github.com/celestiaorg/celestia-app/blob/main/docs/architecture/adr-004-qgb-relayer-security.md).
## Blobstream vs Data Availability Committees (DACs)
### Decentralization and security
Blobstream is built on Celestia, which uses a CometBFT-based proof-of-stake system. An incorrect data availability attestation in this system will ultimately be penalized (currently not implemented), ensuring validators act in good faith. Thus, Blobstream shares the same security assumptions as Celestia.
In contrast, data availability committees (DACs) are typically centralized or semi-centralized, relying on a specific set of entities or individuals to vouch for data availability.
### Mechanism of verification
Blobstream uses data availability attestations, which are Merkle roots of the batched L2 data, to confirm that the necessary data is present on Celestia. The L2 contract on Ethereum can check directly with Blobstream if the data is published on Celestia.
Similarly, a DAC would rely on attestations or confirmations from its permissioned members.
### Flexibility and scalability
Blobstream is designed to offer high-throughput data availability for Ethereum L2s, aiming to strike a balance between scalability and security. It operates independently of Ethereum's gas costs, as Celestia's resource pricing is more byte-focused rather than computation-centric.
On the other hand, the scalability and flexibility of a DAC would depend on its specific design and implementation.
In summary, both Blobstream and DACs aim to ensure offchain data availability, but Blobstream offers a more decentralized, secure, and scalable solution compared to the potential centralized nature of DACs.
## Build with Blobstream
If you are a developer looking to build on top of Blobstream, check out the [Build section](/build/blobstream/integrate-contracts).
## Operate Blobstream
If you are a validator or node operator looking to run Blobstream, check out the [Operate section](/operate/blobstream/install-binary) to learn how to deploy your own instance.
---
Title: Data availability FAQ
URL: https://docs.celestia.org/learn/celestia-101/data-availability-faq.md
Source: app/learn/celestia-101/data-availability-faq/page.mdx
---
# Data availability FAQ
# What is data availability?
Data availability is about proving that a block's transactions have been published to the network. In most chains this means downloading all transaction data for a new block; in Celestia, light nodes can answer this question via DAS without full downloads.
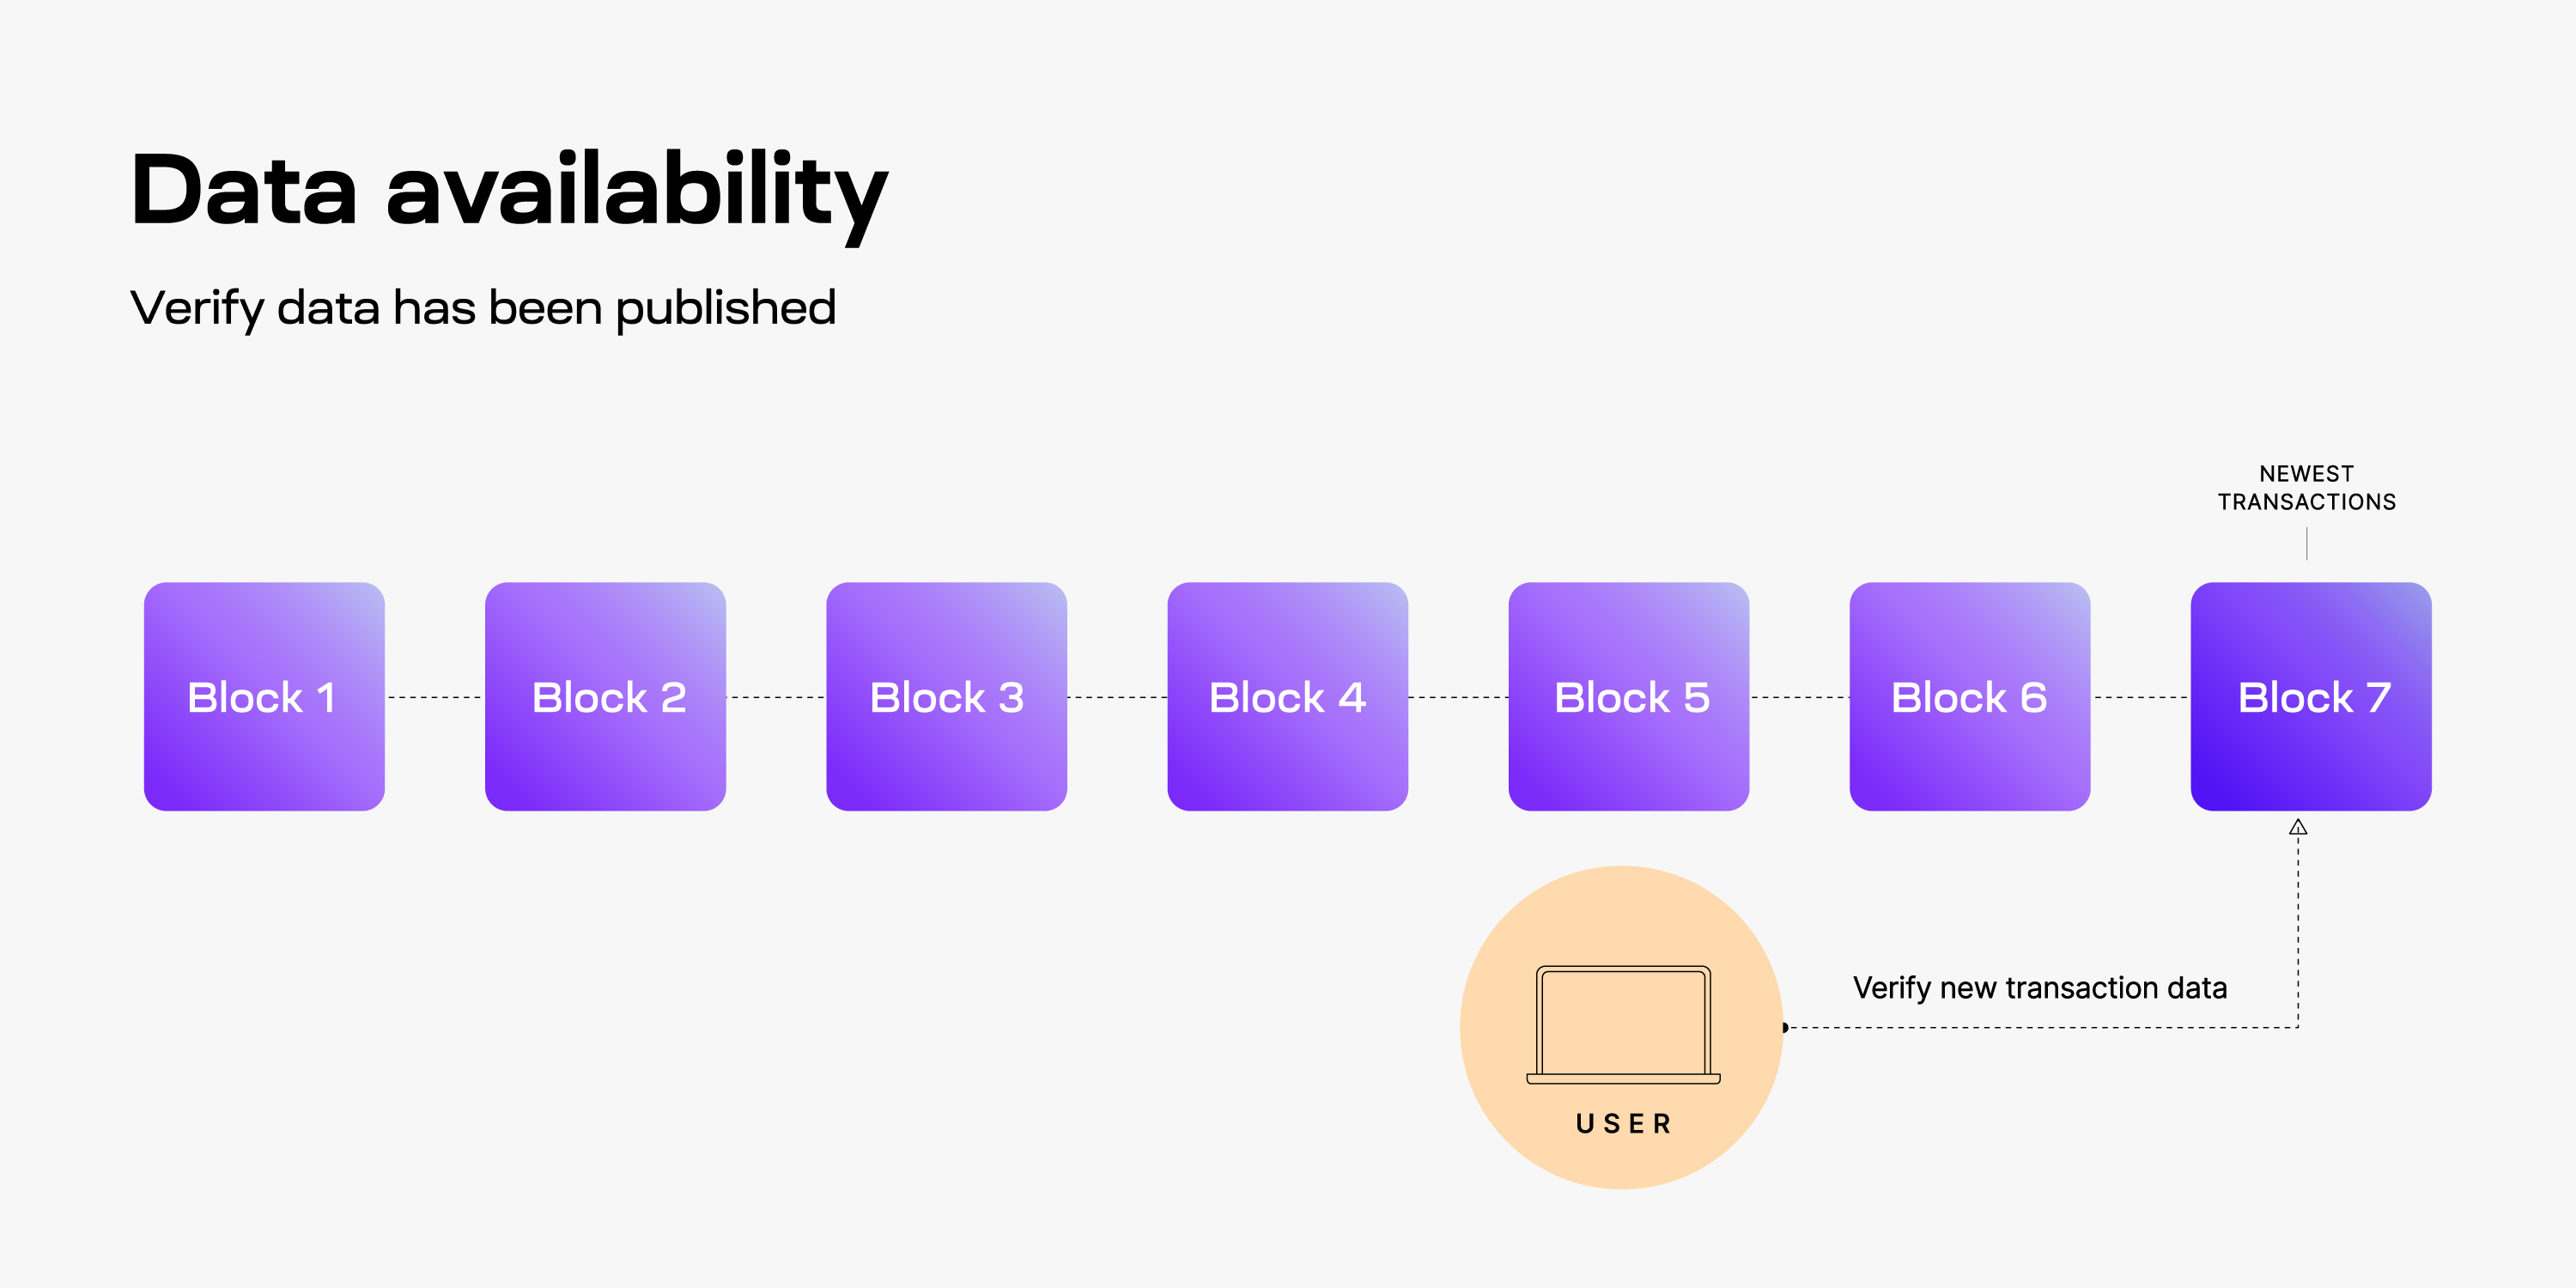
## What is the data availability problem?
If a block producer withholds data for a proposed block (a data withholding attack), other nodes cannot update state or verify the chain. The risk varies by architecture—for example, rollups and validiums are especially sensitive.
## How do nodes verify data availability in Celestia?
Full nodes can download entire blocks as usual. Light nodes leverage DAS: they request random shares with Merkle proofs from the extended data matrix. See [Data availability sampling](#data-availability-sampling-das) for details.
## What is data availability sampling?
DAS lets light nodes make repeated random sampling requests for small portions of a block. As more samples succeed, confidence that the full block is available rises (e.g., to 99%+). A simple analogy is coin flips: enough successful flips (samples) give high confidence the data exists.
## What security assumptions does DAS rely on?
- Enough light nodes sample for the given block size so an honest bridge node can reconstruct the full block from their collected shares.
- Light nodes connect to at least one honest bridge node to receive fraud proofs for incorrectly erasure-coded blocks; eclipse attacks can break this assumption.
## Why is block reconstruction necessary for security?
Blocks are erasure coded; malicious encoders could extend data incorrectly. Bridge nodes need the full block to produce fraud proofs of bad encoding. If only light nodes receive data and bridge nodes cannot reconstruct the block, the network could miss invalid encoding.
## What is data storage and how is it different?
Data storage concerns keeping and retrieving historical transaction data. The security assumption for storage is 1-of-N honesty—only one honest keeper of history is needed—while data availability is about new blocks being publishable and verifiable.
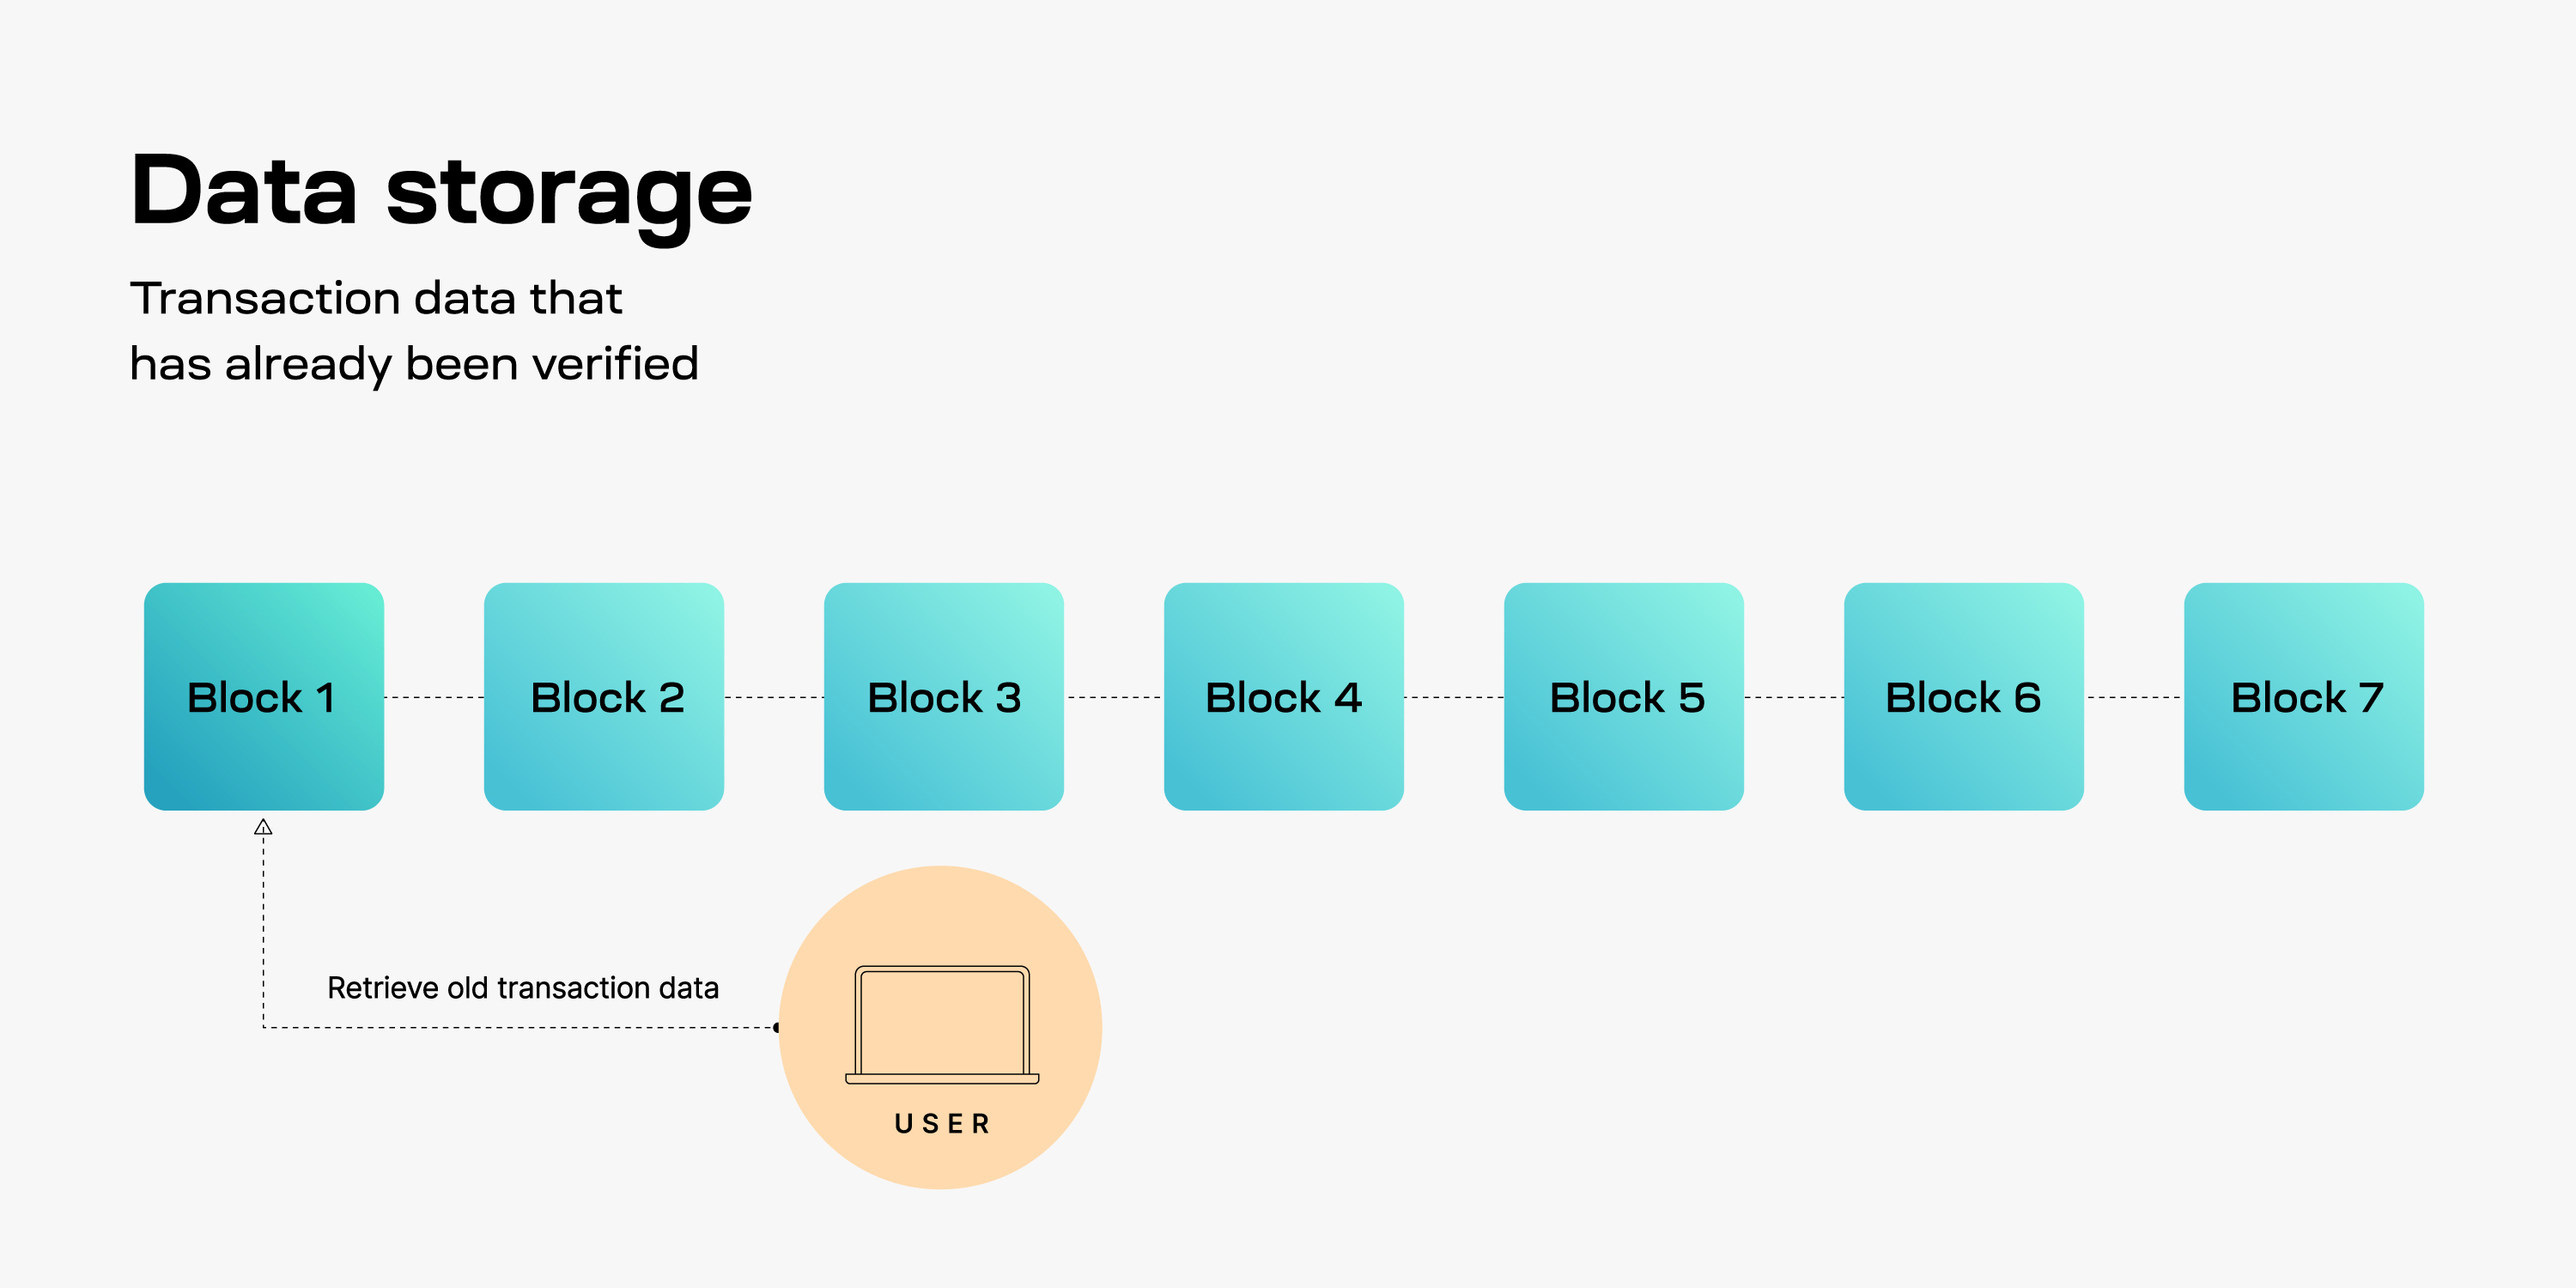
## What problems arise around data storage?
If historical data cannot be retrieved, users may lose access to transaction history and nodes cannot sync from genesis. This is a retrieval problem, not an availability problem.
## Where does blockchain state fit into this?
State (balances, contract storage, validator set) is a snapshot derived from transaction data. Its growth poses different challenges than DA or data retrieval.
## Why doesn’t Celestia incentivize storing historical data?
Guaranteeing permanent storage is not the DA layer’s role, and storage needs only 1-of-N honest providers. Celestia focuses on securely publishing data; third parties store history based on their incentives.
## Who might store historical data?
- Block explorers serving past transactions
- Indexers with query APIs
- Applications or rollups needing history for processes
- Users who want their own transaction history
## How can chains improve data retrievability?
- Reward nodes for storing and serving data (e.g., storage networks like [Filecoin](https://filecoin.io)).
- Publish transaction data to an incentivized storage layer.
- Offer paid archival access or snapshots so others can sync from known good data.
---
Title: Celestia's data availability layer
URL: https://docs.celestia.org/learn/celestia-101/data-availability.md
Source: app/learn/celestia-101/data-availability/page.mdx
---
# Celestia's data availability layer
Data availability (DA) answers a simple question: **has this block's data been published and can it be downloaded? In other words, is the data available?** When a node receives a new block, it must be able to retrieve the associated transaction data; otherwise, the chain can stall or be exploited. Celestia provides a modular DA layer so light nodes can verify availability efficiently without downloading whole blocks.
## tl;dr
1. Celestia is a modular data availability network: it orders blobs and keeps them available while execution and settlement live on layers above.
2. It scales by decoupling execution from consensus and using data availability sampling (DAS) so light nodes can verify availability without downloading whole blocks; more light nodes sampling safely unlocks larger block sizes.
3. Namespaced Merkle trees (NMTs) let each app fetch only its own namespaced data and prove availability.
4. Block producers erasure-code blobs into a $2k \times 2k$ matrix, commit to every row and column, and put that root in the header.
5. Light nodes sample within a rolling window; archival nodes (or providers) keep older data retrievable.
Celestia is a data availability (DA) layer that provides a
scalable solution to the [data availability problem](https://coinmarketcap.com/academy/article/what-is-data-availability).
Due to the permissionless nature of the blockchain networks,
a DA layer must provide a mechanism for the execution and settlement
layers to check in a trust-minimized way whether transaction data is indeed available.
Two key features of Celestia's DA layer are [data availability sampling](https://blog.celestia.org/celestia-mvp-release-data-availability-sampling-light-clients)
(DAS) and [Namespaced Merkle trees](https://github.com/celestiaorg/nmt) (NMTs).
Both features are novel blockchain scaling solutions: DAS enables light
nodes to verify data availability without needing to download an entire block;
NMTs enable execution and settlement layers on Celestia to download transactions
that are only relevant to them.
## Data availability sampling (DAS)
In general, light nodes download only block headers that contain
commitments (_i.e._, Merkle roots) of the block data (_i.e._, the list of transactions).
To make DAS possible, Celestia uses a 2-dimensional Reed-Solomon
encoding scheme to encode the block data: every block data is split
into $k \times k$ shares, arranged in a $k \times k$ matrix, and extended with parity
data into a $2k \times 2k$ extended matrix by applying multiple
times Reed-Solomon encoding.
Then, $4k$ separate Merkle roots are computed for the rows and columns
of the extended matrix; the Merkle root of these Merkle roots is used
as the block data commitment in the block header.
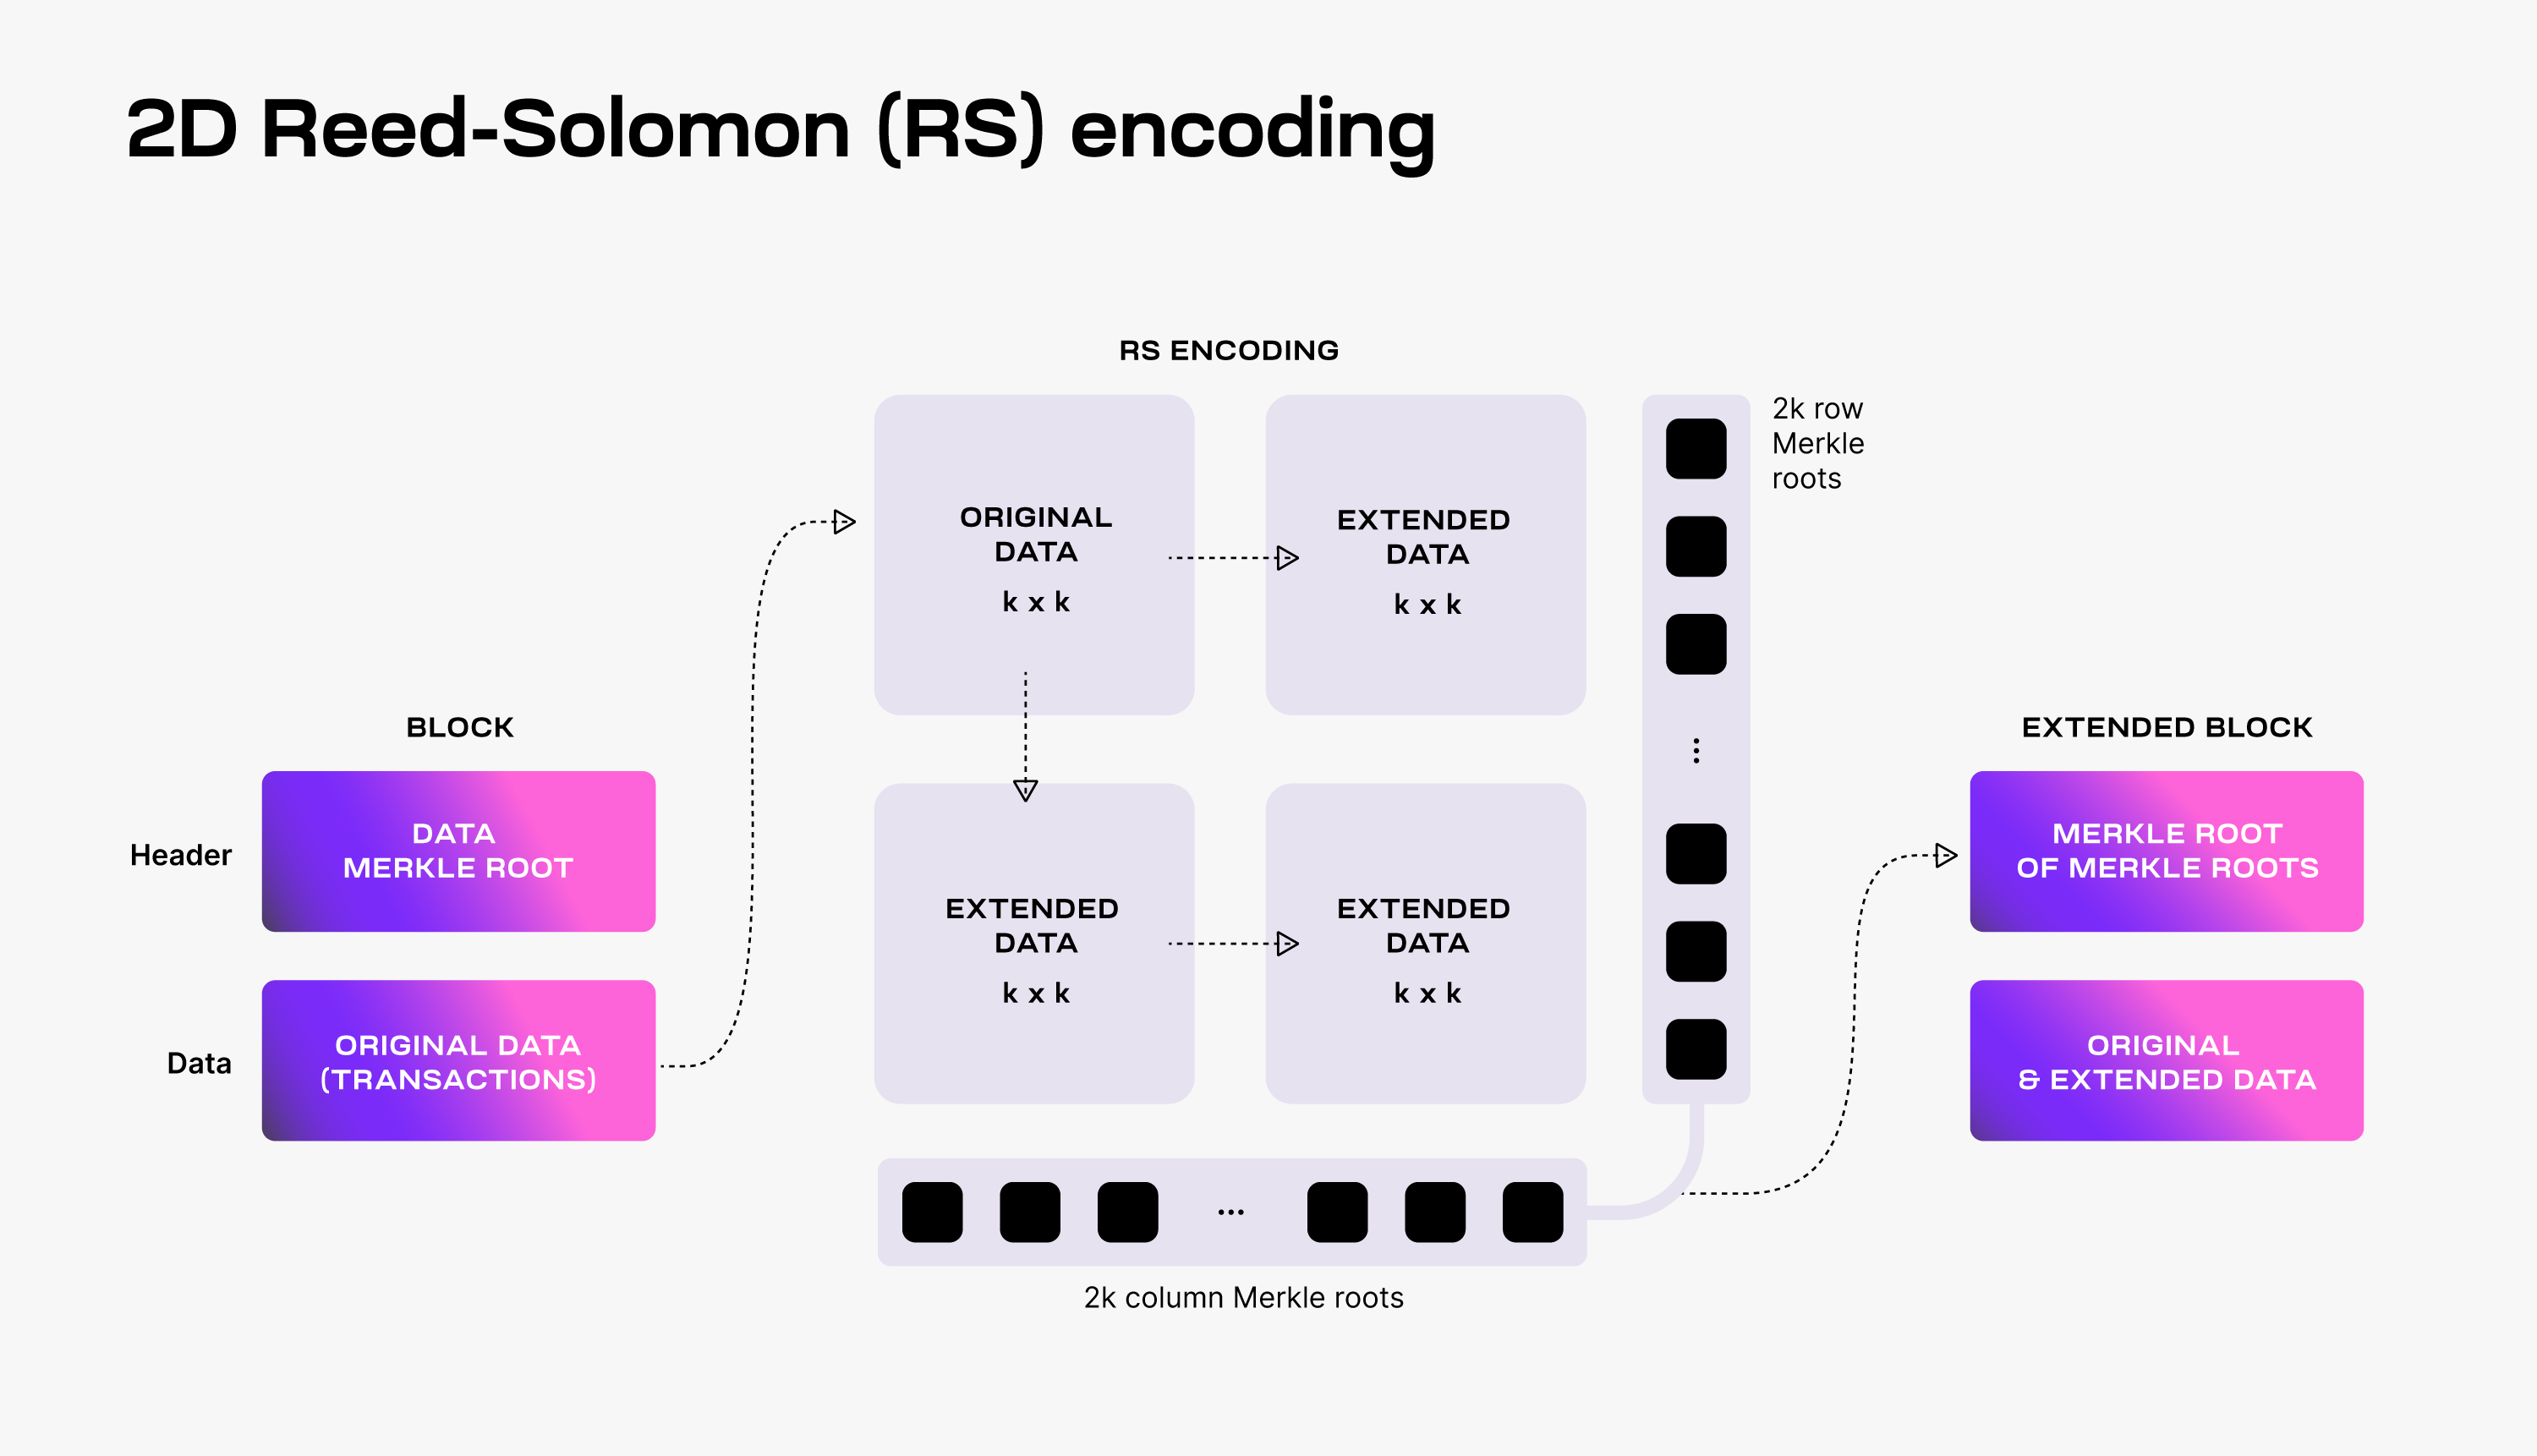
To verify that the data is available, Celestia light nodes are sampling
the $2k \times 2k$ data shares.
Every light node randomly chooses a set of unique coordinates in the
extended matrix and queries bridge nodes for the data shares and the
corresponding Merkle proofs at those coordinates. If light nodes
receive a valid response for each sampling query, then there is a
[high probability guarantee](https://github.com/celestiaorg/celestia-node/issues/805#issuecomment-1150081075)
that the whole block's data is available.
Additionally, every received data share with a correct Merkle proof
is gossiped to the network. As a result, as long as the Celestia light
nodes are sampling together enough data shares (_i.e._, at least
$k \times k$ unique shares),
the full block can be recovered by honest bridge nodes.
For more details on DAS, take a look at the [original paper](https://arxiv.org/abs/1809.09044).
### Scalability
DAS enables Celestia to scale the DA layer. DAS can be performed by
resource-limited light nodes since each light node only samples a small
portion of the block data. The more light nodes there are in the network,
the more data they can collectively download and store.
This means that increasing the number of light nodes performing DAS allows
for larger blocks (_i.e._, with more transactions), while still keeping DAS
feasible for resource-limited light nodes. However, in order to validate
block headers, Celestia light nodes need to download the $4k$ intermediate
Merkle roots.
For a block data size of $n^2$ bytes, this means that every light node must
download $O(n)$ bytes. Therefore, any improvement in the bandwidth capacity
of Celestia light nodes has a quadratic effect on the throughput of Celestia's
DA layer.
### Fraud proofs of incorrectly extended data
The requirement of downloading the $4k$ intermediate Merkle roots is a
consequence of using a 2-dimensional Reed-Solomon encoding scheme. Alternatively,
DAS could be designed with a standard (_i.e._, 1-dimensional) Reed-Solomon encoding,
where the original data is split into $k$ shares and extended with $k$ additional
shares of parity data. Since the block data commitment is the Merkle root of the
$2k$ resulting data shares, light nodes no longer need to download $O(n)$ bytes to
validate block headers.
The downside of the standard Reed-Solomon encoding is dealing with malicious
block producers that generate the extended data incorrectly.
This is possible as **Celestia does not require a majority of the consensus
(_i.e._, block producers) to be honest to guarantee data availability.**
Thus, if the extended data is invalid, the original data might not be
recoverable, even if the light nodes are sampling sufficient unique shares
(_i.e._, at least $k$ for a standard encoding and $k \times k$ for a
2-dimensional encoding).
As a solution, _Fraud Proofs of Incorrectly Generated Extended Data_ enable
light nodes to reject blocks with invalid extended data. Such proofs require
reconstructing the encoding and verifying the mismatch. With standard Reed-Solomon
encoding, this entails downloading the original data, _i.e._, _n²_ bytes.
Contrastingly, with 2-dimensional Reed-Solomon encoding, only $O(n)$ bytes are
required as it is sufficient to verify only one row or one column of the
extended matrix.
## Namespaced Merkle trees (NMTs)
Celestia partitions the block data into multiple namespaces, one for
every application (e.g., rollup) using the DA layer. As a result, every
application needs to download only its own data and can ignore the data
of other applications.
For this to work, the DA layer must be able to prove that the provided
data is complete, _i.e._, all the data for a given namespace is returned.
To this end, Celestia is using Namespaced Merkle trees (NMTs).
An NMT is a Merkle tree with the leaves ordered by the namespace identifiers
and the hash function modified so that every node in the tree includes the
range of namespaces of all its descendants. The following figure shows an
example of an NMT with height three (_i.e._, eight data shares). The data is
partitioned into three namespaces.
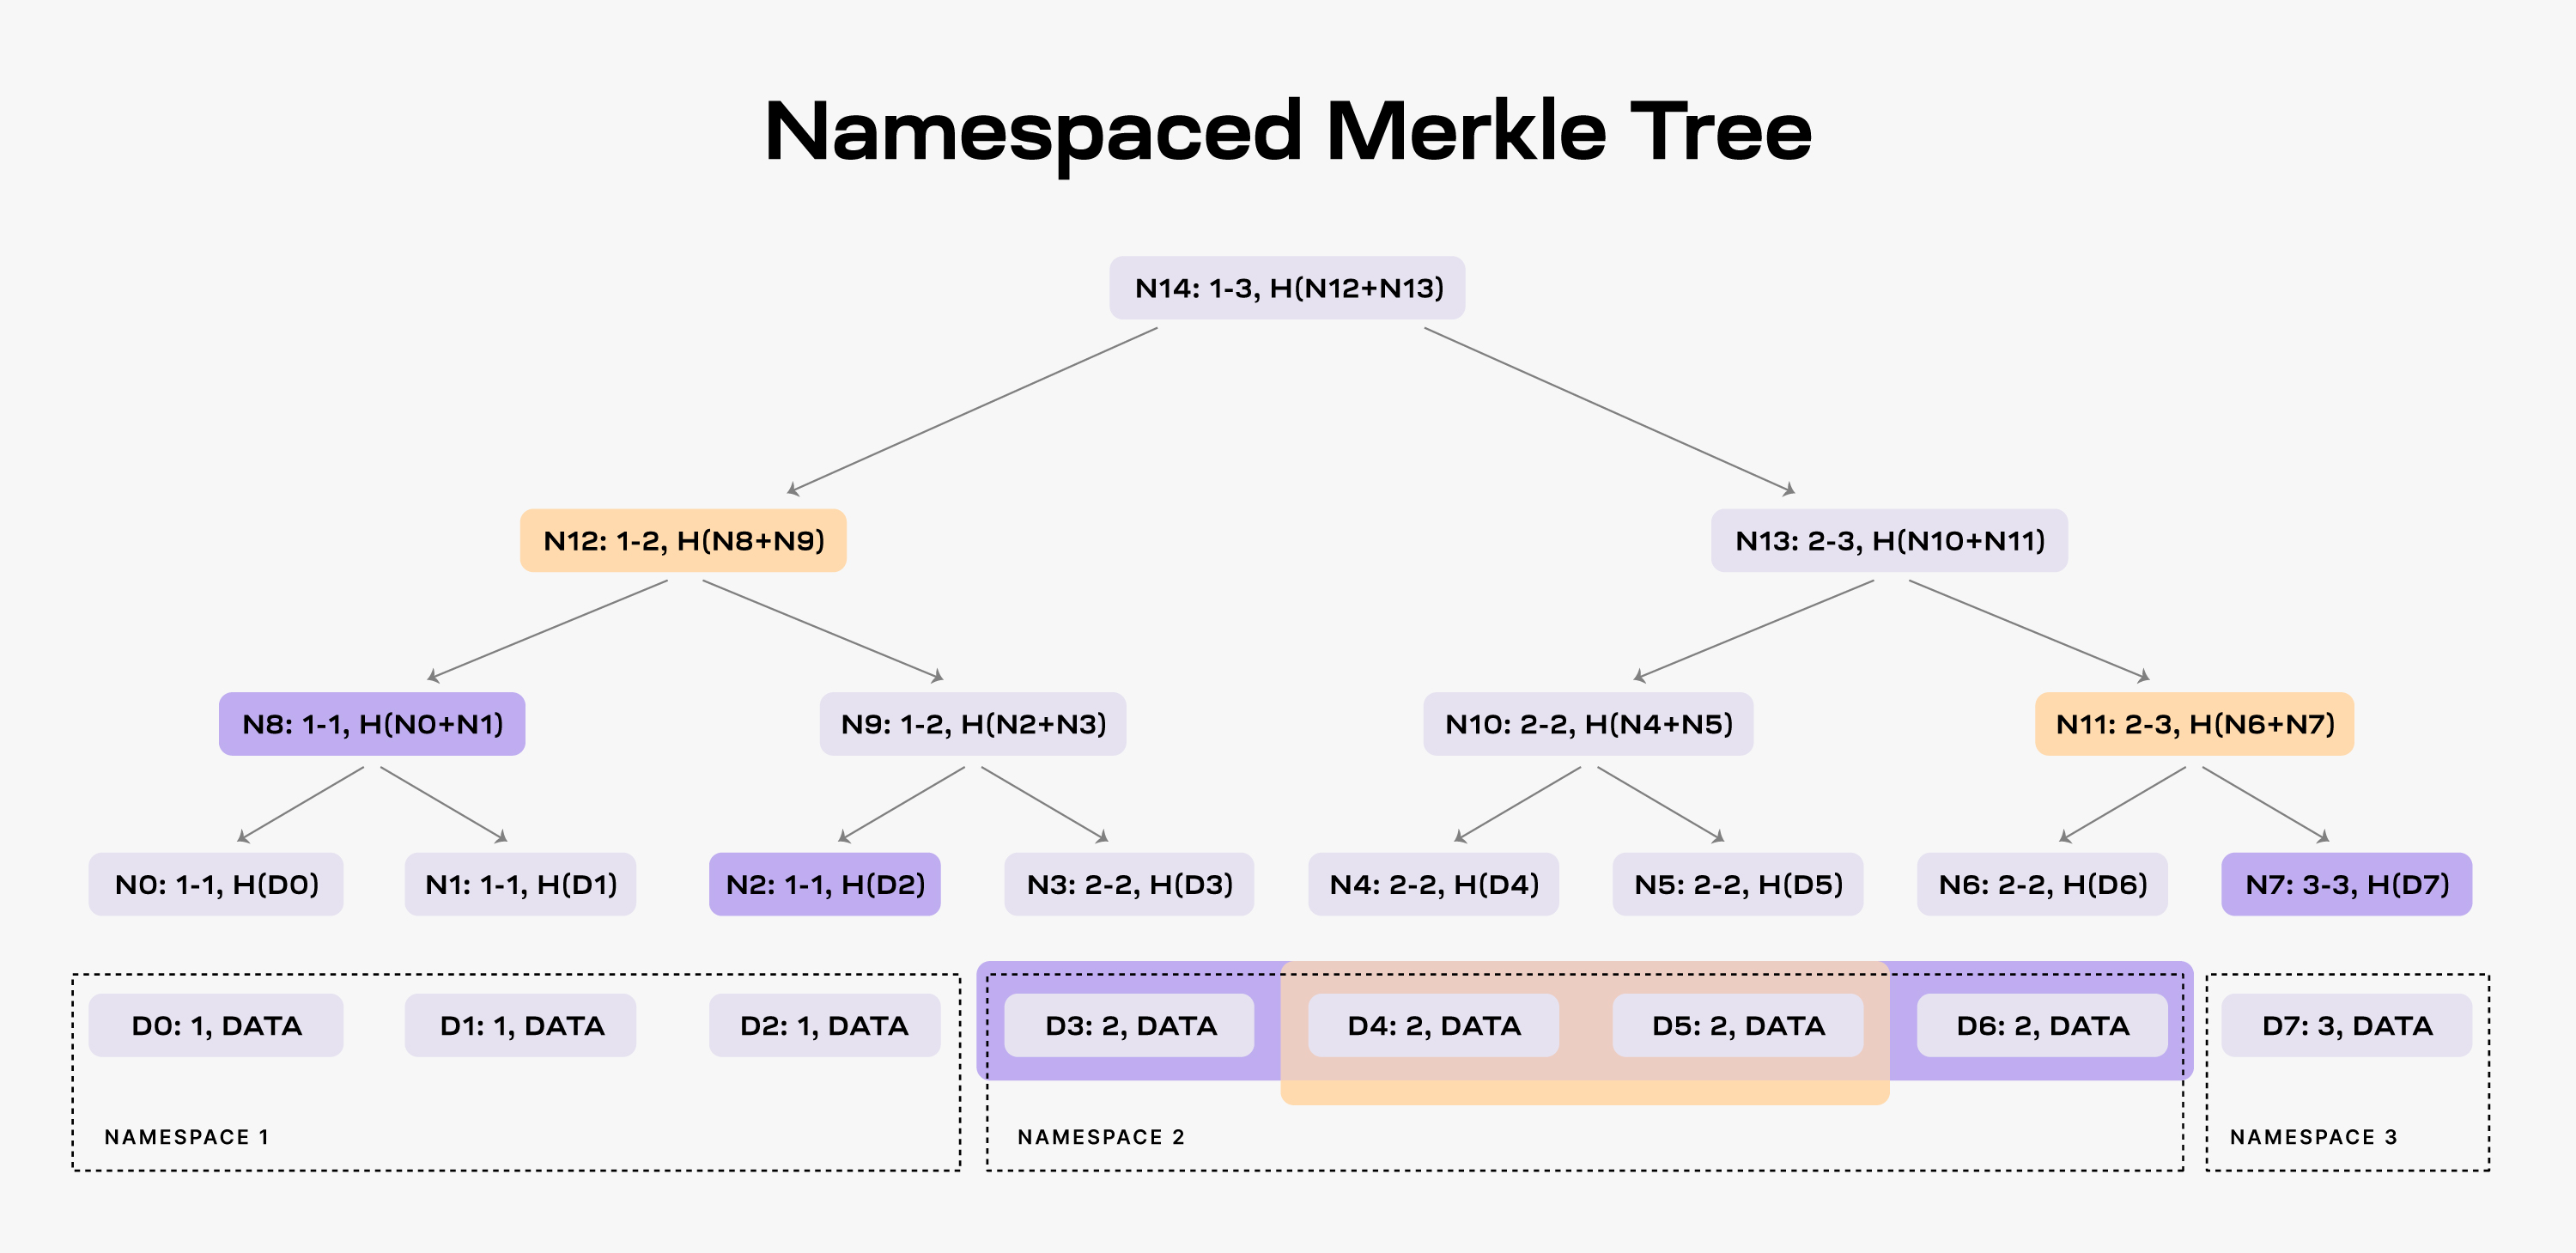
When an application requests the data for namespace 2, the DA layer must
provide the data shares `D3`, `D4`, `D5`, and `D6` and the nodes `N2`, `N8`
and `N7` as proof (note that the application already has the root `N14` from
the block header).
As a result, the application is able to check that the provided data is part
of the block data. Furthermore, the application can verify that all the data
for namespace 2 was provided. If the DA layer provides for example only the
data shares `D4` and `D5`, it must also provide nodes `N12` and `N11` as proofs.
However, the application can identify that the data is incomplete by checking
the namespace range of the two nodes, _i.e._, both `N12` and `N11` have descendants
part of namespace 2.
For more details on NMTs, refer to the [original paper](https://arxiv.org/abs/1905.09274).
## Building a PoS blockchain for DA
### Providing data availability
The Celestia DA layer consists of a PoS blockchain. Celestia is dubbing this
blockchain as the [celestia-app](https://github.com/celestiaorg/celestia-app),
an application that provides transactions to facilitate the DA layer and is built
using [Cosmos SDK](https://docs.cosmos.network/sdk/v0.53). The following figure
shows the main components of celestia-app.
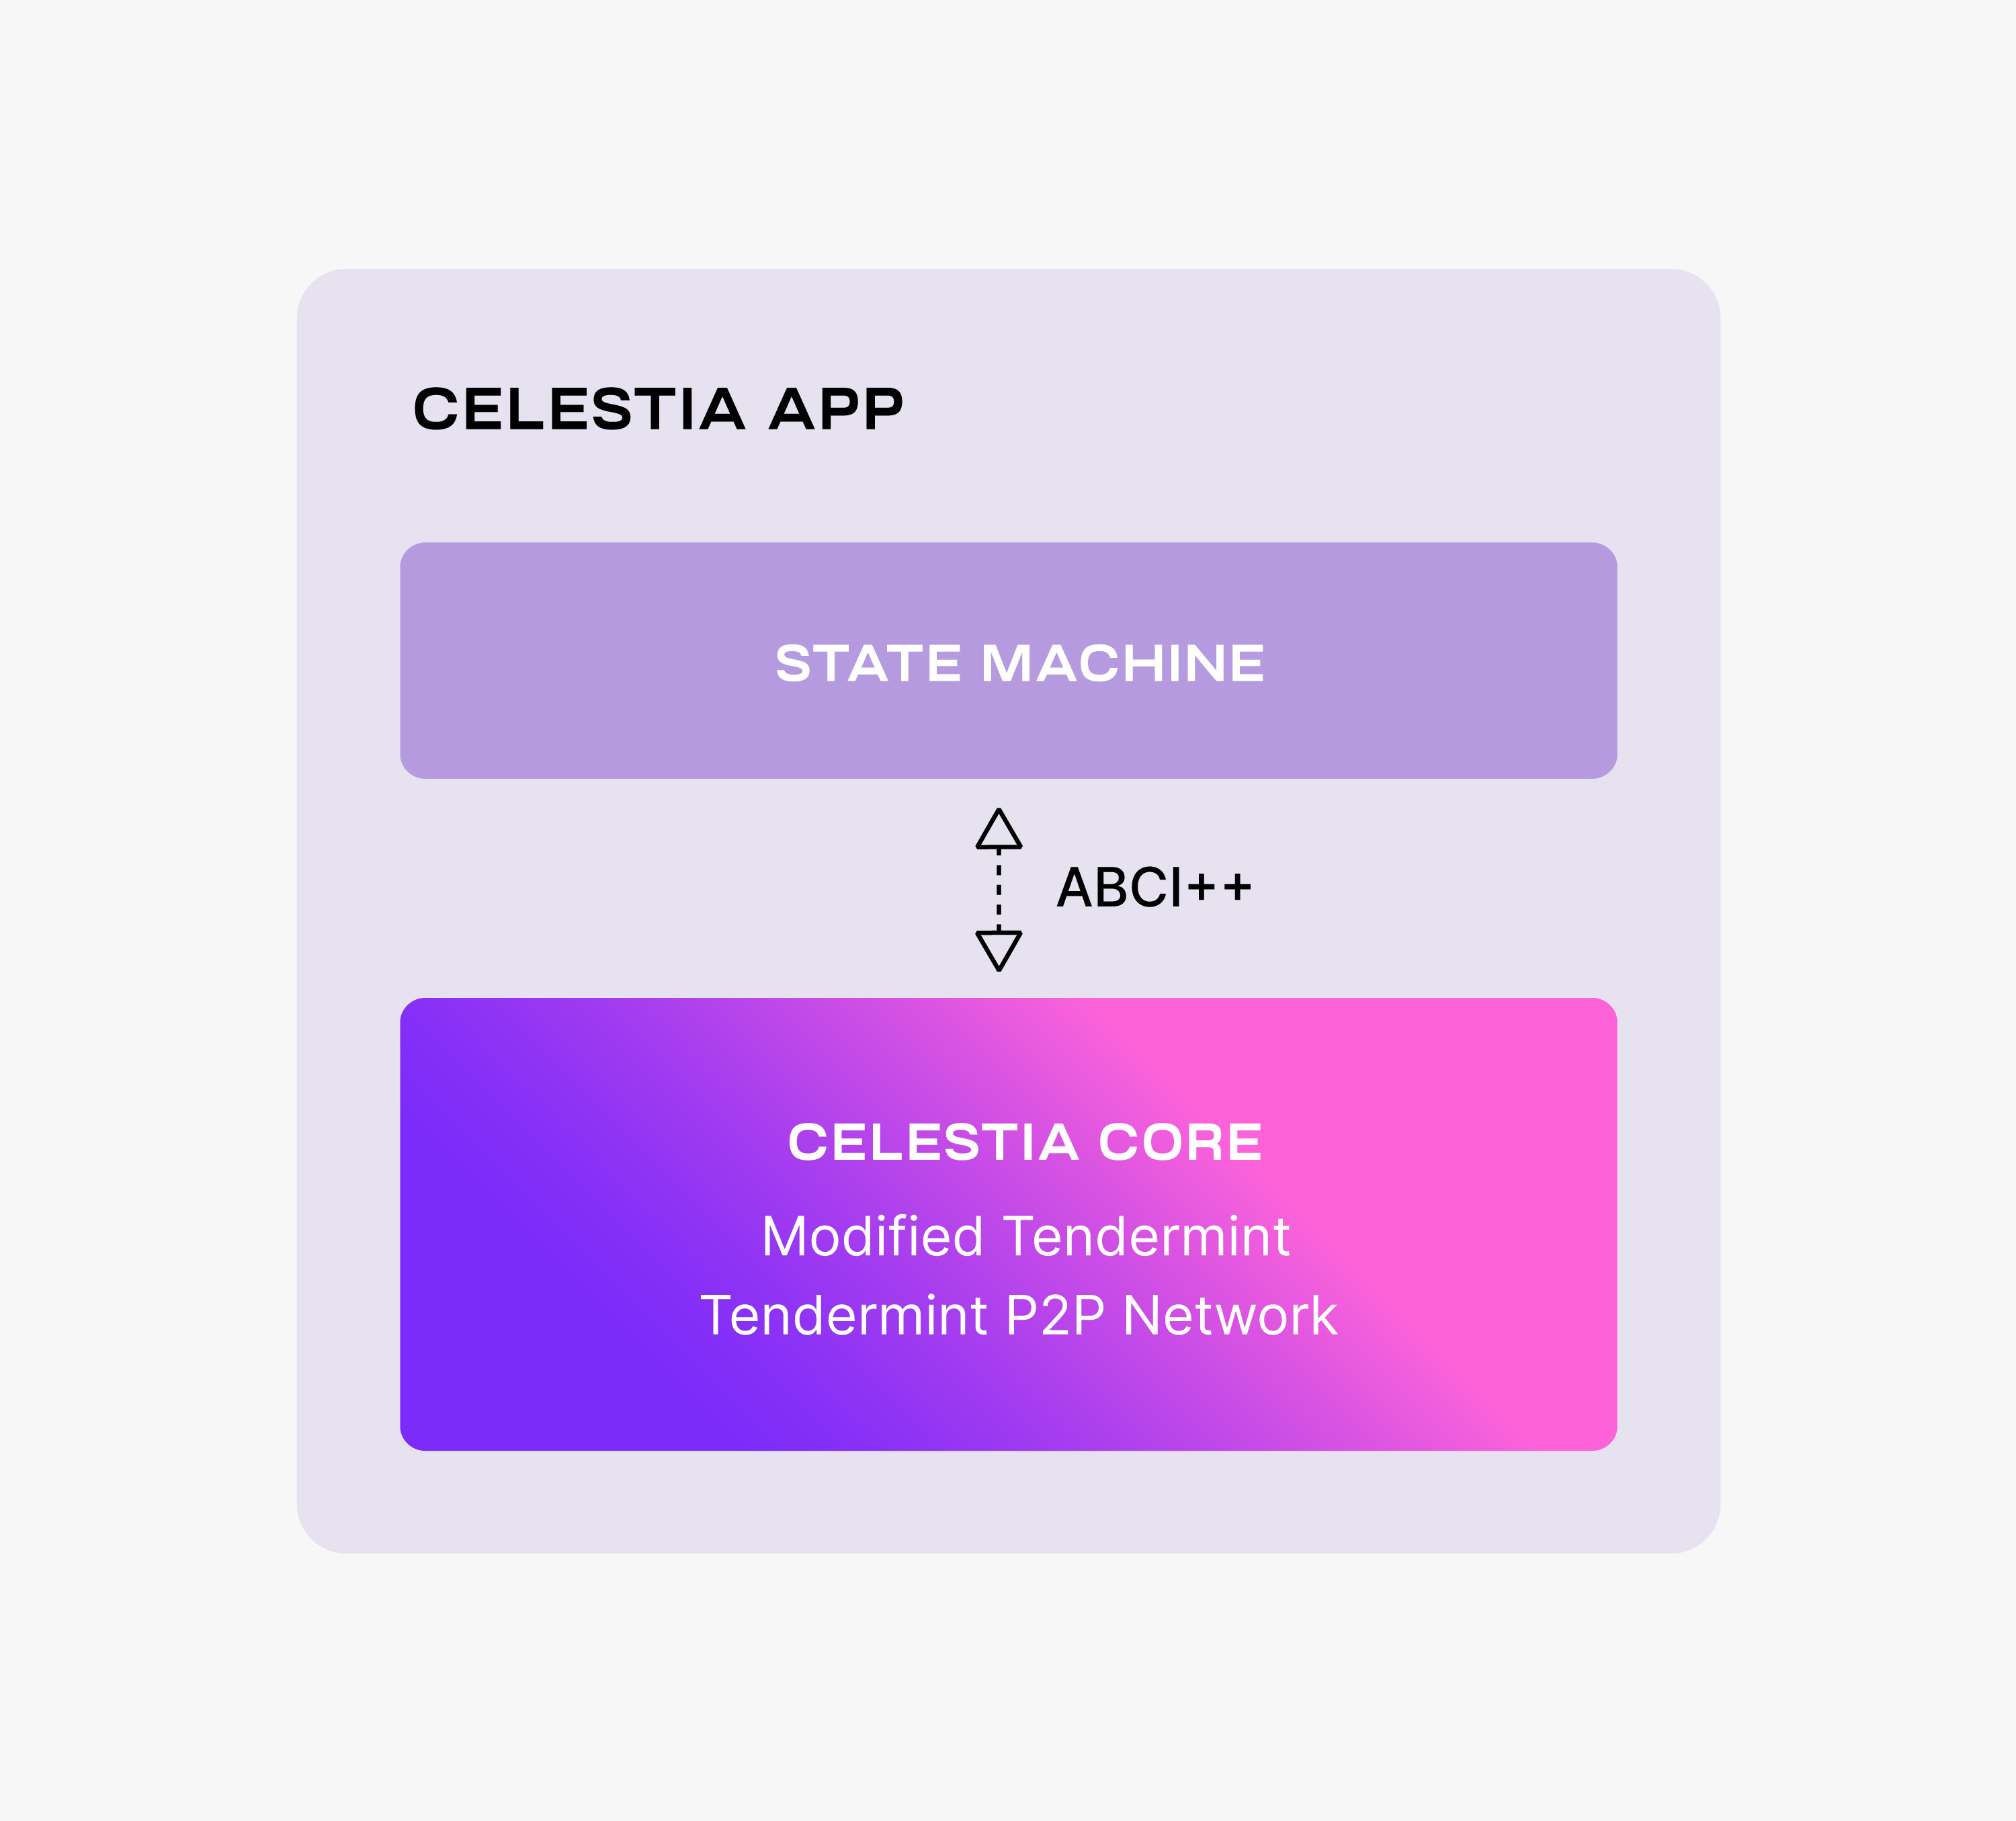
celestia-app is built on top of [celestia-core](https://github.com/celestiaorg/celestia-core),
a modified version of the [Tendermint consensus algorithm](https://arxiv.org/abs/1807.04938).
Among the more important changes to vanilla Tendermint, celestia-core:
- Enables the erasure coding of block data (using the [2-dimensional Reed-Solomon
encoding scheme](https://github.com/celestiaorg/rsmt2d)).
- Replaces the regular Merkle tree used by Tendermint to store block data with
a [Namespaced Merkle tree](https://github.com/celestiaorg/nmt) that enables
the above layers (_i.e._, execution and settlement) to only download the needed
data (for more details, see the section below describing use cases).
For more details on the changes to Tendermint, take a look at the
[ADRs](https://github.com/celestiaorg/celestia-core/tree/v0.34.x-celestia/docs/celestia-architecture).
Notice that celestia-core nodes are still using the Tendermint p2p network.
Similarly to Tendermint, celestia-core is connected to the application layer
(_i.e._, the state machine) by [ABCI++](https://github.com/tendermint/tendermint/tree/master/spec/abci%2B%2B),
a major evolution of [ABCI](https://github.com/tendermint/tendermint/tree/master/spec/abci)
(Application Blockchain Interface).
The celestia-app state machine is necessary to execute the PoS logic and to
enable the governance of the DA layer.
However, the celestia-app is data-agnostic -- the state machine neither
validates nor stores the data that is made available by the celestia-app.
## Monolithic vs. modular blockchains
Blockchains instantiate [replicated state machines](https://dl.acm.org/doi/abs/10.1145/98163.98167):
the nodes in a permissionless distributed network apply an ordered sequence
of deterministic transactions to an initial state resulting in a common
final state.
In other words, this means that nodes in a network all follow
the same set of rules (_i.e._, an ordered sequence of transactions) to go from a
starting point (_i.e._, an initial state) to an ending point
(_i.e._, a common final state). This process ensures that all
nodes in the network agree on the final state
of the blockchain, even though they operate independently.
This means blockchains
require the following four functions:
- **Execution** entails executing transactions that update the state correctly.
Thus, execution must ensure that only valid transactions are executed, _i.e._,
transactions that result in valid state machine transitions.
- **Settlement** entails an environment for execution layers to verify proofs,
resolve fraud disputes, and bridge between other execution layers.
- **Consensus** entails agreeing on the order of the transactions.
- **Data Availability** (DA) entails making the transaction data available.
Note that execution, settlement, and consensus require DA.
Traditional blockchains, _i.e._ _monolithic blockchains_, implement all four
functions together in a single base consensus layer. The problem with
monolithic blockchains is that the consensus layer must perform numerous
different tasks, and it cannot be optimized for only one of these functions.
As a result, the monolithic paradigm limits the throughput of the system.
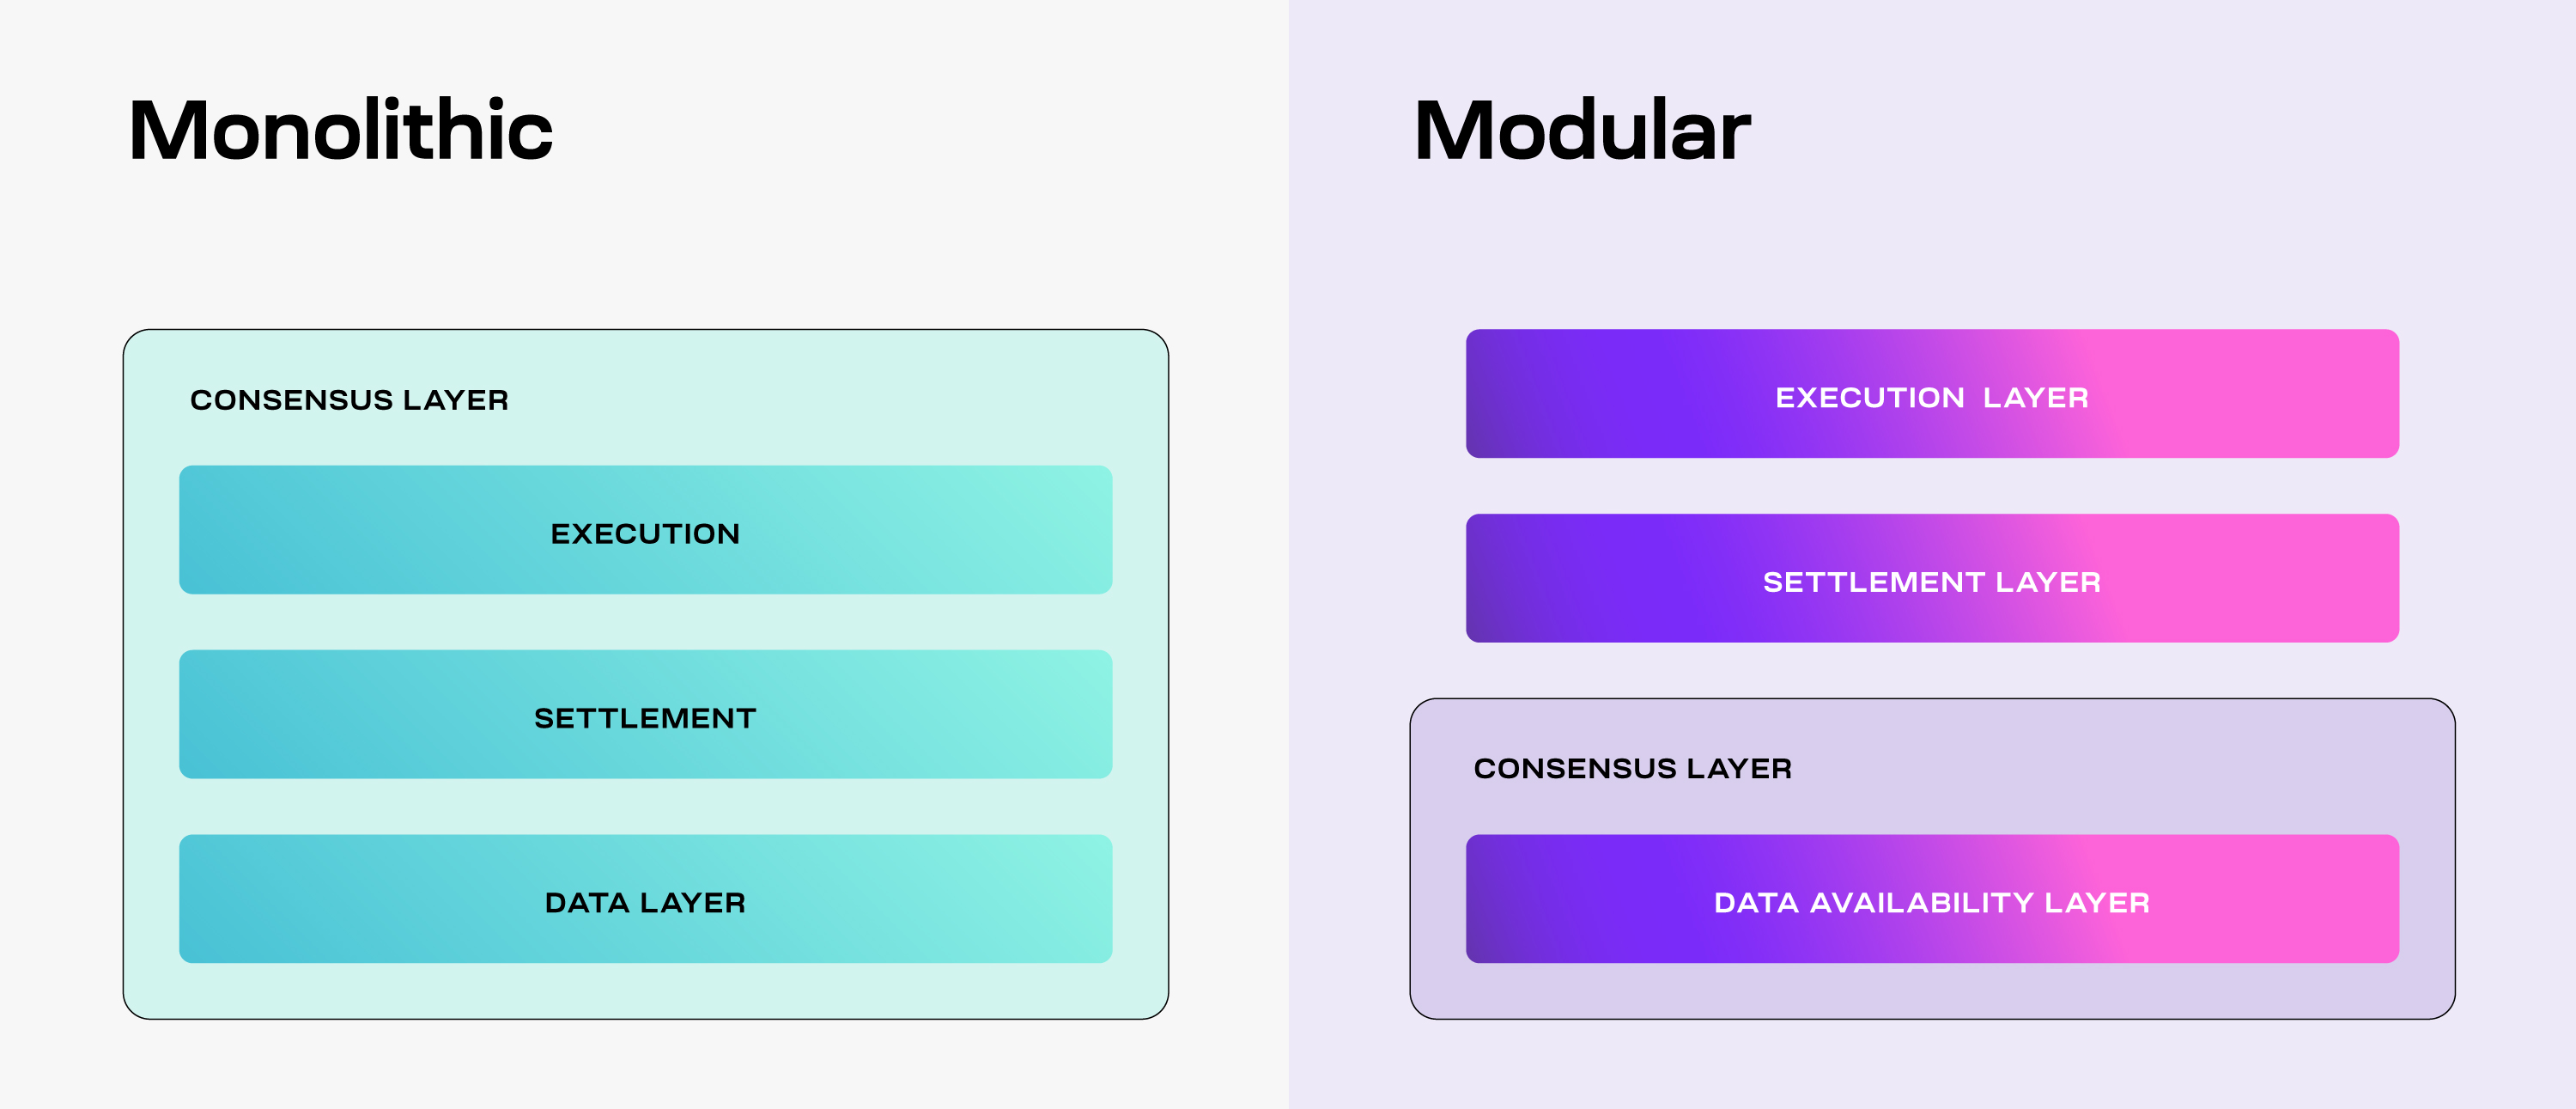
As a solution, modular blockchains decouple these functions among
multiple specialized layers as part of a modular stack. Due to the
flexibility that specialization provides, there are many possibilities
in which that stack can be arranged. For example, one such arrangement
is the separation of the four functions into three specialized layers.
The base layer consists of DA and consensus and thus, is referred to
as the Consensus and DA layer (or for brevity, the DA layer), while both
settlement and execution are moved on top in their own layers. As a result,
every layer can be specialized to optimally perform only its function, and thus,
increase the throughput of the system. Furthermore, this modular paradigm
enables multiple execution layers, _i.e._,
[rollups](https://vitalik.eth.limo/general/2021/01/05/rollup.html), to use the
same settlement and DA layers.
---
Title: Data, dashboards, and analytics
URL: https://docs.celestia.org/learn/celestia-101/resources.md
Source: app/learn/celestia-101/resources/page.mdx
---
# Data, dashboards, and analytics
A collection of useful tools, dashboards, and analytics platforms for exploring the Celestia network.
## Useful links
1. Learn category of celestia.org: https://celestia.org/learn/
2. Celestia glossary: https://celestia.org/glossary/
3. Celestia-app specifications: https://celestiaorg.github.io/celestia-app/
4. Awesome-celestia repo: https://github.com/celestiaorg/awesome-celestia/
## Data analytics & dashboards
| Resource | Description | URL |
| ----------------- | ------------------------------------------------------------ | ------------------------------------------------------------------------------ |
| **Celenium** | Blockchain explorer and analytics platform for Celestia | [celenium.io](https://celenium.io/) |
| **Celestia Data** | Comprehensive analytics and metrics for the Celestia network | [celestiadata.com](https://celestiadata.com/) |
| **L2 Beat** | Data availability tracking and metrics by L2BEAT | [l2beat.com](https://l2beat.com/data-availability/projects/celestia/no-bridge) |
| **Validao** | Validator and network visualization tools | [validao.xyz](https://validao.xyz/#maps-celestia-da) |
## Bridge & node data
| Resource | Description | URL |
| ------------------------------ | --------------------------------------------------- | --------------------------------------------------------------------------------------------------------------- |
| **Bridge node data dashboard** | Looker Studio dashboard for Celestia bridge metrics | [View dashboard](https://lookerstudio.google.com/u/0/reporting/73fc0733-5f3e-4a85-be1f-081f99991f4c/page/Tn17D) |
## Research & analytics
| Resource | Description | URL |
| ------------------------------ | --------------------------------------------------------------- | ---------------------------------------------------------------------------------------------------------------------- |
| **Blockworks research (paid)** | In-depth analytics and research on TIA and the Celestia network | [View analytics](https://app.blockworksresearch.com/analytics/tia?dashboard=celestia&interval=weekly) |
| **Numia blocks dashboard** | Blocks analytics dashboard | [View dashboard](https://lookerstudio.google.com/u/0/reporting/6d5530fd-4115-4951-8a79-644842f6a2b3/page/Tn17D) |
| **Numia rollups dashboard** | Rollups analytics dashboard | [View dashboard](https://lookerstudio.google.com/u/0/reporting/8853db32-fe0b-4a39-b4d7-3b9efd9e5226/page/p_da0hhwxfjd) |
## Rollup tracking
| Resource | Description | URL |
| -------------- | --------------------------------------- | -------------------------------- |
| **rollup.wtf** | Rollup ecosystem tracking and analytics | [rollup.wtf](https://rollup.wtf) |
---
Title: Data retrievability and pruning
URL: https://docs.celestia.org/learn/celestia-101/retrievability.md
Source: app/learn/celestia-101/retrievability/page.mdx
---
# Data retrievability and pruning
The purpose of data availability layers such as Celestia is to ensure
that block data is provably published, so that applications
and rollups can know what the state of their chain is, and store that data.
Once the data is published, data availability layers
[do not inherently guarantee that historical data will be permanently stored](https://notes.ethereum.org/@vbuterin/proto_danksharding_faq#If-data-is-deleted-after-30-days-how-would-users-access-older-blobs)
and remain retrievable.
In this document, we discuss the state of data retrievability and
pruning in Celestia, as well as some tips for rollup developers in
order to ensure that syncing new rollup nodes is possible.
## Data retrievability and pruning in celestia-node
As of version v6 of celestia-app, celestia-node has implemented a light node
sampling window of 7 days, as specified in
[CIP-36](https://github.com/celestiaorg/CIPs/blob/main/cips/cip-036.md).
Light nodes now only sample blocks within a 7-day
window instead of sampling all blocks from genesis. This change
introduces the concept of pruning to celestia-node, where data
outside of the 7-day window may not be stored by light nodes,
marking a significant update in how data retrievability and
storage are managed within the network.
Data blobs older than the recency window will be pruned by default
on light nodes,
but will continue to be stored by archival nodes that do not prune data. Light
nodes will be able to query historic blob data in namespaces from archival
nodes, as long as archival nodes exist on the public network.
## Suggested practices for rollups
Rollups may need to access historic data in order to allow new rollup nodes
to reconstruct the latest state by replaying historical blocks. Once data has
been published on Celestia and guaranteed to have been made available, rollups
and applications are responsible for storing their historical data.
While it is possible to continue to do this by using the `GetAll` API method in
celestia-node on historic blocks as long as archival nodes exist on the public
Celestia network, rollup developers should not rely on this as the only method
to access historical data, as archival nodes serving requests for historical
data for free is not guaranteed. Below are some other suggested methods to
access historical data.
- **Use professional archival node or data providers.** It is expected that
professional infrastructure providers will provide paid access to archival
nodes, where historical data can be retrieved, for example using the `GetAll`
API method. Providers like QuickNode offer archival node services that maintain
complete historical data, ensuring reliable access to past transactions and state.
This provides better guarantees than solely relying on free archival nodes on the
public Celestia network. For a list of available providers, see the
[network's](/operate/networks/mainnet-beta) page, and for specific archival
node endpoints, refer to the [archival DA RPC endpoints](/operate/networks/mainnet-beta#archival-da-rpc-endpoints)
section.
- **Share snapshots of rollup nodes.** Rollups could share snapshots of their
data directories which can be downloaded manually by users bootstrapping new
nodes. These snapshots could contain the latest state of the rollup, and/or
all the historical blocks.
- **Add peer-to-peer support for historical block sync.** A less manual version
of sharing snapshots, where rollup nodes could implement built-in support for
block sync, where rollup nodes download historical block data from each other
over a peer-to-peer network.
- [**Namespace pinning.**](https://github.com/celestiaorg/celestia-node/issues/2830)
In the future, celestia-node is expected to allow nodes to choose to "pin"
data from selected namespaces that they wish to store and make available for
other nodes. This will allow rollup nodes to be responsible for storing their
data, without needing to implement their own peer-to-peer historical block
sync mechanism.
---
Title: The lifecycle of a celestia-app transaction
URL: https://docs.celestia.org/learn/celestia-101/transaction-lifecycle.md
Source: app/learn/celestia-101/transaction-lifecycle/page.mdx
---
# The lifecycle of a celestia-app transaction
Users request the celestia-app to make data available by
sending `PayForBlobs` transactions. Every such transaction consists
of the identity of the sender, the data to be made available, also
referred to as the message, the data size, the namespace, and
a signature. Every block producer batches multiple `PayForBlobs`
transactions into a block.
Before proposing the block though, the producer passes it to the
state machine via ABCI++, where each `PayForBlobs` transaction is
split into a namespaced message (denoted by `Msg` in the figure below),
i.e., the data together with the namespace ID, and an executable
transaction (denoted by `e-Tx` in the figure below) that does not
contain the data, but only a commitment that can be used at a later
time to prove that the data was indeed made available.
Thus, the block data consists of data partitioned into namespaces
and executable transactions. Note that only these transactions are
executed by the Celestia state machine once the block is committed.
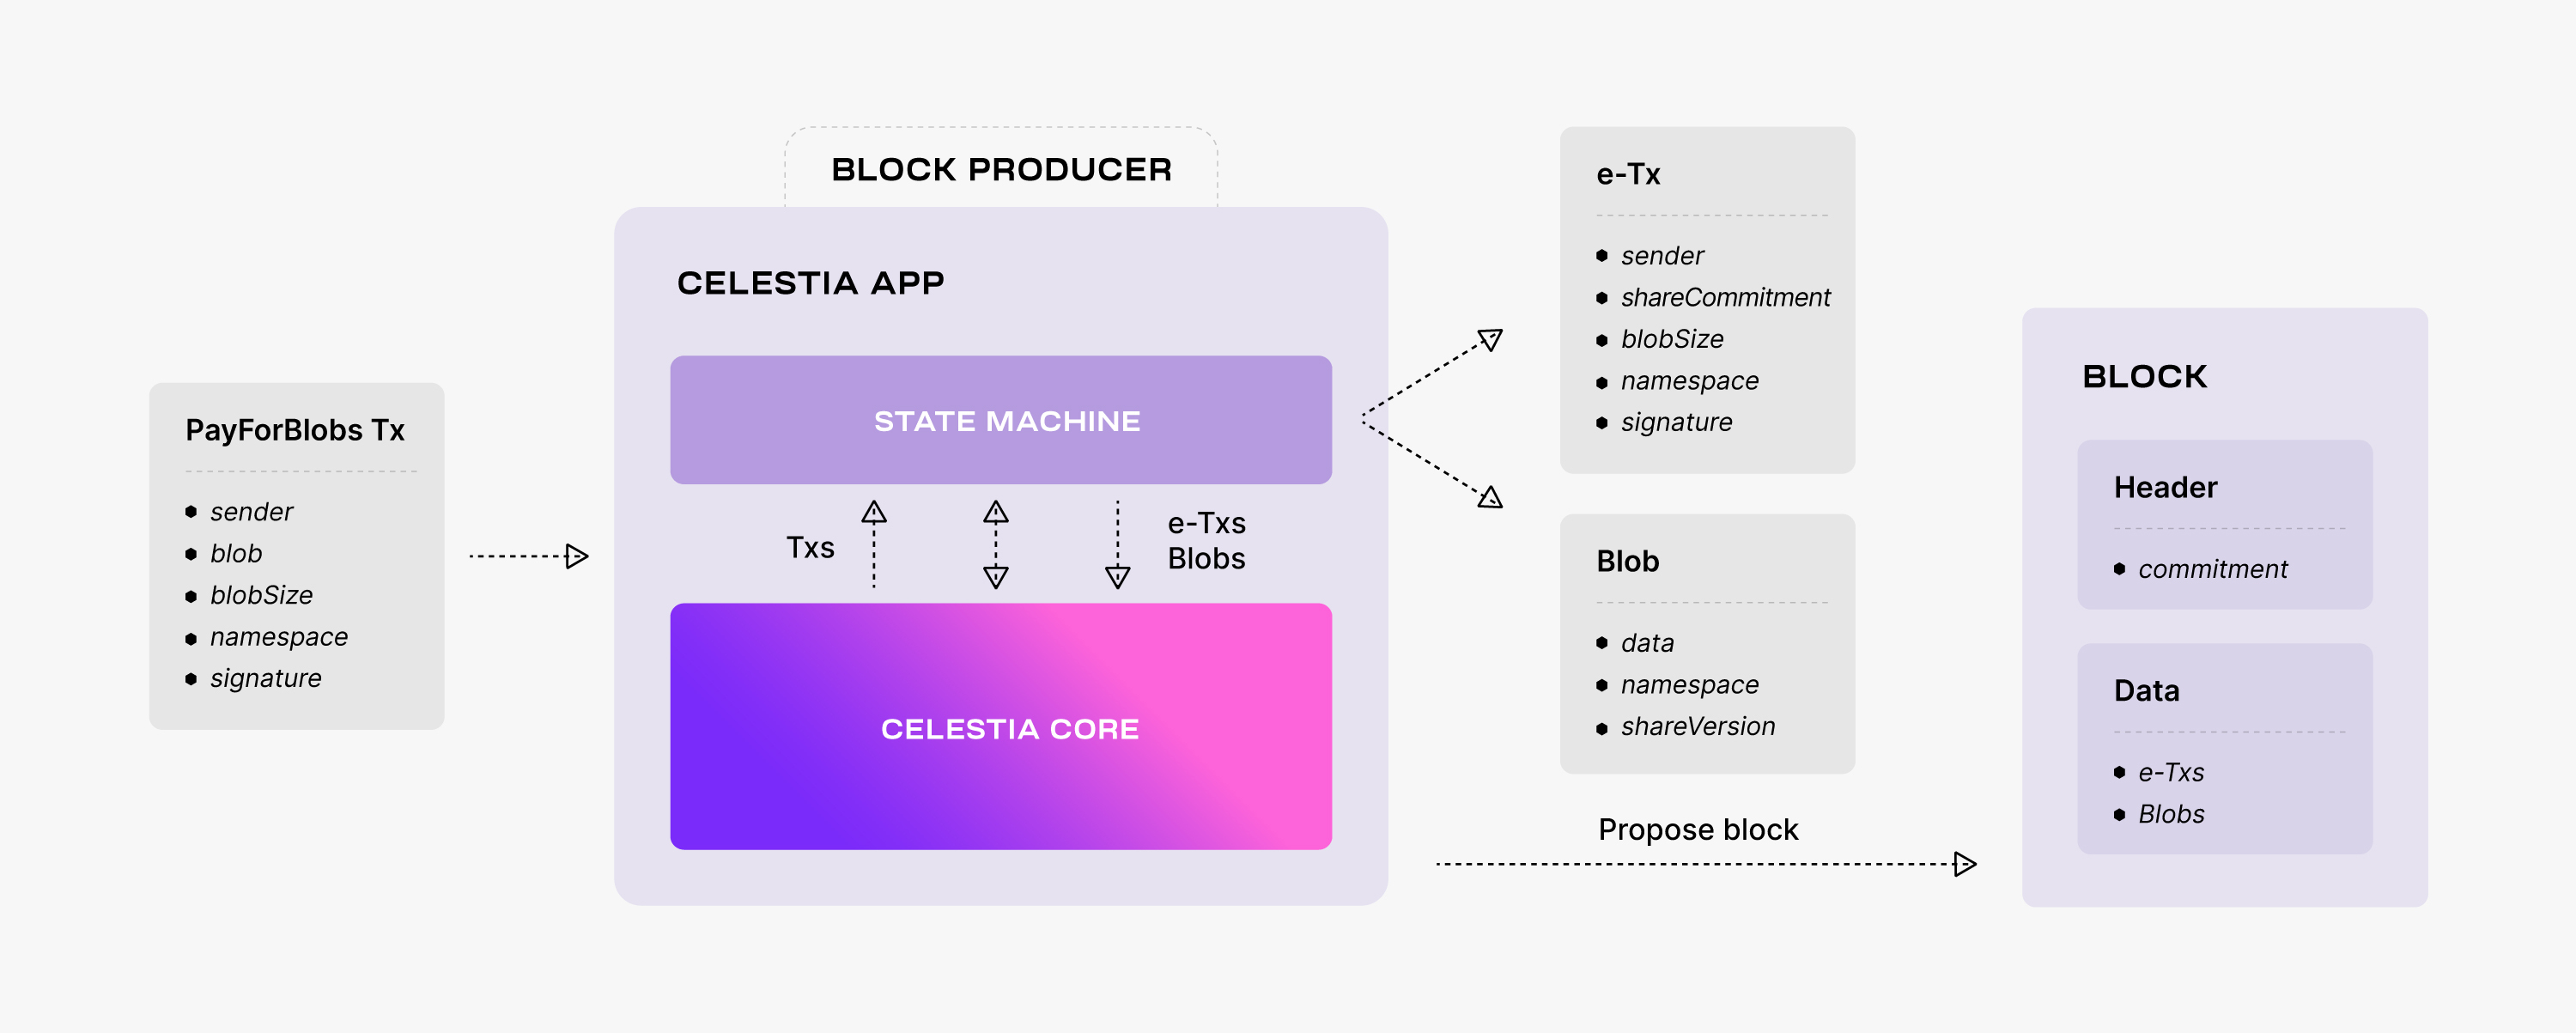
Next, the block producer adds to the block header a commitment
of the block data. As
[described in the "Celestia's data availability layer" page](/learn/celestia-101/data-availability),
the commitment is the Merkle root of the $4k$ intermediate Merkle roots
(i.e., one for each row and column of the extended matrix).
To compute this commitment, the block producer performs the following operations:
- It splits the executable transactions and the namespaced data
into shares. Every share consists of some bytes prefixed by a
namespace. To this end, the executable transactions are associated
with a reserved namespace.
- It arranges these shares into a square matrix (row-wise). Note that
the shares are padded to the next power of two. The outcome square
of size $k \times k$ is referred to as the original data.
- It extends the original data to a $2k \times 2k$ square matrix using
the 2-dimensional Reed-Solomon encoding scheme described above.
The extended shares (i.e., containing erasure data) are associated
with another reserved namespace.
- It computes a commitment for every row and column of the extended
matrix using the NMTs described above.
Thus, the commitment of the block data is the root of a Merkle tree
with the leaves the roots of a forest of Namespaced Merkle subtrees,
one for every row and column of the extended matrix.
## Checking data availability
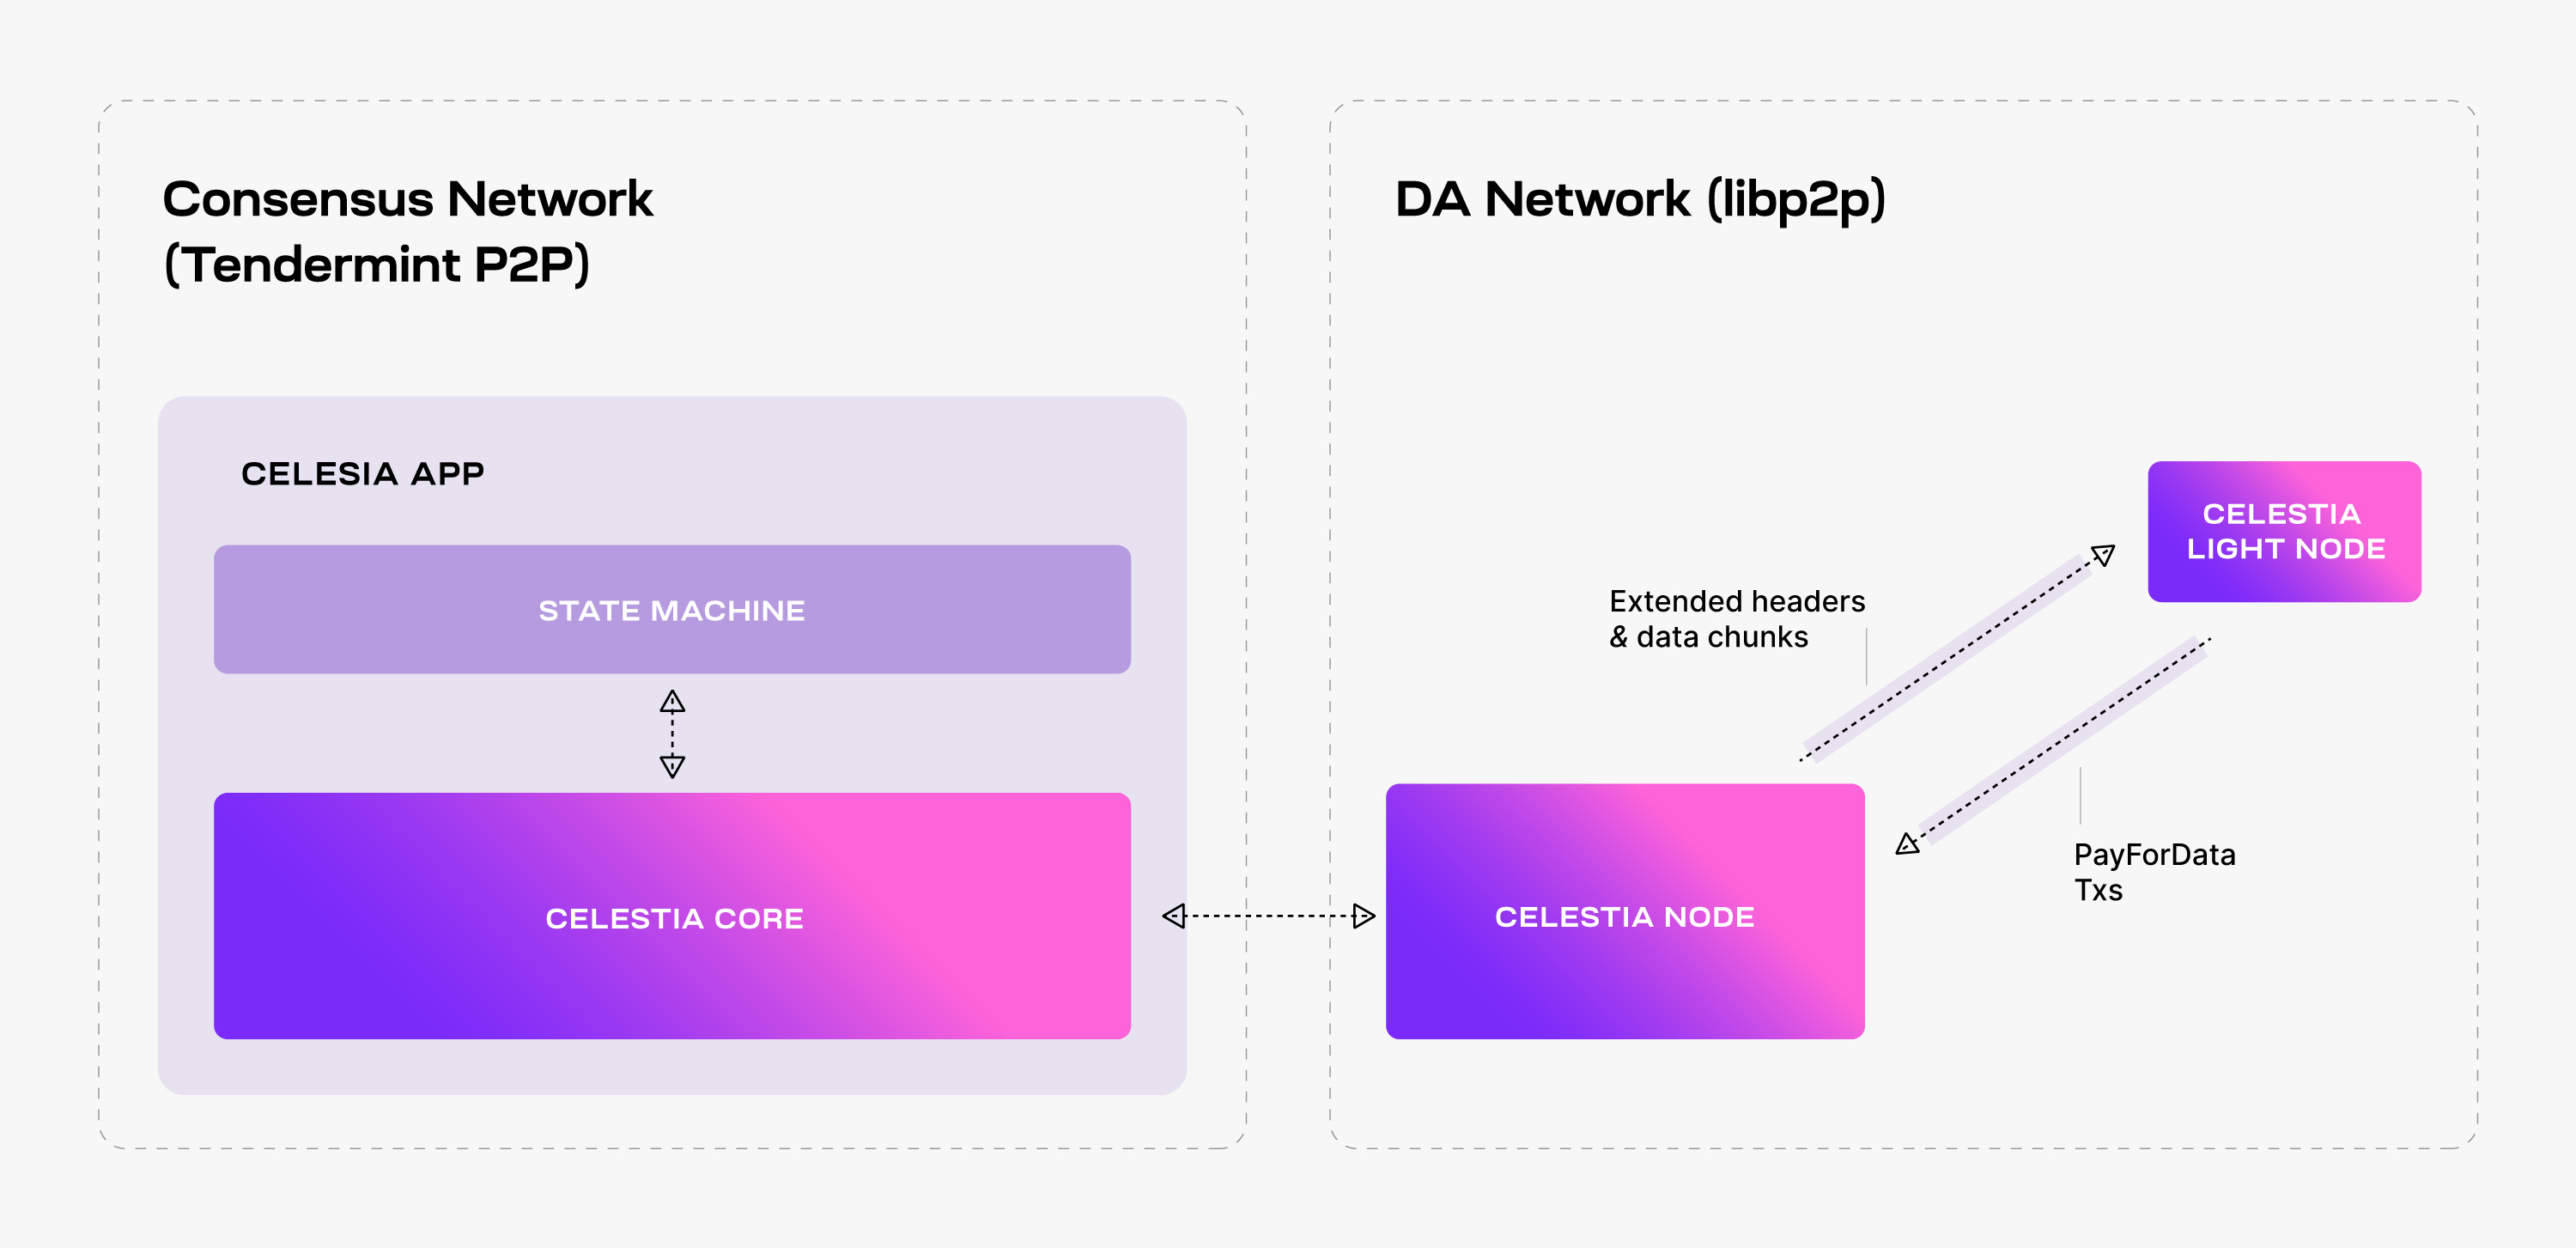
To enhance connectivity, the celestia-node augments the celestia-app
with a separate libp2p network, _i.e._, the so-called _DA network_,
that serves DAS requests.
Light nodes connect to a celestia-node in the DA network, listen to
extended block headers (i.e., the block headers together with the
relevant DA metadata, such as the $4k$ intermediate Merkle roots), and
perform DAS on the received headers (i.e., ask for random data shares).
Note that although it is recommended, performing DAS is optional -- light
nodes could just trust that the data corresponding to the commitments in
the block headers was indeed made available by the Celestia DA layer.
In addition, light nodes can also submit transactions to the celestia-app,
i.e., `PayForBlobs` transactions.
While performing DAS for a block header, every light node queries Celestia
Nodes for a number of random data shares from the extended matrix and the
corresponding Merkle proofs. If all the queries are successful, then the
light node accepts the block header as valid (from a DA perspective).
If at least one of the queries fails (i.e., either the data share is not
received or the Merkle proof is invalid), then the light node rejects the
block header and tries again later. The retrial is necessary to deal with
false negatives, i.e., block headers being rejected although the block
data is available. This may happen due to network congestion for example.
Alternatively, light nodes may accept a block header although the data
is not available, i.e., a _false positive_. This is possible since the
soundness property (i.e., if an honest light node accepts a block as available,
then at least one honest bridge node will eventually have the entire block data)
is probabilistically guaranteed (for more details, take a look at the
[original paper](https://arxiv.org/abs/1809.09044)).
By fine tuning Celestia's parameters (e.g., the number of data shares sampled
by each light node) the likelihood of false positives can be sufficiently
reduced such that block producers have no incentive to withhold the block data.
---
Title: Celestia.org Code of Conduct
URL: https://docs.celestia.org/learn/code-of-conduct.md
Source: app/learn/code-of-conduct/page.mdx
---
# Celestia.org Code of Conduct
## Our Pledge
We as Celestia.org members, contributors, and leaders pledge to make
participation in our community a harassment-free experience for everyone,
regardless of age, body size, visible or invisible disability, ethnicity,
sex characteristics, gender identity and expression, level of experience,
education, socio-economic status, nationality, personal appearance, race,
caste, color, religion, or sexual identity and orientation.
We pledge to act and interact in ways that contribute to an open, welcoming,
diverse, inclusive, and healthy community.
## Our Standards
Examples of behavior that contributes to a positive environment for our
community include:
- Demonstrating empathy and kindness toward other people
- Being respectful of differing opinions, viewpoints, and experiences
- Giving and gracefully accepting constructive feedback
- Accepting responsibility and apologizing to those affected by our mistakes,
and learning from the experience
- Focusing on what is best not just for us as individuals, but for the overall
community
- Contributing to conversations about Celestia’s technology and ecosystem
Examples of unacceptable behavior include:
- The use of sexualized language or imagery, and sexual attention or advances of
any kind
- Trolling, insulting or derogatory comments, and personal or political attacks
- Public or private harassment
- Publishing others' private information, such as a physical or email address,
without their explicit permission
- Focusing on the prices of digital assets or tokens, or where they can be purchased
- Other conduct which could reasonably be considered inappropriate in a
professional setting
## Enforcement Responsibilities
Community leaders are responsible for clarifying and enforcing our standards of
acceptable behavior and will take appropriate and fair corrective action in
response to any behavior that they deem inappropriate, threatening, offensive,
or harmful.
Community leaders have the right and responsibility to remove, edit, or reject
comments, commits, code, wiki edits, issues, and other contributions that are
not aligned to this Code of Conduct, and will communicate reasons for moderation
decisions when appropriate.
## Scope
This Code of Conduct applies within all community spaces, and also applies when
an individual is officially representing the community in public spaces.
Examples of representing our community include using an official e-mail address,
posting via an official social media account, or acting as an appointed
representative at an online or offline event.
## Enforcement
Instances of abusive, harassing, or otherwise unacceptable behavior may be
reported to the community leaders responsible for enforcement at Celestia.org Discord.
All complaints will be reviewed and investigated promptly and fairly.
All community leaders are obligated to respect the privacy and security of the
reporter of any incident.
## Enforcement Guidelines
Community leaders will follow these Community Impact Guidelines in determining
the consequences for any action they deem in violation of this Code of Conduct:
### 1. Correction
**Community Impact**: Use of inappropriate language or other behavior deemed
unprofessional or unwelcome in the community.
**Consequence**: A private, written warning from community leaders, providing
clarity around the nature of the violation and an explanation of why the
behavior was inappropriate. A public apology may be requested.
### 2. Warning
**Community Impact**: A violation through a single incident or series of
actions.
**Consequence**: A warning with consequences for continued behavior. No
interaction with the people involved, including unsolicited interaction with
those enforcing the Code of Conduct, for a specified period of time. This
includes avoiding interactions in community spaces as well as external channels
like social media. Violating these terms may lead to a temporary or permanent
ban.
### 3. Temporary Ban
**Community Impact**: A serious violation of community standards, including
sustained inappropriate behavior.
**Consequence**: A temporary ban from any sort of interaction or public
communication with the community for a specified period of time. No public or
private interaction with the people involved, including unsolicited interaction
with those enforcing the Code of Conduct, is allowed during this period.
Violating these terms may lead to a permanent ban.
### 4. Permanent Ban
**Community Impact**: Demonstrating a pattern of violation of community
standards, including sustained inappropriate behavior, harassment of an
individual, or aggression toward or disparagement of classes of individuals.
**Consequence**: A permanent ban from any sort of public interaction within the
community.
## Attribution
This Code of Conduct is adapted from the [Contributor Covenant][homepage],
version 2.1, available at
[https://www.contributor-covenant.org/version/2/1/code_of_conduct.html][v2.1].
Community Impact Guidelines were inspired by
[Mozilla's code of conduct enforcement ladder][Mozilla CoC].
For answers to common questions about this code of conduct, see the FAQ at
[https://www.contributor-covenant.org/faq][FAQ]. Translations are available at
[https://www.contributor-covenant.org/translations][translations].
[homepage]: https://www.contributor-covenant.org
[v2.1]: https://www.contributor-covenant.org/version/2/1/code_of_conduct.html
[Mozilla CoC]: https://github.com/mozilla/diversity
[FAQ]: https://www.contributor-covenant.org/faq
[translations]: https://www.contributor-covenant.org/translations
---
Title: Using Hyperlane with Celestia
URL: https://docs.celestia.org/learn/features/bridging/hyperlane.md
Source: app/learn/features/bridging/hyperlane/page.mdx
---
# Using Hyperlane with Celestia
## Live bridge
- [Hyperlane Nexus UI](https://nexus.hyperlane.xyz/?origin=celestia&token=TIA&destination=base)
## Summary
[Hyperlane](https://hyperlane.xyz/) is a permissionless interoperability layer that lets blockchains send messages and trigger actions on one another. Along with [IBC](/learn/features/bridging/ibc), it is one of the standards used on Celestia for cross-chain asset transfers and messages.
You can use Hyperlane to bridge TIA between Celestia and other EVM-compatible chains, as well as send arbitrary cross-chain messages.
## How bridging works
```mermaid
flowchart LR
%% --- Chain A ---
subgraph ChainA["Chain A"]
A_App["Application"]
A_Mailbox["Mailbox Contract"]
A_ISM["Interchain Security Module"]
end
%% --- Chain B ---
subgraph ChainB["Chain B"]
B_App["Application"]
B_Mailbox["Mailbox Contract"]
B_ISM["Interchain Security Module"]
end
%% Internal flows (Chain A)
A_App --> A_Mailbox
A_Mailbox --> A_ISM
A_ISM -->|Verify Message| A_Mailbox
%% Internal flows (Chain B)
B_App --> B_Mailbox
B_Mailbox --> B_ISM
B_ISM -->|Verify Message| B_Mailbox
%% Cross-chain relayer messages
A_Mailbox <-->|Relayers Messages + Proofs| B_Mailbox
```
- **Mailbox** — the core contract on each chain that dispatches and processes messages.
- **Relayer** — an off-chain program that delivers messages and metadata between blockchains.
- **Interchain Security Module (ISM)** — a modular security component that verifies messages before they're processed on the destination chain.
**Bridging flow**
1. **Source chain** — the application sends a message to the Mailbox contract, which emits an event and stores a commitment.
2. **Relayer** — an offchain relayer observes the source chain, reads the message event, and fetches the necessary metadata and proofs.
3. **Relayer → destination** — the relayer submits the message plus metadata to the destination Mailbox contract.
4. **Destination chain** — the ISM verifies the message using the provided metadata (proofs, signatures, etc.), and if valid, the Mailbox delivers the message to the recipient application.
5. **Recipient application** — the destination application receives and processes the message (for example, mints tokens, executes a function call, etc.).
---
Title: Using IBC with Celestia
URL: https://docs.celestia.org/learn/features/bridging/ibc.md
Source: app/learn/features/bridging/ibc/page.mdx
---
# Using IBC with Celestia
## Live IBC channels
- [Mocha testnet](https://www.mintscan.io/celestia-testnet/relayers/)
- [Mainnet](https://www.mintscan.io/celestia/relayers/)
## Summary
[IBC (Inter-Blockchain Communication)](https://ibcprotocol.dev/) is a protocol for authenticated, permissionless message passing between blockchains. Along with [Hyperlane](/learn/features/bridging/hyperlane), it is one of the standards used on Celestia for cross-chain asset transfers and messages.
You can use IBC to bridge assets between Celestia-native chains along with other chains.
## How bridging works
```mermaid
flowchart LR
%% --- Chain A ---
subgraph ChainA["Chain A"]
A_App["Application"]
A_Router["Router (Core)"]
A_Light["Light Client of Chain B"]
end
%% --- Chain B ---
subgraph ChainB["Chain B"]
B_App["Application"]
B_Router["Router (Core)"]
B_Light["Light Client of Chain A"]
end
%% Internal flows (Chain A)
A_App --> A_Router
A_Router --> A_Light
A_Router -->|Verify Membership / Verify Non-Membership| A_Light
%% Internal flows (Chain B)
B_App --> B_Router
B_Router --> B_Light
B_Router -->|Verify Membership / Verify Non-Membership| B_Light
%% Cross-chain relayer packets
A_Router <-->|Relayers Data Packets| B_Router
```
- **Light client** — a lightweight representation of a destination chain that lives within the state machine of a source chain.
- **Relayer** — an off-chain program that facilitates communication between independent blockchains.
- **Router** — a component in the that connects two blockchains, handles packet routing between applications, and manages the verification of cross-chain data.
**Bridging flow**
1. **Source chain** — the source router (onchain module) escrows or burns the tokens, builds a packet (payload + seq + timeout), and stores a packet commitment (hash) in state.
2. **Relayer** — an offchain relayer observes the source, reads the packet and the packet-commitment, and fetches a proof of that commitment from the source chain.
3. **Relayer → destination** — the relayer submits the packet plus the commitment proof to the destination router.
4. **Destination chain** — the destination’s light client verifies the commitment proof and, if valid, the destination router processes the packet (for example mints or credits) and writes an acknowledgement commitment.
5. **Relayer → Source** — the relayer fetches the acknowledgement and submits the acknowledgement proof back to the source chain.
6. **Source chain** — the source’s light client verifies the acknowledgement proof and the source router finalizes the transfer (releases escrow or marks the packet complete); if the timeout elapsed first, the source router executes refund logic.
---
Title: Private Blockspace
URL: https://docs.celestia.org/learn/features/private-blockspace.md
Source: app/learn/features/private-blockspace/page.mdx
---
# Private Blockspace
Private Blockspace lets applications publish **encrypted state to Celestia** while still making it **publicly accountable**.
Networks can keep sensitive data—like balances, positions, liquidations, and routing logic—confidential, without pushing trust back onto offchain operators. Anyone can verify that encrypted data is **available and properly committed to**, while only authorized parties can decrypt the underlying contents.
Private Blockspace is built for systems where **privacy is required** and **verifiability is non-negotiable**.
## How it works
Private Blockspace is implemented as a lightweight **Private Blockspace Proxy** that sits between your application and Celestia’s data availability layer:
1. **Submit**: Your app sends blobs to the proxy. The proxy encrypts the data, generates a zkVM proof (**Verifiable Encryption**), and publishes the encrypted blob to Celestia.
2. **Retrieve**: Your app fetches blobs through the proxy. The proxy retrieves encrypted data from Celestia and attempts to decrypt it using the configured key material.
3. **Verify**: Anyone can verify that the encrypted data is available on Celestia and that protocol-defined commitments about the plaintext hold—without revealing the plaintext itself.
## Use cases
Private Blockspace is designed for applications that need private execution or private state while preserving public guarantees. Here are a few novel use cases it can be applied to:
- **Accountable offchain exchanges**: Keep exchange state private while making availability and commitments publicly verifiable.
- **Trust-minimized data marketplaces**: Sellers can publish verifiably encrypted data to Celestia so buyers can verify availability and integrity before payment—without relying on intermediaries.
## Get started
- [About Private Blockspace](/build/private-blockspace/about): Architecture and technical details
- [Quickstart guide](/build/private-blockspace/quickstart): Run it locally and submit encrypted blobs
- [Private Blockspace Proxy](https://github.com/celestiaorg/private-blockspace-proxy/): Source code and implementation details
---
Title: Overview of TIA
URL: https://docs.celestia.org/learn/TIA/overview.md
Source: app/learn/TIA/overview/page.mdx
---
# Overview of TIA
## TIA at a glance
| Property | Details |
| ----------------------- | ------------------------------------------------------------------------------------------------ |
| Abbreviation | TIA |
| Total supply at genesis | 1,000,000,000 TIA |
| Inflation schedule | 8% in the first year, decreasing 10% per year until reaching an inflation floor of 1.5% annually |
| Decimals | 6 |
| Conversion | 1 uTIA = 1 TIA × 10⁻⁶ |
## Role of TIA
### Paying for blobspace
Celestia’s native asset, TIA, is an essential part of how developers build on
the first modular blockchain network. To use Celestia for data availability,
rollup developers submit PayForBlobs transactions on the network for a fee,
denominated in TIA.
### Bootstrapping new rollups
A core part of the Celestia vision is that deploying a blockchain should be as
easy as deploying a smart contract. In the modular era, developers no longer
need to issue a token to launch their own blockchain.
Similarly to ETH on Ethereum-based rollups, developers may opt to bootstrap
their chain quickly by using TIA as a gas token and currency, in addition to
paying for data availability. In this mode, developers can focus on creating
their application or execution layer, instead of issuing a token right away.
### Proof-of-stake
As a permissionless network built with Cosmos SDK, Celestia uses proof-of-stake
to secure its own consensus. Like in other Cosmos networks, any user can help
secure the network by delegating their TIA to a Celestia validator for a portion
of their validator’s staking rewards.
Learn [how proof-of-stake works in Cosmos](https://docs.cosmos.network/sdk/v0.53/build/modules/staking).
### Decentralised governance
TIA staking also allows the community to play a critical role in decentralised
governance over key parts of Celestia, such as voting on network parameters
through governance proposals, and governing the community pool, which receives
2% of block rewards.
Learn more about [Celestia’s decentralised governance model](/learn/tia/staking-governance-supply#decentralised-governance).
### Denominations
#### TIA: display token
TIA is the [`DisplayDenom`](https://github.com/celestiaorg/celestia-app/blob/ada77509d7fdedf2a3e3400b720549365851454c/app/app.go#L110-L111)
that you will typically see in wallets and user interfaces.
#### utia: staking denomination
`utia` is the [`BondDenom`](https://github.com/celestiaorg/celestia-app/blob/ada77509d7fdedf2a3e3400b720549365851454c/pkg/appconsts/global_consts.go#L75-L76)
and stands for "micro TIA", with 1 TIA = 1,000,000 `utia`. This is the
native staking denomination.
In staking operations or transactions, if no denomination is specified, `utia`
is assumed.
#### microtia: staking denomination alias
`microtia` is the [`BondDenomAlias`](https://github.com/celestiaorg/celestia-app/blob/ada77509d7fdedf2a3e3400b720549365851454c/app/app.go#L108-L109),
an alias for `utia`.
---
Title: Paying for blobspace
URL: https://docs.celestia.org/learn/TIA/paying-for-blobspace.md
Source: app/learn/TIA/paying-for-blobspace/page.mdx
---
# Paying for blobspace
## PayForBlobs transactions
To publish data on Celestia, developers can submit `PayForBlobs` transactions. A
`PayForBlobs` transaction consists of the identity of the sender, the data to be
made available, the data size, the namespace, and a signature.
Each `PayForBlobs` transaction is split into two parts: the blob or blobs which
include the data to be made available along with the namespace, and the executable
payment transaction which includes a commitment to the data.
Both the blobs and executable payment transactions are put into the block within
the appropriate namespace. The block data is extended using erasure coding and then
Merkelized into a data root commitment included in the block header.

See
[the detailed life cycle of a Celestia transaction](/learn/celestia-101/transaction-lifecycle).
Learn how to
[submit data to Celestia’s data availability layer](/learn/TIA/submit-data).
## Fee market overview
Celestia uses a standard gas-price prioritised mempool. This means that
transactions with higher fees will be prioritised by validators. Fees are
comprised of a flat fee per transaction and then a variable fee based on the
size of each blob in the transaction.
Understand how fees are calculated on Celestia in
[the overview on submitting PFB transactions](/learn/TIA/submit-data).
---
Title: Staking, governance, & supply
URL: https://docs.celestia.org/learn/TIA/staking-governance-supply.md
Source: app/learn/TIA/staking-governance-supply/page.mdx
---
# Staking, governance, & supply
## Proof-of-stake on Celestia
Celestia is a proof-of-stake blockchain based on CometBFT and the Cosmos SDK.
Celestia supports in-protocol delegation and will start with an initial
validator set of 100.
Staking TIA as a validator or delegator enables you to earn staking rewards from
the network. Validators charge a fee to delegators which gives them a percentage
of staking rewards.
Learn
[how proof of stake works on Cosmos SDK chains like Celestia](https://docs.cosmos.network/sdk/v0.53/build/modules/staking).
| Consensus mechanism | Proof-of-stake |
| -------------------- | -------------- |
| Blockchain framework | Cosmos SDK |
| Validator set size | 100 |
| Delegation support | Yes |
Learn how to
[stake on your own at the community dashboards](/learn/tia/staking).
## Inflation
TIA inflation started at 8% annually.
1. Initially, it was set to decrease by 10% every year until reaching a long-term issuance rate of 1.5%.
2. With the v4 Lotus upgrade ([CIP-29](https://cips.celestia.org/cip-029.html)) in July 2025, the inflation rate dropped from ~7.2% to ~5.0% and was set to continue decreasing by 6.7% every year until it stabilized at 1.5%.
3. With the v6 ([CIP-41](https://cips.celestia.org/cip-041.html#inflation-schedule-over-time)) upgrade in November 2025, the inflation rate again dropped to ~2.5% and will continue to decrease by 6.7% every year until it stabilizes at 1.5%.
The diagram below illustrates both the initial inflation rates and those after the v6 upgrade.
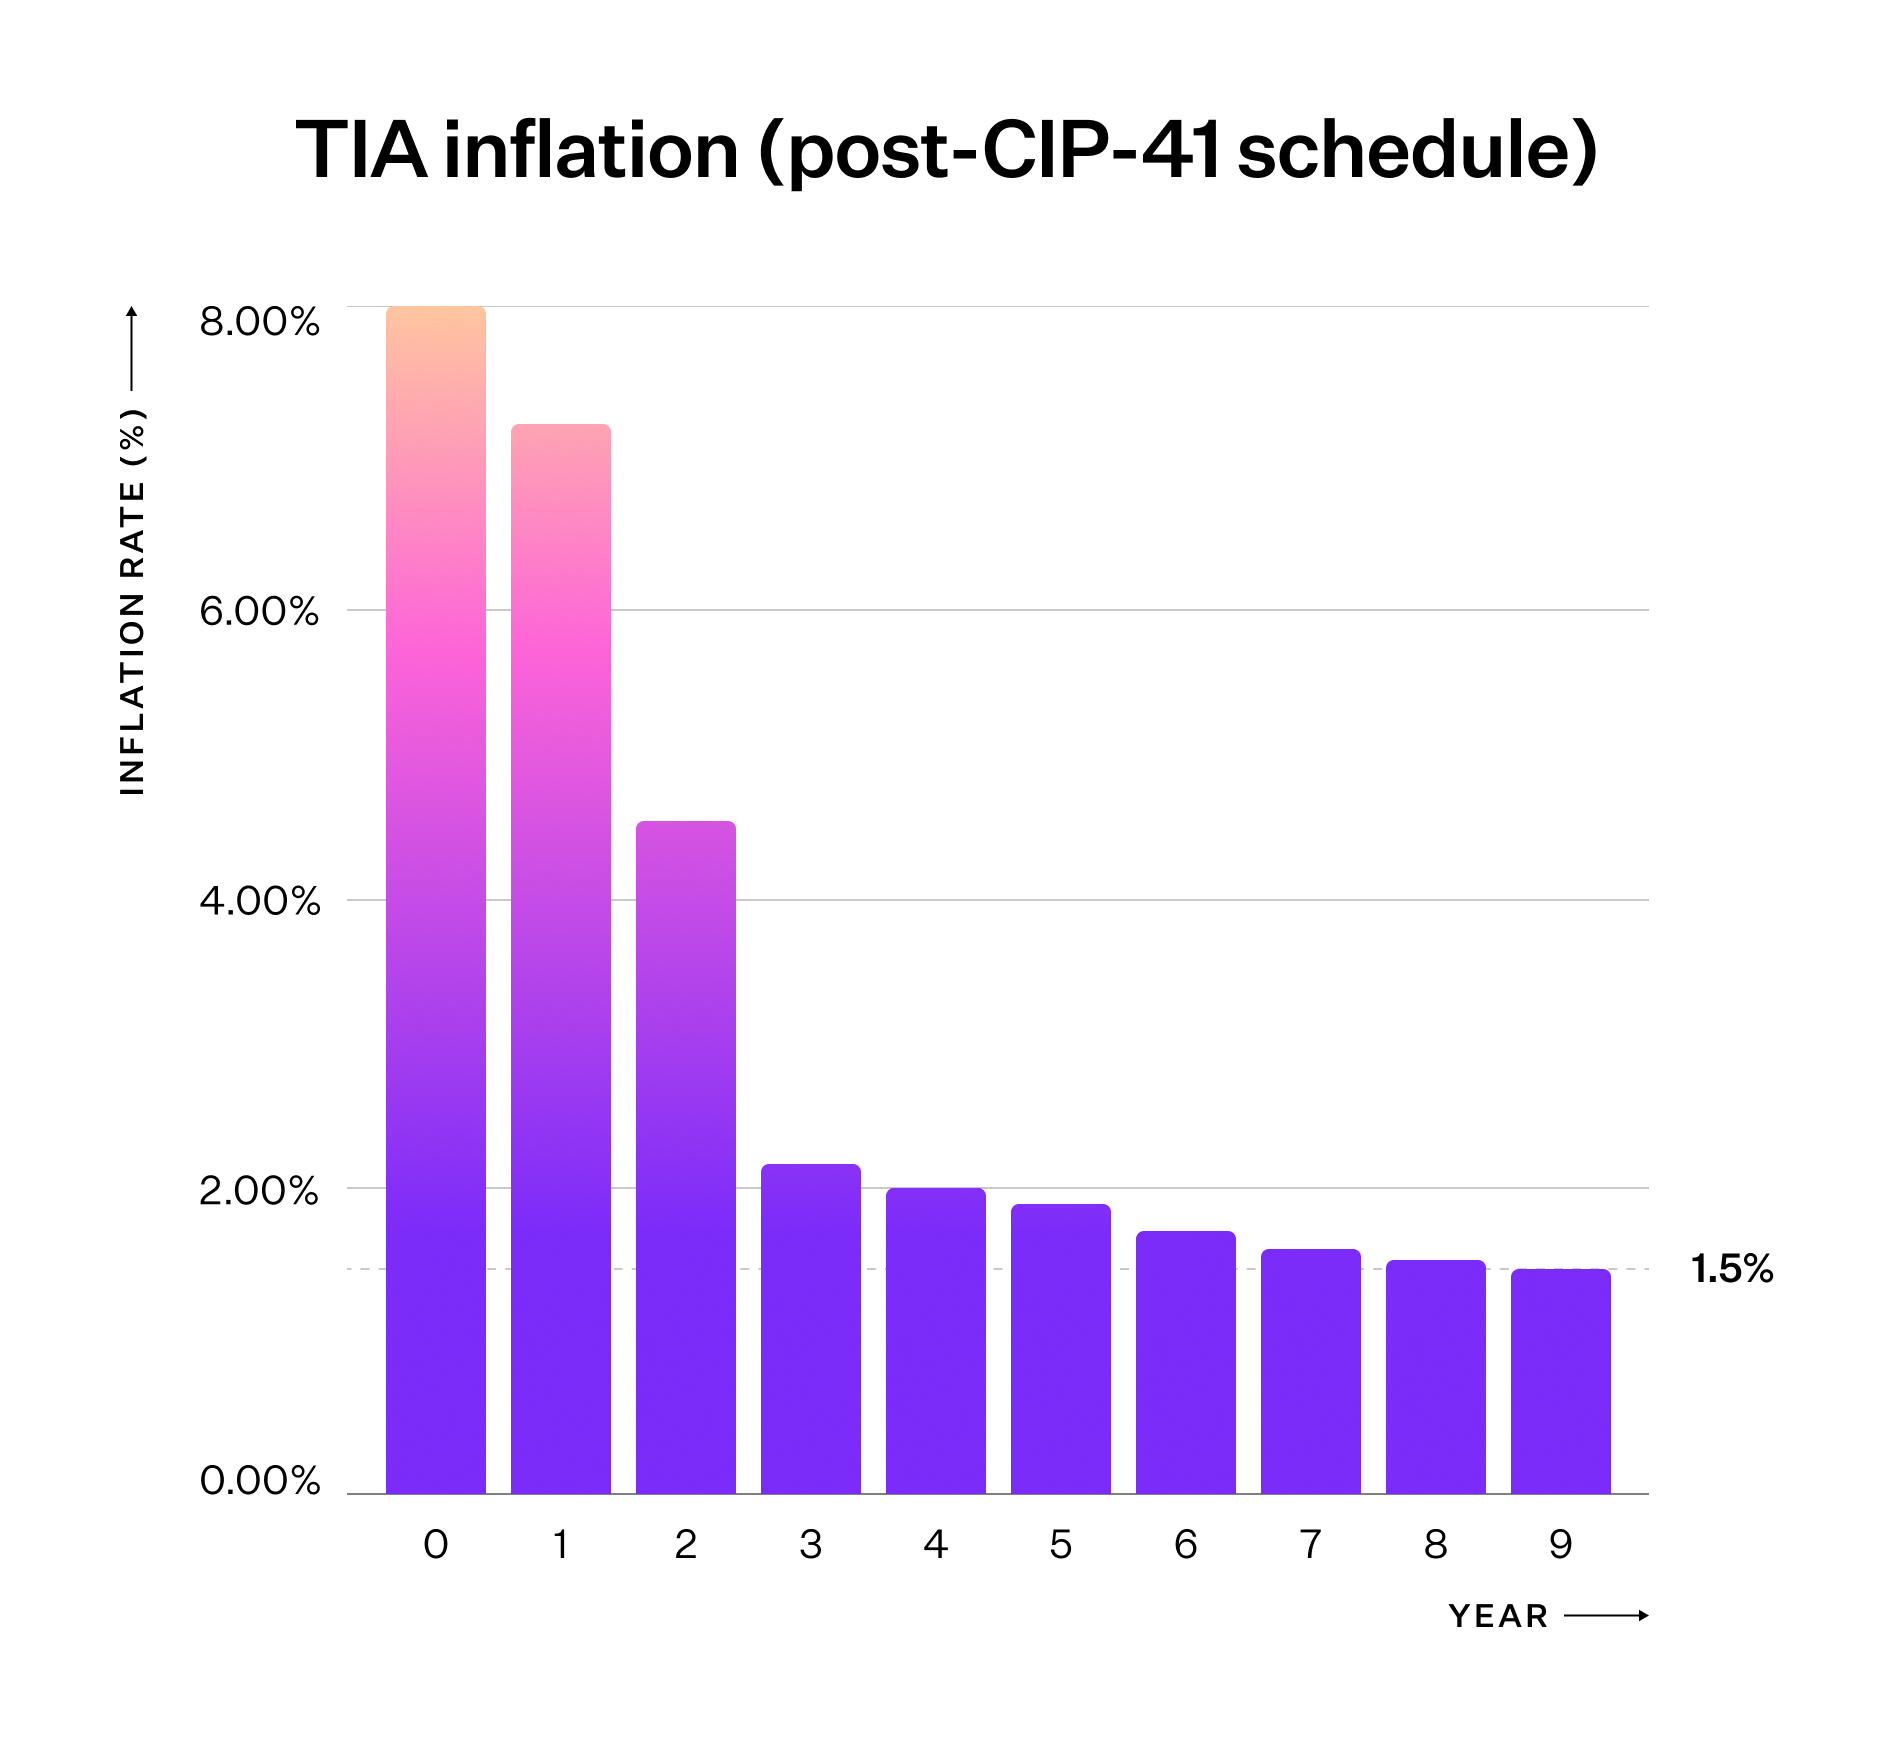
For an in-depth understanding, refer to
[ADR019](https://github.com/celestiaorg/celestia-app/blob/main/docs/architecture/adr-019-strict-inflation-schedule.md).
## Decentralised governance
### Network parameters
TIA holders (not just stakers) can propose and vote on governance proposals to
change a subset of network parameters. To learn more, see a
[complete list of both the changeable and non-changeable parameters and their values](https://celestiaorg.github.io/celestia-app/parameters_v6.html).
Additionally, learn how to
[submit and vote on governance proposals](/operate/consensus-validators/cli-reference#governance).
### Community pool
Starting at genesis, Celestia’s
[community pool](https://docs.cosmos.network/sdk/v0.53/build/modules/distribution)
receives 2% of all Celestia block rewards. TIA stakers may vote to fund
ecosystem initiatives as in many other Cosmos SDK chains.
Learn how to
[submit a governance proposal to spend community pool funds](/operate/consensus-validators/cli-reference#community-pool).
## TIA allocation at genesis
Celestia will have a total supply of 1,000,000,000 TIA at genesis,
split across five categories described in the chart and table below.
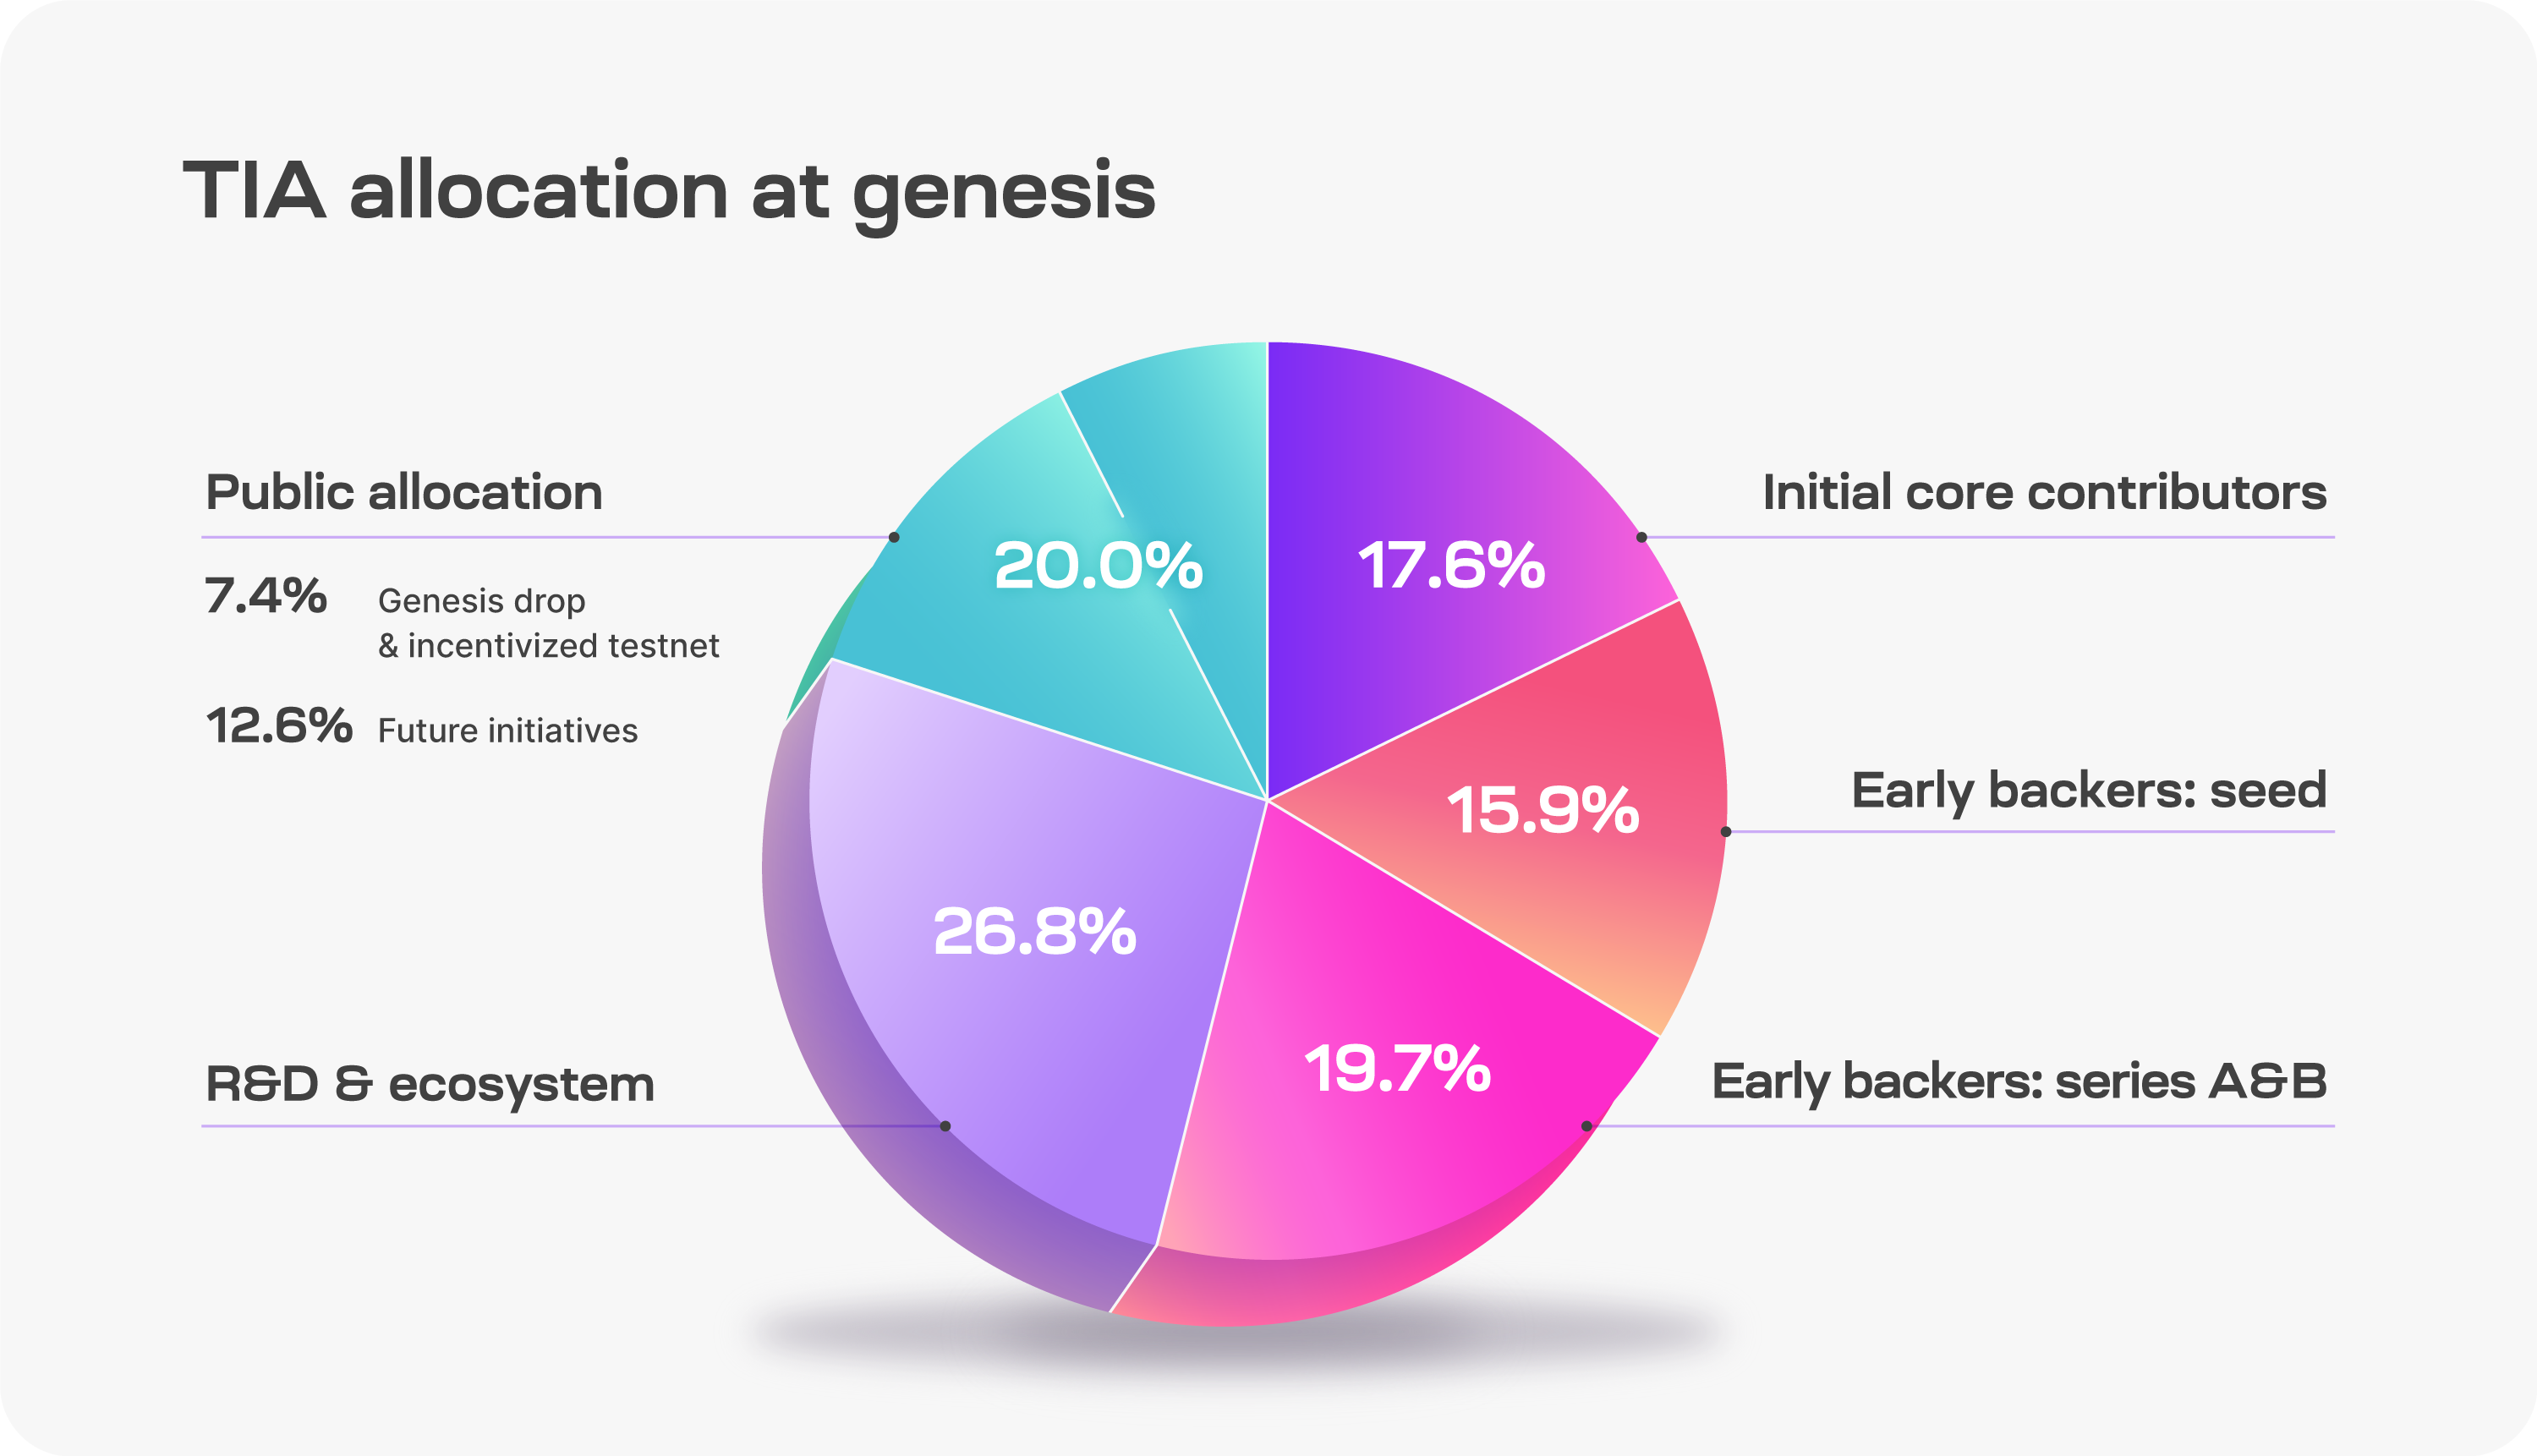
| Category | Description | % |
| ------------------------- | --------------------------------------------------------------------------------------------------------------------------------------------------------------------------------------------------------------------------------------------- | ------ |
| Public Allocation | Genesis Drop and Incentivized Testnet: 7.41% Future initiatives: 12.59% | 20.00% |
| R&D & Ecosystem | Tokens allocated to the Celestia Foundation and core devs for research, development, and ecosystem initiatives including: - Protocol maintenance and development - Programs for rollup developers, infrastructure, and node operators | 26.79% |
| Early Backers: Series A&B | Early supporters of Celestia | 19.67% |
| Early Backers: Seed | Early supporters of Celestia | 15.90% |
| Initial Core Contributors | Members of Celestia Labs, the first core contributor to Celestia | 17.64% |
### Unlocks
Celestia’s 1 billion TIA supply at genesis will be subject to several different
unlock schedules. All tokens, locked or unlocked, may be staked, but staking
rewards are unlocked upon receipt and will add to the circulating supply.
**Circulating supply** is defined as the amount of TIA tokens in general
circulation without onchain transfer restrictions.
**Available supply** is defined as the amount of TIA tokens that are either part
of the circulating supply or are unlocked but subject to some form of governance
to determine when the tokens are allocated. This includes the unlocked portion
of the R&D & Ecosystem tokens and the tokens set aside for future initiatives.
_The definitions for circulating and available supply were adapted from
[Optimism’s definitions](https://community.optimism.io/docs/governance/allocations/#token-distribution-details)._
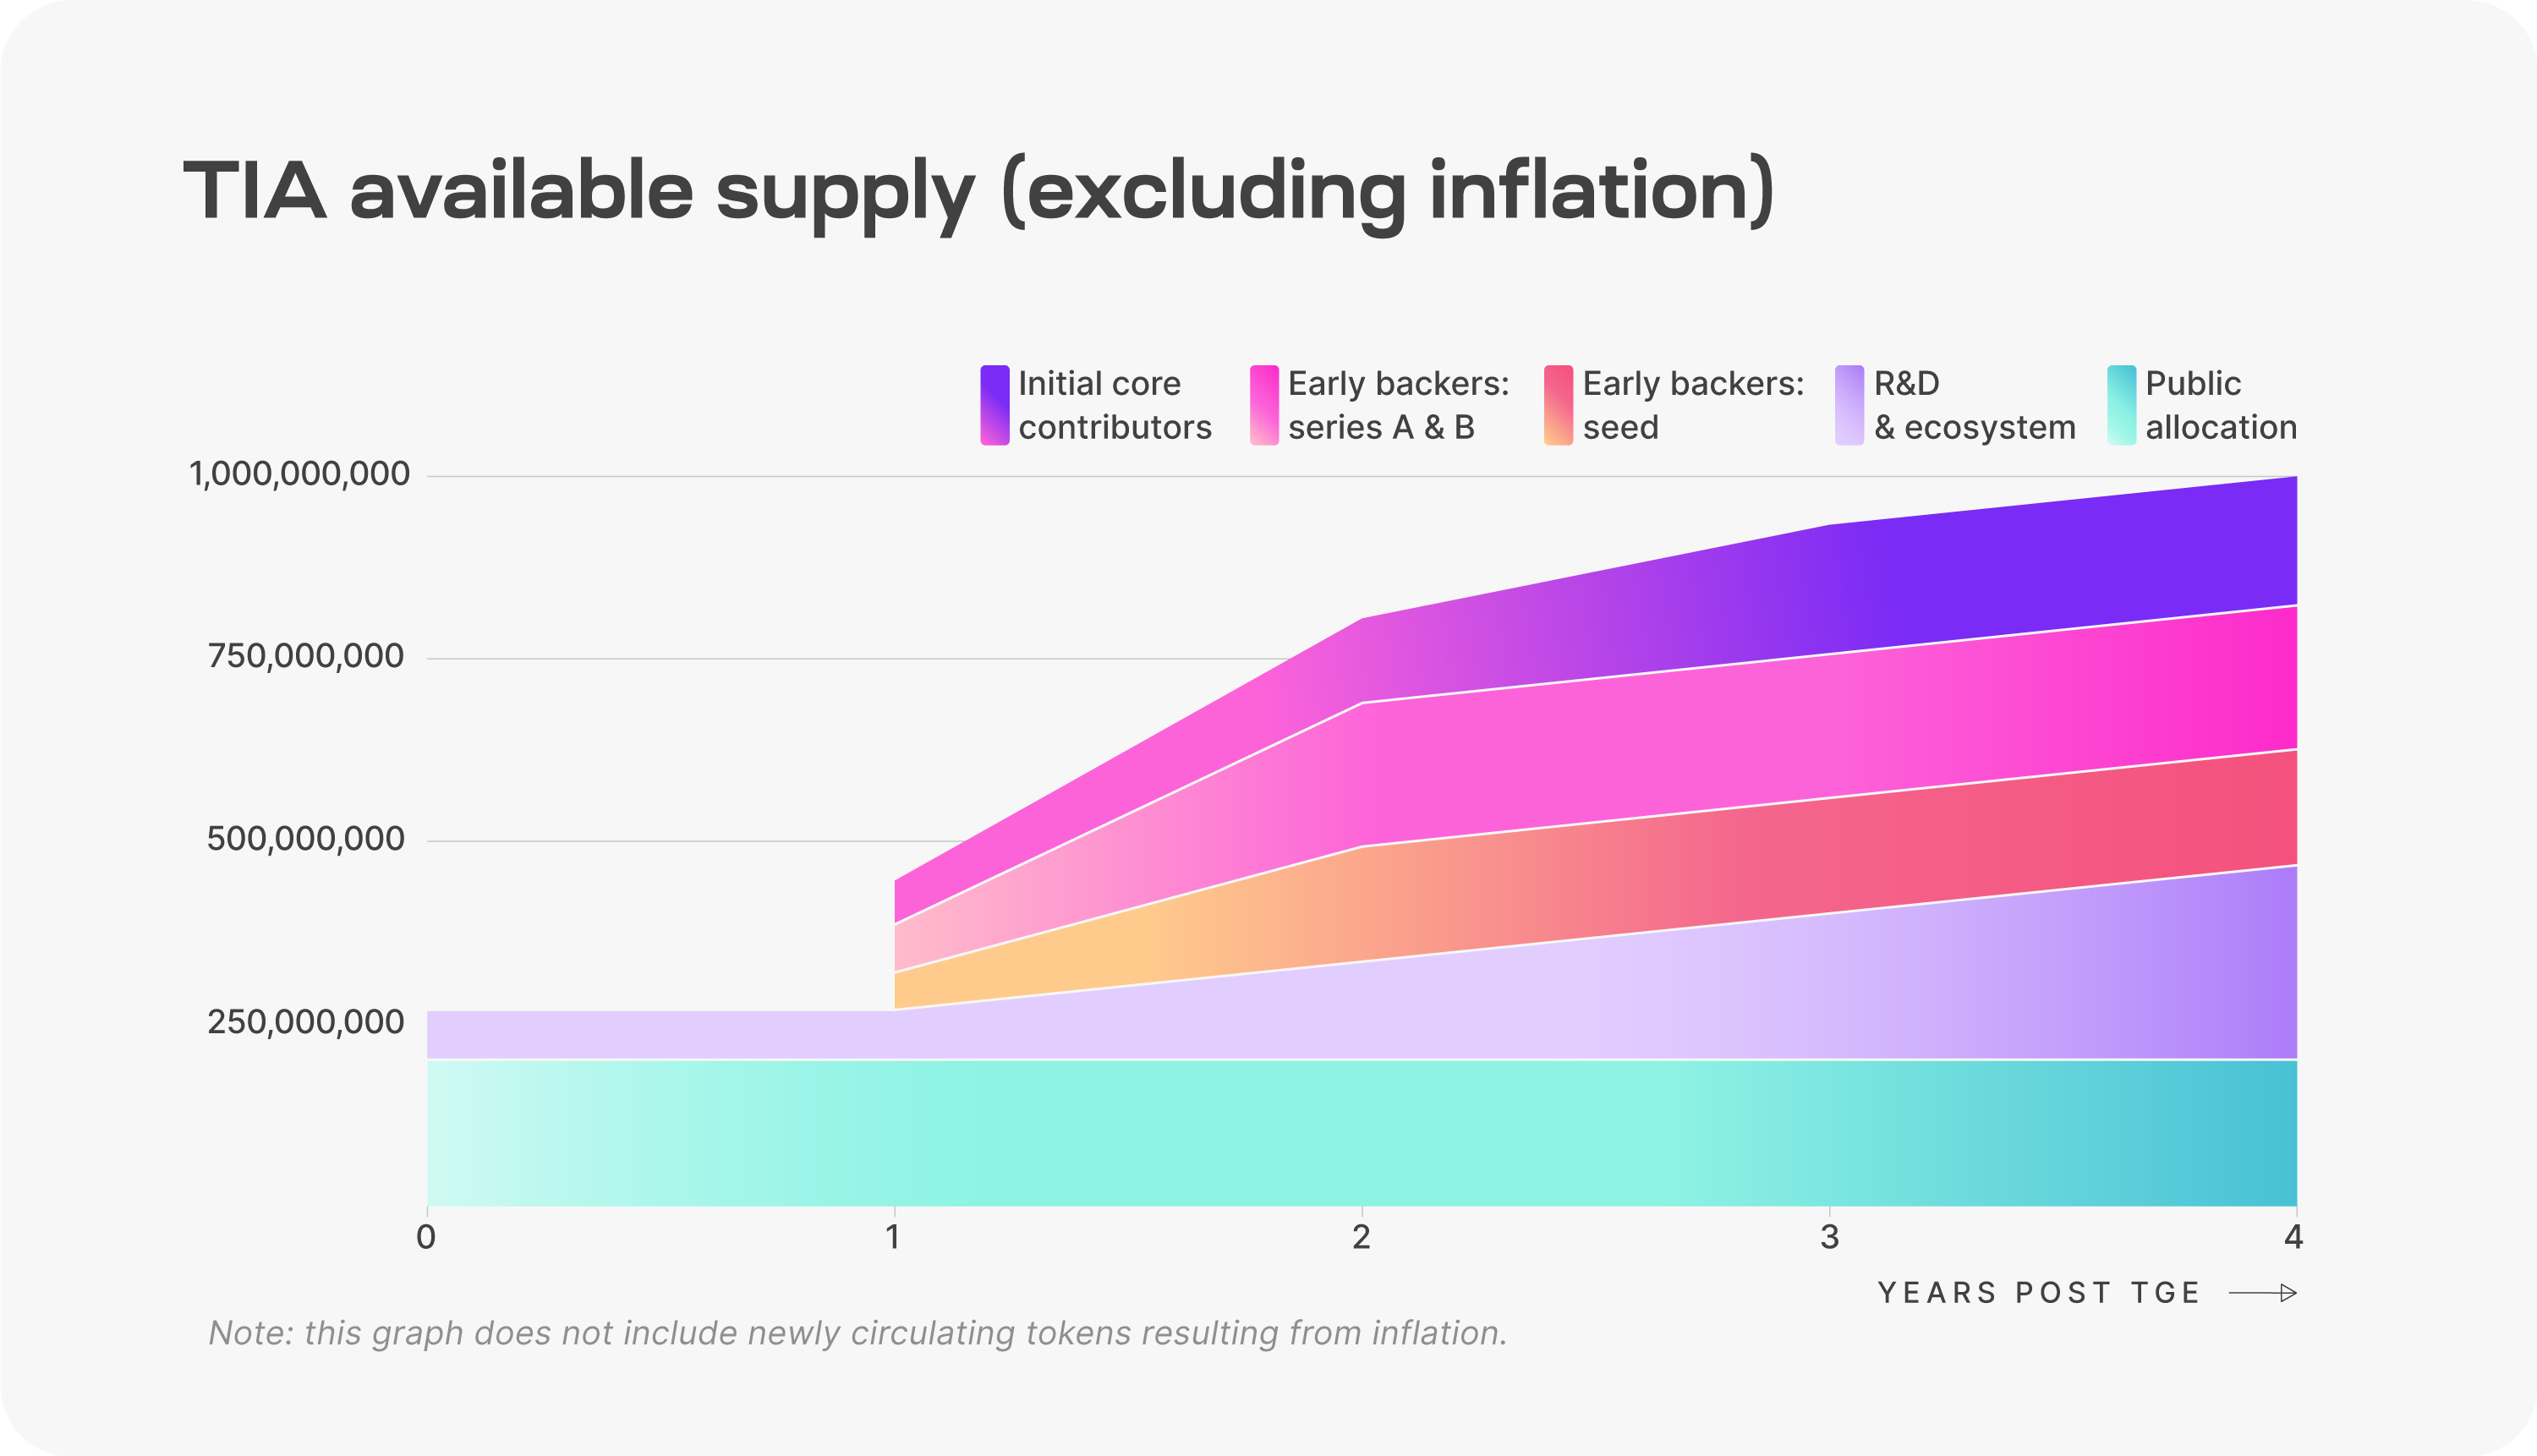
Unlock schedule by category is described in the table below.
_Note: Due to 2024 being a leap year, the yearly unlock intervals will occur on October 30th of each year. For example, unlocks at year 1 will occur on October 30, 2024._
| Category | Unlock Schedule |
| ------------------------- | ------------------------------------------------------------------------------------------- |
| Public Allocation | Fully unlocked at launch. |
| R&D & Ecosystem | 25.00% unlocked at launch. Remaining 75.00% unlocks continuously from year 1 to year 4. |
| Initial Core Contributors | 33.33% unlocked at year 1. Remaining 66.67% unlocks continuously from year 1 to year 3. |
| Early Backers: Seed | 33.33% unlocked at year 1. Remaining 66.67% unlocks continuously from year 1 to year 2. |
| Early Backers: Series A&B | 33.33% unlocked at year 1. Remaining 66.67% unlocks continuously from year 1 to year 2. |
---
Title: Staking on Celestia
URL: https://docs.celestia.org/learn/TIA/staking.md
Source: app/learn/TIA/staking/page.mdx
---
# Staking on Celestia
Engage with the Celestia network at a deeper level through staking. An
essential mechanism to a proof-of-stake network, users can secure the
network by delegating to a validator and receive a share of its
staking rewards.
As of [CIP-30](https://cips.celestia.org/cip-030.html), when delegators modify their staking positions (_e.g._, redelegate or undelegate), the distribution no longer auto-claim rewards on delegation-share changes. Instead, rewards are accrued until the user calls `MsgWithdrawDelegatorReward`.
## Mainnet Beta
Currently, the following staking interfaces exist for the
Mainnet Beta.
Just connect your wallet to get started!
- [https://wallet.keplr.app/chains/celestia?tab=staking](https://wallet.keplr.app/chains/celestia?tab=staking)
- [https://app.leapwallet.io/transact/stake/plain?chain=celestia](https://app.leapwallet.io/transact/stake/plain?chain=celestia)
- [https://alphab.ai/s/m/celestia/](https://alphab.ai/s/m/celestia/)
## Mocha testnet
Currently, the following staking interfaces exist for the
Mocha testnet.
Just connect your wallet to get started!
- [https://testnet.keplr.app/chains/celestia-mocha-testnet](https://testnet.keplr.app/chains/celestia-mocha-testnet)
- [https://explorer.kjnodes.com/celestia-testnet](https://explorer.kjnodes.com/celestia-testnet)
- [https://alphab.ai/s/t/celestia-mocha-4/](https://alphab.ai/s/t/celestia-mocha-4/)
---
Title: Submitting data blobs to Celestia
URL: https://docs.celestia.org/learn/TIA/submit-data.md
Source: app/learn/TIA/submit-data/page.mdx
---
# Submitting data blobs to Celestia
To submit data to Celestia, users submit blob transactions (`BlobTx`). Blob
transactions contain two components, a standard Cosmos-SDK transaction called
`MsgPayForBlobs` and one or more `Blob`s of data.
## Maximum blob size
As of **v6**, the maximum transaction size on all networks is **8 MiB (8,388,608 bytes)**. This cap applies to the _entire_ transaction—including the PFB, all blobs, and overhead—so the maximum total blob size is slightly smaller than 8 MiB.
The _exact_ maximum total blob size in a transaction depends on:
- the number of shares available after accounting for the PFB transaction,
- the share version and layout rules,
- and the fact that the **first sparse share has 478 bytes**, while **all subsequent sparse shares have 482 bytes**.
The current max square size on Arabica is 128 MiB, Mocha is 32 MiB, and Mainnet is 8 MiB.
Under v6 and future upgrades, networks will use larger square sizes, so the absolute maximum blob capacity per transaction will increase correspondingly—up to the global **8 MiB transaction size limit**, which is now the binding constraint.
See the [Mainnet Beta page under “Transaction size limit”](/operate/networks/mainnet-beta#transaction-size-limit) for details.
## Fee market and mempool
Celestia makes use of a standard gas-priced prioritized mempool. By default,
transactions with gas prices higher than that of other transactions in the mempool
will be prioritized by validators.
### Fee estimation
Celestia-node provides flexible fee estimation options for submitting transactions:
1. **Default estimation**: By default, fee estimation relies on the consensus node to which the node is connected.
2. **Third-party estimation**: Users can specify a separate endpoint for fee estimation using the `--core.estimator.address` flag in the CLI. This allows using a dedicated service for fee estimation.
3. **Maximum gas price**: Users can set a maximum gas price they're willing to pay for transactions using the `--max.gas.price` flag. If the estimated gas price exceeds this maximum, the transaction will not be submitted. The default maximum is set to 100 times the minimum gas price (0.2 TIA).
### Fees and gas limits
As of version v1.0.0 of the application (celestia-app), there is no protocol
enforced minimum fee (similar to EIP-1559 in Ethereum). Instead, each
consensus node running a mempool uses a locally configured gas price threshold
that must be met in order for that node to accept a transaction, either directly
from a user or gossiped from another node, into its mempool.
As of version v1.0.0 of the application (celestia-app), gas is not refunded.
Instead, transaction fees are deducted by a flat fee, originally specified by
the user in their tx (where fees = gasLimit \* gasPrice). This means that
users should use an accurate gas limit value if they do not wish to overpay.
Under the hood, fees are currently handled by specifying and deducting a flat
fee. However gas price is often specified by users instead of calculating the
flat fee from the gas used and the gas price. Since the state machine does not
refund users for unused gas, gas price is calculated by dividing the total fee
by the gas limit.
#### Estimating PFB gas
Generally, the gas used by a PFB transaction involves a static fixed cost and
a dynamic cost based on the size of each blob in the transaction.
The fixed cost is an approximation of the gas consumed by operations outside
the function `GasToConsume` (for example, signature verification, tx size, read
access to accounts), which has a default value of 65,000 gas.
Each blob in the PFB contributes to the total gas cost based on its size. The
function `GasToConsume` calculates the total gas consumed by all the blobs
involved in a PFB, where each blob's gas cost is computed by first determining
how many shares are needed to store the blob size. Then, it computes the product
of the number of shares, the number of bytes per share, and the `gasPerByte`
parameter. Finally, it adds a static amount per blob.
The [`blob.GasPerBlobByte`](https://github.com/celestiaorg/celestia-app/blob/29906a468910184f221b42be0a15898722a2b08f/specs/src/parameters_v6.md?plain=1#L33)
and [`auth.TxSizeCostPerByte`](https://github.com/celestiaorg/celestia-app/blob/29906a468910184f221b42be0a15898722a2b08f/specs/src/parameters_v6.md?plain=1#L31)
are parameters that
could potentially be adjusted through the system's governance mechanisms. Hence,
actual costs may vary depending on the current state of these parameters.
#### Gas fee calculation
The total fee for a transaction is calculated as the product of the gas limit
for the transaction and the gas price set by the user:
$$
\text{Total Fee} = \text{Gas Limit} \times \text{Gas Price}
$$
The gas limit for a transaction is the maximum amount of gas that a user is
willing to spend on a transaction. It is determined by both a static
fixed cost (FC) and a variable dynamic cost based on the size of each blob involved
in the transaction:
$$
\text{Gas Limit} = FC + \sum_{i=1}^{n} \text{SSN}(B_i) \times SS \times GCPBB
$$
Where:
- $FC$ = Fixed Cost, is a static value (65,000 gas)
- $\sum_{i=1}^{n} \text{SSN}(B_i)$ = SparseSharesNeeded for the ith Blob, is the number of shares needed for the ith blob in the transaction
- $SS$ = Share Size, is the size of each share
- $GCPBB$ = Gas Cost Per Blob Byte, is a parameter that could potentially be adjusted through the system's governance mechanisms.
The gas fee is set by the user when they submit a transaction. The fee is often
specified by users directly. The total cost for the transaction is then
calculated as the product of the estimated gas limit and the gas price.
Since the state machine does not refund users for unused gas,
it's important for users to estimate the gas limit accurately to
avoid overpaying.
For more details on how gas is calculated per blob, refer to the
[`PayForBlobs` function](https://github.com/celestiaorg/celestia-app/blob/32d247971386c1944d44bec1faeb000b1ff1dd51/x/blob/keeper/keeper.go#L53)
that consumes gas based on the blob sizes. This function uses the
[`GasToConsume` function](https://github.com/celestiaorg/celestia-app/blob/32d247971386c1944d44bec1faeb000b1ff1dd51/x/blob/types/payforblob.go#L157-L167)
to calculate the extra gas charged to pay for a set of blobs in a `MsgPayForBlobs`
transaction. This function calculates the total shares used by all blobs and
multiplies it by the `ShareSize` and `gasPerByte` to get the total gas to consume.
For estimating the total gas required for a set of blobs, refer to the
[`EstimateGas` function](https://github.com/celestiaorg/celestia-app/blob/32d247971386c1944d44bec1faeb000b1ff1dd51/x/blob/types/payforblob.go#L169-L181).
This function estimates the gas based on a linear model that is dependent on
the governance parameters: `gasPerByte` and `txSizeCost`. It assumes other
variables are constant, including the assumption that the `MsgPayForBlobs`
is the only message in the transaction. The `DefaultEstimateGas` function
runs `EstimateGas` with the system defaults.
#### Estimating gas programmatically
Users can estimate an efficient gas limit by using this function:
```go
import (
blobtypes "github.com/celestiaorg/celestia-app/x/blob/types"
)
gasLimit := blobtypes.DefaultEstimateGas([]uint32{uint32(sizeOfDataInBytes)})
```
If using a celestia-node light client, then this function is automatically
called for you when submitting a blob. This function works by breaking down the
components of calculating gas for a blob transaction. These components consist
of a flat costs for all PFBs, the size of each blob and how many shares each
uses and the parameter for gas used per byte. More information about how gas is
used can be found in the [gas
specs](https://github.com/celestiaorg/celestia-app/blob/d17e231ae3a0150b50a1854f3e9a268c34502b6b/specs/src/specs/resource_pricing.md)
and the exact formula can be found in the [blob
module](https://github.com/celestiaorg/celestia-app/blob/d17e231ae3a0150b50a1854f3e9a268c34502b6b/x/blob/types/payforblob.go#L157-L181).
## Transaction submission strategies
Celestia-node offers three transaction submission modes, controlled by the `TxWorkerAccounts` configuration parameter in your node's
state config in `config.toml`. Each mode has different throughput characteristics and ordering guarantees.
### Default behavior (TxWorkerAccounts = 0)
By default, `TxWorkerAccounts` is set to `0`, which means queued submission is disabled. All PayForBlobs transactions are submitted
immediately to the mempool without waiting for confirmations. This is the same behavior as versions prior to [v0.28.2-arabica](https://github.com/celestiaorg/celestia-node/releases/tag/v0.28.2-arabica).
The mempool maintains a fork of the canonical state each block, updating the sequence number (nonce) for each account that submits a
transaction. If you wish to submit multiple transactions from the same account in quick succession, you must specify the nonce
manually. Otherwise, subsequent transactions will not be accepted until the first transaction is reaped from the mempool (included in
a block) or dropped after timing out.
By default, nodes will drop a transaction if it does not get included in 12 blocks (roughly 72 seconds). At this point, you must
resubmit your transaction if you want it to eventually be included.
### Synchronous submission (TxWorkerAccounts = 1)
Setting `TxWorkerAccounts` to `1` enables synchronous, queued transaction submission:
```toml
[State]
TxWorkerAccounts = 1
```
Characteristics:
- Each transaction queues until the previous one is confirmed
- Preserves strict ordering of transactions
- Avoids sequence mismatch errors
- Throughput: approximately 1 PayForBlobs transaction every other block
### Parallel transaction submission (TxWorkerAccounts > 1)
For high-throughput applications that do not require sequential transaction ordering, you can enable parallel transaction submission
by setting `TxWorkerAccounts` to a value > 1:
```toml
[State]
DefaultKeyName = "my_celes_key"
DefaultBackendName = "test"
TxWorkerAccounts = 8
```
#### How it works:
`TxWorkerAccounts` defines how many parallel lanes the node will initialize for submitting transactions. These lanes are implemented as
subaccounts that are automatically:
1. Created and derived from your default account
2. Funded by your default account
3. Added to your node's keyring
This bypasses account sequence limits and enables significantly higher throughput.
Example: TxWorkerAccounts = 8 creates 7 subaccounts plus your 1 default account, allowing at least 8 PayForBlobs transactions per
block.
#### Important considerations
#### Key points to understand:
- Account opacity: You will not know which subaccount signed which blob. Subaccounts are managed automatically by the node.
- Default account only: Parallel submission only works with your node's default account. If you specify a different account in
TxConfig, parallel submission is bypassed.
- Blob retrieval: Since you don't know which account submitted each blob, retrieve your blobs using namespace, height, and commitment.
### Retrieving blobs submitted via parallel lanes
When using parallel submission, retrieve your blobs using the following RPC methods from the [Node API `blob` section](/build/rpc/node-api/):
- [`blob.Get`](/build/rpc/node-api/#blob) - Get blob by namespace and commitment
- [`blob.GetProof`](/build/rpc/node-api/#blob) - Get inclusion proof by height, namespace, and commitment
- [`blob.GetCommitmentProof`](/build/rpc/node-api/#blob) - Get commitment proof by height, namespace, and share commitment
Example using blob.Get:
```bash
celestia blob get
```
You should store the namespace, height, and commitment from your submission response to retrieve blobs later.
## API
Users can currently create and submit `BlobTx`s in six ways.
### The celestia-app consensus node CLI
```bash
celestia-appd tx blob PayForBlobs [flags]
```
### The celestia-node light node CLI
Using `blob.Submit`:
```bash
celestia blob submit [flags]
```
Available flags:
- `--core.estimator.address string`: Specifies the endpoint of the third-party service for gas price and gas estimation. Format: `:`. If not provided, the default connection to the consensus node will be used.
- `--max.gas.price`: Sets the maximum gas price you're willing to pay for the transaction. If the estimated gas price exceeds this value, the transaction will not be submitted. Default is 0.2 TIA (100x the minimum gas price).
Learn more in the [light node tutorial](/operate/data-availability/light-node/quickstart).
### The celestia-node API golang client
See the [golang client tutorial](/build/post-retrieve-blob/client/go).
### The celestia-node API Rust client
See the [Rust client tutorial](/build/post-retrieve-blob/client/rust).
### RPC to a celestia-node
Using the JSON RPC API, submit data using the following methods:
- [`blob.Submit`](/build/rpc/node-api/#blob.Submit)
- [`state.SubmitPayForBlob`](/build/rpc/node-api/#state.SubmitPayForBlob)
Learn more in the [Node API docs](/build/rpc/node-api/).
### Post a blob directly from Celenium
Celenium provides a user-friendly interface to view and interact with data on Celestia,
and allows for submitting blobs directly from the explorer interface.
To submit a blob from Celenium, follow these steps:
1. Navigate to the [Celenium explorer](https://celenium.io) and connect your wallet.
2. Click on the terminal button in the top right corner of the screen and select the "Submit data blob" option.
3. Next, ensure the file you are submitting is in a supported format and upload it.
4. In the "Namespace" field, input the namespace you want to use for the blob in hex format.
5. Finally, click on the "Continue" button to submit your blob, then approve the transaction in your wallet.
Once the blob is submitted, you will see its hash on the screen.
You can also use Celenium’s search bar to search for the blob's hash and view its details.
---
Title: Deploy the Blobstream contract
URL: https://docs.celestia.org/operate/blobstream/deploy-contract.md
Source: app/operate/blobstream/deploy-contract/page.mdx
---
# Deploy the Blobstream contract
The `deploy` is a helper command that allows deploying the Blobstream smart contract to a new EVM chain:
```bash
blobstream deploy --help
Deploys the Blobstream contract and initializes it using the provided Celestia chain
Usage:
blobstream deploy [flags]
blobstream deploy [command]
Available Commands:
keys Blobstream keys manager
```
## How to run
### Install the Blobstream binary
Make sure to have the Blobstream binary installed. Check [the Blobstream binary page](/operate/blobstream/install-binary) for more details.
### Add keys
In order to deploy a Blobstream smart contract, you will need a funded EVM address and its private key. The `keys` command will help you set up this key:
```bash
blobstream deploy keys --help
```
To import your EVM private key, there is the `import` subcommand to assist you with that:
```bash
blobstream deploy keys evm import --help
```
This subcommand allows you to either import a raw ECDSA private key provided as plaintext, or import it from a file. The files are JSON keystore files encrypted using a passphrase like in [this example](https://geth.ethereum.org/docs/developers/dapp-developer/native-accounts).
After adding the key, you can check that it's added via running:
```bash
blobstream deploy keys evm list
```
For more information about the `keys` command, check [the keys documentation](/operate/blobstream/key-management).
### Deploy the contract
Now, you can deploy the Blobstream contract to a new EVM chain:
```bash
blobstream deploy \
--evm.chain-id 4 \
--evm.contract-address 0x27a1F8CE94187E4b043f4D57548EF2348Ed556c7 \
--core.grpc.host localhost \
--core.grpc.port 9090 \
--starting-nonce latest \
--evm.rpc http://localhost:8545
```
The `--starting-nonce` can be replaced by the following:
- `latest`: to deploy the Blobstream contract starting from the latest validator set
- `earliest`: to deploy the Blobstream contract starting from genesis
- `nonce`: you can provide a custom nonce on where you want Blobstream to start. If the provided nonce is not a `Valset` attestation, then the one before it will be used to deploy the Blobstream smart contract
After deployment, you will see the Blobstream smart contract address in the logs along with the transaction hash.
---
Title: Install the Blobstream binary
URL: https://docs.celestia.org/operate/blobstream/install-binary.md
Source: app/operate/blobstream/install-binary/page.mdx
---
# Install the Blobstream binary
The [orchestrator](/operate/blobstream/orchestrator) is the software that signs the
Blobstream attestations, and the [relayer](/operate/blobstream/relayer) is the one that
relays them to the target EVM chain.
## Install
1. [Install Go](https://go.dev/doc/install) (1.21 or later)
2. Clone the `orchestrator-relayer` repository:
```bash
git clone https://github.com/celestiaorg/orchestrator-relayer.git
cd orchestrator-relayer
git checkout v1.2.0
```
3. Install the Blobstream CLI:
```bash
make install
```
## Usage
```bash
# Print help
blobstream --help
```
## How to run
If you are a Celestia-app validator, all you need to do is run the orchestrator. Check out [the Blobstream orchestrator page](/operate/blobstream/orchestrator) for more details.
If you want to post commitments on an EVM chain, you will need to deploy a new Blobstream contract and run a relayer. Check out [the Blobstream relayer page](/operate/blobstream/relayer) for relayer docs and [the Blobstream deployment page](/operate/blobstream/deploy-contract) for how to deploy a new Blobstream contract.
> **Note:** The Blobstream P2P network is a separate network from the consensus or the data availability one. Thus, you will need its specific bootstrappers to be able to connect to it.
## Contributing
### Tools
1. Install [golangci-lint](https://golangci-lint.run/docs/welcome/install/)
2. Install [markdownlint](https://github.com/DavidAnson/markdownlint)
### Helpful Commands
```bash
# Build a new orchestrator-relayer binary and output to build/blobstream
make build
# Run tests
make test
# Format code with linters (this assumes golangci-lint and markdownlint are installed)
make fmt
```
## Useful links
- The smart contract implementation is in [blobstream-contracts](https://github.com/celestiaorg/blobstream-contracts/)
- The state machine implementation is in [orchestrator-relayer](https://github.com/celestiaorg/orchestrator-relayer)
- Blobstream ADRs are in [the docs](https://github.com/celestiaorg/celestia-app/tree/main/docs/architecture)
- Blobstream design explained in [this blog post on layer 2s](https://blog.celestia.org/celestiums/)
---
Title: Key management
URL: https://docs.celestia.org/operate/blobstream/key-management.md
Source: app/operate/blobstream/key-management/page.mdx
---
# Key management
The Blobstream `keys` command allows managing EVM private keys and P2P identities. It is defined as a subcommand for multiple commands with the only difference being the directory where the keys are stored. For the remaining functionality, it is the same for all the commands.
## Orchestrator command
The `blobstream orchestrator keys` command manages keys for the orchestrator. By default, it uses the orchestrator default home directory to store the keys: `~/.orchestrator/keystore`. However, the default home can be changed either by specifying a different directory using the `--home` flag or setting the following environment variable:
| Variable | Explanation | Default value | Required |
| ------------------- | ----------------------------------- | ----------------- | -------- |
| `ORCHESTRATOR_HOME` | Home directory for the orchestrator | `~/.orchestrator` | Optional |
## Relayer command
The `blobstream relayer keys` command manages keys for the relayer. By default, it uses the relayer default home directory to store the keys: `~/.relayer/keystore`. However, the default home can be changed either by specifying a different directory using the `--home` flag or setting the following environment variable:
| Variable | Explanation | Default value | Required |
| -------------- | ------------------------------ | ------------- | -------- |
| `RELAYER_HOME` | Home directory for the relayer | `~/.relayer` | Optional |
## Deploy command
The `blobstream deploy keys` command manages keys for the deployer. By default, it uses the deployer default home directory to store the keys: `~/.deployer/keystore`. However, the default home can be changed either by specifying a different directory using the `--home` flag or setting the following environment variable:
| Variable | Explanation | Default value | Required |
| --------------- | ------------------------------------- | ------------- | -------- |
| `DEPLOYER_HOME` | Home directory for the deploy command | `~/.deployer` | Optional |
## Store initialization
For the `keys` command, the home directory will be created automatically for commands that `add/import` new keys without having to manually initialize the store. Thus, you should be careful when running those.
However, if it finds an already initialized store, it will only add new keys to it and not overwrite it.
For the remaining subcommands `update/delete/list`, if the store is not initialized, the command will complain and change nothing on the file system.
## Options
Aside from the difference in the default home directory, the `keys` subcommand is similar for all commands and handles the keys in the same way.
The examples will use the orchestrator command to access the keys. However, the same behavior applies to the other commands as well.
```bash
blobstream orchestrator keys --help
Blobstream keys manager
Usage:
blobstream orchestrator keys [command]
Available Commands:
evm Blobstream EVM keys manager
p2p Blobstream p2p keys manager
Flags:
-h, --help help for keys
Use "blobstream orchestrator keys [command] --help" for more information about a command.
```
## EVM keystore
The first subcommand of the `keys` command is `evm`. This allows managing EVM keys.
The EVM keys are `ECDSA` keys using the `secp256k1` curve. The implementation uses `geth` file system keystore [implementation](https://geth.ethereum.org/docs/developers/dapp-developer/native-accounts). Thus, keys can be used interchangeably with any compatible software.
```bash
blobstream orchestrator keys evm --help
Blobstream EVM keys manager
Usage:
blobstream orchestrator keys evm [command]
Available Commands:
add create a new EVM address
delete delete an EVM addresses from the key store
import import evm keys to the keystore
list list EVM addresses in key store
update update an EVM account passphrase
Flags:
-h, --help help for evm
Use "blobstream orchestrator keys evm [command] --help" for more information about a command.
```
The store also uses the `accounts.StandardScryptN` and `accounts.StandardScryptP` for the `Scrypt` password-based key derivation algorithm to improve its resistance to parallel hardware attacks:
```go
evmKs = keystore.NewKeyStore(evmKeyStorePath(path), keystore.StandardScryptN, keystore.StandardScryptP)
```
### EVM: Add subcommand
The `add` subcommand allows creating a new EVM private key and storing it in the keystore:
```bash
blobstream orchestrator keys evm add --help
create a new EVM address
Usage:
blobstream orchestrator keys evm add [flags]
```
The passphrase of the key encryption can be passed as a flag. But it is advised not to pass it as plain text and instead enter it when prompted interactively.
After creating a new key, you will see its corresponding address printed:
```bash
blobstream orchestrator keys evm add
I[2023-04-13|14:16:11.387] successfully opened store path=/home/midnight/.orchestrator
I[2023-04-13|14:16:11.387] please provide a passphrase for your account
I[2023-04-13|14:16:30.533] account created successfully address=0xaF319b70de80232539ad576f88739afD2dF44187
I[2023-04-13|14:16:30.534] successfully closed store path=/home/midnight/.orchestrator
```
### EVM: Delete subcommand
The `delete` subcommand allows deleting an EVM private key from store via providing its corresponding address:
```bash
blobstream orchestrator keys evm delete --help
delete an EVM addresses from the key store
Usage:
blobstream orchestrator keys evm delete [flags]
```
The provided address should be a `0x` prefixed EVM address.
After running the command, you will be prompted to enter the passphrase for the encrypted private key, if not passed as a flag.
Then, you will be prompted to confirm that you want to delete that private key. Make sure to verify if you're deleting the right one because once deleted, it can no longer be recovered!
```bash
blobstream orchestrator keys evm delete 0x27a1F8CE94187E4b043f4D57548EF2348Ed556c7
I[2023-04-13|15:01:41.308] successfully opened store path=/home/midnight/.orchestrator
I[2023-04-13|15:01:41.309] deleting account address=0x27a1F8CE94187E4b043f4D57548EF2348Ed556c7
I[2023-04-13|15:01:41.309] please provide the address passphrase
I[2023-04-13|15:01:43.268] Are you sure you want to delete your private key? This action cannot be undone and may result in permanent loss of access to your account.
Please enter 'yes' or 'no' to confirm your decision: yes
I[2023-04-13|15:01:45.532] private key has been deleted successfully address=0x27a1F8CE94187E4b043f4D57548EF2348Ed556c7
I[2023-04-13|15:01:45.534] successfully closed store path=/home/midnight/.orchestrator
```
### EVM: List subcommand
The `list` subcommand allows listing the existing keys in the keystore:
```bash
blobstream orchestrator keys evm list
I[2023-04-13|16:08:45.084] successfully opened store path=/home/midnight/.orchestrator
I[2023-04-13|16:08:45.084] listing accounts available in store
I[2023-04-13|16:08:45.084] 0x7Dd8F9CAfe6D25165249A454F2d0b72FD149Bbba
I[2023-04-13|16:08:45.084] successfully closed store path=/home/midnight/.orchestrator
```
You could specify a different home using the `--home` flag to list the keys in another home directory.
### EVM: Update subcommand
The `update` subcommand allows changing the EVM private key passphrase to a new one. It takes as argument the `0x` prefixed EVM address corresponding to the private key you want to edit.
```bash
blobstream orchestrator keys evm update --help
update an EVM account passphrase
Usage:
blobstream orchestrator keys evm update [flags]
```
Example:
```bash
blobstream orchestrator keys evm update 0x7Dd8F9CAfe6D25165249A454F2d0b72FD149Bbba
I[2023-04-13|16:21:17.139] successfully opened store path=/home/midnight/.orchestrator
I[2023-04-13|16:21:17.140] updating account address=0x7Dd8F9CAfe6D25165249A454F2d0b72FD149Bbba
I[2023-04-13|16:21:17.140] please provide the address passphrase
I[2023-04-13|16:21:18.134] please provide the address new passphrase
I[2023-04-13|16:21:22.403] successfully updated the passphrase address=0x7Dd8F9CAfe6D25165249A454F2d0b72FD149Bbba
I[2023-04-13|16:21:22.420] successfully closed store path=/home/midnight/.orchestrator
```
Both passphrases can be provided as flags, but it's better to pass them interactively for more security.
The `--home` can be specified if the store is not in the default directory.
### EVM: Import subcommand
The `import` subcommand allows importing existing private keys into the keystore. It has two subcommands: `ecdsa` and `file`. The first allows importing a private key in plaintext, while the other allows importing a private key from a JSON file secured with a passphrase.
```bash
blobstream orchestrator keys evm import --help
import evm keys to the keystore
Usage:
blobstream orchestrator keys evm import [command]
Available Commands:
ecdsa import an EVM address from an ECDSA private key
file import an EVM address from a file
Flags:
-h, --help help for import
Use "blobstream orchestrator keys evm import [command] --help" for more information about a command.
```
#### EVM: Import ECDSA
For the first one, it takes as argument the private key in plaintext. Then, it prompts for the passphrase to use when encrypting the key and saving it to the keystore. The passphrase could be passed as a flag using the `--evm.passphrase`, but it's advised not to.
Example:
```bash
blobstream orchestrator keys evm import ecdsa da6ed55cb2894ac2c9c10209c09de8e8b9d109b910338d5bf3d747a7e1fc9eb7
I[2023-04-13|17:00:48.617] successfully opened store path=/home/midnight/.orchestrator
I[2023-04-13|17:00:48.617] importing account
I[2023-04-13|17:00:48.617] please provide the address passphrase
I[2023-04-13|17:00:51.989] successfully imported file address=0x6B452Da14195b0aDc3C960E56a078Cf8f50448f8
I[2023-04-13|17:00:51.990] successfully closed store path=/home/midnight/.orchestrator
```
#### EVM: Import file
For the second, it takes a JSON key file, as defined in [@ethereum/eth-keyfile](https://github.com/ethereum/eth-keyfile), and imports it to your keystore, so it can be used for signatures.
```bash
blobstream orchestrator keys evm import file --help
import an EVM address from a file
Usage:
blobstream orchestrator keys evm import file [flags]
```
For example, if you have a file in the current directory containing a private key, you could run the following:
```bash
blobstream orchestrator keys evm import file UTC--2023-04-13T15-00-50.302148204Z--966e6f22781ef6a6a82bbb4db3df8e225dfd9488
I[2023-04-13|17:31:53.307] successfully opened store path=/home/midnight/.orchestrator
I[2023-04-13|17:31:53.307] importing account
I[2023-04-13|17:31:53.308] please provide the address passphrase
I[2023-04-13|17:31:54.440] please provide the address new passphrase
I[2023-04-13|17:31:58.436] successfully imported file address=0x966e6f22781EF6a6A82BBB4DB3df8E225DfD9488
I[2023-04-13|17:31:58.437] successfully closed store path=/home/midnight/.orchestrator
```
With the `passphrase` being the current file passphrase, and the `new passphrase` being the new passphrase that will be used to encrypt the private key in the Blobstream store.
## P2P keystore
Similar to the EVM keystore, the P2P store has similar subcommands for handling the P2P Ed25519 private keys. However, it doesn't use any passphrase to secure them because they aren't that important. Any key could be used, and it is not binding to any identity. Thus, there is no need to secure them.
To access the P2P keystore, run the following:
```bash
blobstream orchestrator keys p2p
Blobstream p2p keys manager
Usage:
blobstream orchestrator keys p2p [command]
Available Commands:
add create a new Ed25519 P2P address
delete delete an Ed25519 P2P private key from store
import import an existing p2p private key
list list existing p2p addresses
Flags:
-h, --help help for p2p
Use "blobstream orchestrator keys p2p [command] --help" for more information about a command.
```
The `orchestrator` could be replaced by `relayer` and the only difference would be the default home directory. Aside from that, all the methods defined for the orchestrator will also work with the relayer.
### P2P: Add subcommand
The `add` subcommand creates a new p2p key to the p2p store:
```bash
blobstream orchestrator keys p2p add --help
create a new Ed25519 P2P address
Usage:
blobstream orchestrator keys p2p add [flags]
```
It takes as argument an optional `` which would be the name that you can use to reference that private key. If not specified, an incremental nickname will be assigned.
```bash
blobstream orchestrator keys p2p add
I[2023-04-13|17:38:17.289] successfully opened store path=/home/midnight/.orchestrator
I[2023-04-13|17:38:17.290] generating a new Ed25519 private key nickname=1
I[2023-04-13|17:38:17.291] key created successfully nickname=1
I[2023-04-13|17:38:17.291] successfully closed store path=/home/midnight/.orchestrator
```
For example, in the above execution, the nickname `1` was given to the newly added key, since no nickname was provided.
The nickname will be needed in case the orchestrator needs to use a specific private key to connect to the P2P network, and that nickname will be provided as a flag. However, if not provided, the orchestrator/relayer will choose the first key in the store and just use it to connect.
### P2P: Delete subcommand
The `delete` subcommand will delete a P2P private key from store referenced by its nickname:
```bash
blobstream orchestrator keys p2p delete --help
delete an Ed25519 P2P private key from store
Usage:
blobstream orchestrator keys p2p delete [flags]
```
### P2P: Import subcommand
The `import` subcommand will import an existing Ed25519 private key to the store. It takes as argument the nickname that you wish to save the private key under, and the actual private key in hex format without `0x`:
```bash
blobstream orchestrator keys p2p import --help
import an existing p2p private key
Usage:
blobstream orchestrator keys p2p import [flags]
```
### P2P: List subcommand
The `list` subcommand lists the existing P2P private keys in the store:
```bash
blobstream orchestrator keys p2p list --help
list existing p2p addresses
Usage:
blobstream orchestrator keys p2p list [flags]
```
---
Title: Blobstream orchestrator
URL: https://docs.celestia.org/operate/blobstream/orchestrator.md
Source: app/operate/blobstream/orchestrator/page.mdx
---
# Blobstream orchestrator
The role of the orchestrator is to sign attestations using its corresponding validator EVM private key. These attestations are generated within the Blobstream module of the Celestia-app state machine. To learn more about what attestations are, you can refer to [the Blobstream overview](https://github.com/celestiaorg/orchestrator-relayer).
## How it works
The orchestrator does the following:
1. Connect to a Celestia-app full node or validator node via RPC and gRPC and wait for new attestations
2. Once an attestation is created inside the Blobstream state machine, the orchestrator queries it
3. After getting the attestation, the orchestrator signs it using the provided EVM private key. The private key should correspond to the EVM address provided when creating the validator. Read [more about Blobstream keys](/operate/blobstream/key-management)
4. Then, the orchestrator pushes its signature to the P2P network it is connected to, via adding it as a DHT value
5. Listen for new attestations and go back to step 2
The orchestrator connects to a separate P2P network than the consensus or the data availability one. Bootstrappers for that network will be provided.
Bootstrapper for the Mocha testnet is:
```
/dns/bootstr-incent-1.celestia.tools/tcp/30000/p2p/12D3KooWSGZ2LXW2soQFHgU82uLfN7pNW5gMMkTnu1fhMXG43TvP
```
Make sure to specify it using the `-b` flag when running the orchestrator.
This means that even if the consensus node is already connected to the consensus network, if the orchestrator doesn't start with a list of bootstrappers for its specific network, then it will not work and will output the following logs:
```text
I[2023-04-26|00:04:08.175] waiting for routing table to populate targetnumberofpeers=1 currentcount=0
I[2023-04-26|00:04:18.175] waiting for routing table to populate targetnumberofpeers=1 currentcount=0
I[2023-04-26|00:04:28.175] waiting for routing table to populate targetnumberofpeers=1 currentcount=0
```
## How to run
### Requirements
To run an orchestrator, you will need to have access to the following:
- Access to your EVM address private key. This doesn't need to be funded in any network. If yours is not yet set, check the [register an EVM address](#register-evm-address) section
- A list of bootstrappers for the P2P network. These will be shared by the team for every network supported
- Access to your consensus node RPC and gRPC ports
### Install the Blobstream binary
Make sure to have the Blobstream binary installed. Check [the Blobstream binary page](/operate/blobstream/install-binary) for more details.
### Init the store
Before starting the orchestrator, you need to init the store:
```bash
blobstream orchestrator init
```
By default, the store will be created under `~/.orchestrator`. However, if you want to specify a custom location, you can use the `--home` flag. Or, you can use the following environment variable:
| Variable | Explanation | Default value | Required |
| ------------------- | ----------------------------------- | ----------------- | -------- |
| `ORCHESTRATOR_HOME` | Home directory for the orchestrator | `~/.orchestrator` | Optional |
### Add keys
In order for the orchestrator to start, it will need two private keys:
- EVM private key
- P2P private key
The EVM private key is the most important one since it needs to correspond to the EVM address provided when creating the validator.
The P2P private key is optional, and a new one will be generated automatically on start if none is provided.
The `keys` command will help you set up these keys:
```bash
blobstream orchestrator keys --help
```
To add an EVM private key, check the next section.
#### EVM key
Because EVM keys are important, we provide a keystore that will help manage them. The keystore uses a file system keystore protected by a passphrase to store and open private keys.
To register an EVM address for your validator, check the section [Register EVM Address](#register-evm-address).
To import your EVM private key, there is the `import` subcommand to assist you with that:
```bash
blobstream orchestrator keys evm import --help
```
This subcommand allows you to either import a raw ECDSA private key provided as plaintext, or import it from a file. The files are JSON keystore files encrypted using a passphrase like in [this example](https://geth.ethereum.org/docs/developers/dapp-developer/native-accounts).
After adding the key, you can check that it's added via running:
```bash
blobstream orchestrator keys evm list
```
For more information about the `keys` command, check [the keys documentation](/operate/blobstream/key-management).
### Start the orchestrator
Now that you have the store initialized, you can start the orchestrator. Make sure you have your Celestia-app node RPC and gRPC accessible, and able to connect to the P2P network bootstrappers.
The orchestrator accepts the following flags:
```bash
blobstream orchestrator start --help
Starts the Blobstream orchestrator to sign attestations
Usage:
blobstream orchestrator start [flags]
```
To start the orchestrator in the default home directory, run the following:
```bash
blobstream orchestrator start \
--core.grpc.host localhost \
--core.grpc.port 9090 \
--core.rpc.host localhost \
--core.rpc.port 26657 \
--evm.account 0x966e6f22781EF6a6A82BBB4DB3df8E225DfD9488 \
--p2p.bootstrappers /ip4/127.0.0.1/tcp/30001/p2p/12D3KooWFFHahpcZcuqnUhpBoX5fJ68Qm5Hc8dxiBcX1oo46fLxh \
--p2p.listen-addr /ip4/0.0.0.0/tcp/30000
```
You will be prompted to enter your EVM key passphrase so that the orchestrator can use it to sign attestations. Make sure that it's the EVM address that was provided when creating the validator. If not, then the orchestrator will not sign, and you will keep seeing a "validator not part of valset" warning message.
If you see such message, first verify that your validator is part of the active validator set. If so, then probably the EVM address provided to the orchestrator is not the right one, and you should check which EVM address is registered to your validator. Check the next section for more information.
If you no longer have access to your EVM address, you could always edit your validator with a new EVM address. This can be done through the `edit-validator` command. Check the next section.
### Open the P2P port
In order for the signature propagation to be successful, you will need to expose the P2P port, which is by default `30000`.
If not, then the signatures may not be available to the network and relayers will not be able to query them.
## Register EVM Address
When creating a validator, a random EVM address corresponding to its operator is set in the Blobstream state. This address is used by the orchestrator to sign attestations. And since validators will generally not have access to its corresponding private key, that address needs to be edited with one whose private key is known to the validator operator.
To edit an EVM address for a certain validator, its corresponding account needs to send a `RegisterEVMAddress` transaction with the new address.
First, you should get your validator `valoper` address. To do so, run the following:
```bash
celestia-appd keys show --bech val
```
This assumes that you're using the default home directory, the default keystore, etc. If not, make sure to add the flags that correspond to your situation.
To check which EVM address is registered for your `valoper` address, run the following:
```bash
celestia-appd query blobstream evm
```
Then, to proceed with the edit, run the following command:
```bash
celestia-appd tx blobstream register \
\
\
--fees 30000utia \
--broadcast-mode block \
--yes
```
Now, you can verify that the EVM address has been updated using the following command:
```bash
celestia-appd query blobstream evm
```
Now, you can restart the orchestrator, and it should start signing.
> **Note:** A validator set change is triggered if more than 5% of the total staking power of the network changes (0.5% for BSR). This means that even if you change your EVM address, and you don't see your orchestrator signing, it's alright. Just wait until the validator set changes, and then your orchestrator will automatically start signing.
## Systemd service
If you want to start the orchestrator as a `systemd` service, you can use the following:
1. Make sure you have the store initialized and the EVM address private key imported. Check the above sections for how to do that.
2. Put the following configuration under `/etc/systemd/system/orchestrator.service`:
```text
[Unit]
Description=Blobstream orchestrator service
After=network.target
[Service]
Type=simple
ExecStart= orchestrator start --evm.account --evm.passphrase --core.grpc.host --core.grpc.port --core.rpc.host --core.rpc.port --p2p.bootstrappers
LimitNOFILE=infinity
LimitCORE=infinity
Restart=always
RestartSec=1
StartLimitBurst=5
User=
StandardError=journal
StandardOutput=journal
TTYPath=/dev/tty0
[Install]
WantedBy=multi-user.target
```
3. Start the orchestrator service using:
```bash
sudo systemctl start orchestrator
```
4. Follow the logs to see if everything is running correctly:
```bash
sudo journalctl -f -u orchestrator
```
And you should see the orchestrator signing.
### Issue: Journald not outputting the logs
Sometimes, `journald` wouldn't load the logs from the specified service. An easy fix would be to restart it:
```bash
sudo systemctl restart systemd-journald
```
Then, you should be able to follow the logs as expected.
---
Title: Blobstream relayer
URL: https://docs.celestia.org/operate/blobstream/relayer.md
Source: app/operate/blobstream/relayer/page.mdx
---
# Blobstream relayer
The role of the relayer is to gather attestations' signatures from the orchestrators, and submit them to a target EVM chain. The attestations are generated within the Blobstream module of the Celestia-app state machine. To learn more about what attestations are, you can refer to [the Blobstream overview](https://github.com/celestiaorg/orchestrator-relayer).
While every validator in the Celestia validator set needs to run an orchestrator, only one entity needs to run the relayer, and it can be anyone. Thus, if you're a validator, most likely you want to read [the orchestrator documentation](/operate/blobstream/orchestrator).
Every relayer needs to target a Blobstream smart contract. This can be deployed, if not already, using the `blobstream deploy` command. More details in the [Deploy the Blobstream contract guide](/operate/blobstream/deploy-contract).
## How it works
The relayer works as follows:
1. Connect to a Celestia-app full node or validator node via RPC and gRPC and wait for attestations
2. Once an attestation is created inside the Blobstream state machine, the relayer queries it
3. After getting the attestation, the relayer checks if the target Blobstream smart contract's nonce is lower than the attestation
4. If so, the relayer queries the P2P network for signatures from the orchestrators
5. Once the relayer finds more than 2/3s signatures, it submits them to the target Blobstream smart contract where they get validated
6. Listen for new attestations and go back to step 2
The relayer connects to a separate P2P network than the consensus or the data availability one. Bootstrappers for that network will be provided.
This means that even if the consensus node is already connected to the consensus network, if the relayer doesn't start with a list of bootstrappers for its specific network, then it will not work and will output the following logs:
```text
I[2023-04-26|00:04:08.175] waiting for routing table to populate targetnumberofpeers=1 currentcount=0
I[2023-04-26|00:04:18.175] waiting for routing table to populate targetnumberofpeers=1 currentcount=0
I[2023-04-26|00:04:28.175] waiting for routing table to populate targetnumberofpeers=1 currentcount=0
```
## How to run
### Install the Blobstream binary
Make sure to have the Blobstream binary installed. Check out the [Install the Blobstream binary page](/operate/blobstream/install-binary) for more details.
### Init the store
Before starting the relayer, you need to init the store:
```bash
blobstream relayer init
```
By default, the store will be created under `~/.relayer`. However, if you want to specify a custom location, you can use the `--home` flag. Or, you can use the following environment variable:
| Variable | Explanation | Default value | Required |
| -------------- | ------------------------------ | ------------- | -------- |
| `RELAYER_HOME` | Home directory for the relayer | `~/.relayer` | Optional |
### Add keys
In order for the relayer to start, it will need two private keys:
- EVM private key
- P2P private key
The EVM private key is the most important since it needs to be funded, so it is able to send transactions in the target EVM chain.
The P2P private key is optional, and a new one will be generated automatically on start if none is provided.
The `keys` command will help you set up these keys:
```bash
blobstream relayer keys --help
```
To add an EVM private key, check the next section.
#### EVM key
Because EVM keys are important, we provide a keystore that will help manage them. The keystore uses a file system keystore protected by a passphrase to store and open private keys.
To import your EVM private key, there is the `import` subcommand to assist you with that:
```bash
blobstream relayer keys evm import --help
```
This subcommand allows you to either import a raw ECDSA private key provided as plaintext, or import it from a file. The files are JSON keystore files encrypted using a passphrase like [in this example](https://geth.ethereum.org/docs/developers/dapp-developer/native-accounts).
After adding the key, you can check that it's added via running:
```bash
blobstream relayer keys evm list
```
For more information about the `keys` command, check [the keys documentation](/operate/blobstream/key-management).
### Start the relayer
Now that you have the store initialized, and you have a target Blobstream smart contract address, you can start the relayer. Make sure you have your Celestia-app node RPC and gRPC accessible, and able to connect to the P2P network bootstrappers.
The relayer accepts the following flags:
```bash
blobstream relayer start --help
Runs the Blobstream relayer to submit attestations to the target EVM chain
Usage:
blobstream relayer start [flags]
```
To start the relayer using the default home directory, run the following:
```bash
blobstream relayer start \
--evm.contract-address=0x27a1F8CE94187E4b043f4D57548EF2348Ed556c7 \
--core.rpc.host=localhost \
--core.rpc.port=26657 \
--core.grpc.host=localhost \
--core.grpc.port=9090 \
--evm.chain-id=4 \
--evm.rpc=http://localhost:8545 \
--evm.account=0x35a1F8CE94187E4b043f4D57548EF2348Ed556c8 \
--p2p.bootstrappers=/ip4/127.0.0.1/tcp/30001/p2p/12D3KooWFFHahpcZcuqnUhpBoX5fJ68Qm5Hc8dxiBcX1oo46fLxh \
--p2p.listen-addr=/ip4/0.0.0.0/tcp/30001
```
You will be prompted to enter your EVM key passphrase for the EVM address passed using the `--evm.account` flag, so that the relayer can use it to send transactions to the target Blobstream smart contract. Make sure that it's funded.
---
Title: Helpful CLI commands
URL: https://docs.celestia.org/operate/consensus-validators/cli-reference.md
Source: app/operate/consensus-validators/cli-reference/page.mdx
---
# Helpful CLI commands
View all options:
```console
$ celestia-appd --help
Start celestia-app
Usage:
celestia-appd [command]
Available Commands:
add-genesis-account Add a genesis account to genesis.json
collect-gentxs Collect genesis txs and output a genesis.json file
config Create or query an application CLI configuration file
debug Tool for helping with debugging your application
export Export state to JSON
gentx Generate a genesis tx carrying a self delegation
help Help about any command
init Initialize private validator, p2p, genesis,
and application configuration files
keys Manage your application's keys
migrate Migrate genesis to a specified target version
query Querying subcommands
rollback rollback cosmos-sdk and tendermint state by one height
start Run the full node
status Query remote node for status
tendermint Tendermint subcommands
tx Transactions subcommands
validate-genesis validates the genesis file at the default
location or at the location passed as an arg
version Print the application binary version information
```
## Creating a wallet
```sh
celestia-appd config keyring-backend test
```
`keyring-backend` configures the keyring's backend, where the keys are stored.
Options are: `os|file|kwallet|pass|test|memory`.
You can learn more on the [Cosmos documentation](https://docs.cosmos.network/sdk/v0.53/user/run-node/keyring)
or [Go Package documentation](https://pkg.go.dev/github.com/cosmos/cosmos-sdk/crypto/keyring).
## Key management
```sh
# listing keys
celestia-appd keys list
# adding keys
celestia-appd keys add
# deleting keys
celestia-appd keys delete
# renaming keys
celestia-appd keys rename
```
### Importing and exporting keys
Import an encrypted and ASCII-armored private key into the local keybase.
```sh
celestia-appd keys import
```
Example usage:
```sh
celestia-appd keys import amanda ./keyfile.txt
```
Export a private key from the local keyring in encrypted and ASCII-armored format:
```sh
celestia-appd keys export
# you will then be prompted to set a password for the encrypted private key:
Enter passphrase to encrypt the exported key:
```
After you set a password, your encrypted key will be displayed.
## Querying subcommands
Usage:
```sh
celestia-appd query |
# alias q
celestia-appd q |
```
To see all options:
```sh
celestia-appd q --help
```
## Token management
Get token balances:
```sh
celestia-appd q bank balances --node
```
Example usage:
```sh
celestia-appd q bank balances celestia1czpgn3hdh9sodm06d5qk23xzgpq2uyc8ggdqgw \
--node https://rpc-mocha.pops.one:443
```
Transfer tokens from one wallet to another:
```sh
celestia-appd tx bank send \
--node --chain-id
```
Example usage:
```sh
celestia-appd tx bank send \
19000000utia --node https://rpc-mocha.pops.one:443 --chain-id mocha
```
To see options:
```sh
celestia-appd tx bank send --help
```
## Governance
Governance proposals on Celestia are limited as there are no text proposals,
upgrades occur via social consensus, and some params are not modifiable.
However, one can submit governance proposals to change certain parameters and
spend community funds. More detailed information on this topic can be found in
the [cosmos-sdk documentation for submitting
proposals](https://docs.cosmos.network/sdk/v0.53/build/modules/gov),
the list of [parameter defaults in the
specs](https://github.com/celestiaorg/celestia-app/blob/0012451c4dc118767dd59bc8d341878b7a7cacdf/specs/src/specs/params.md),
and the [x/paramfilter module
specs](https://github.com/celestiaorg/celestia-app/tree/1570b3d4937ac4418b3ecf77365d47c5f094ad8f/x/paramfilter).
Viewing the available proposals can be done with the query command:
```sh
celestia-appd q gov proposals
```
There are four options when voting "yes", "no", "no_with_veto" and "abstain".
The "no_with_veto" vote is different from the "no" vote in that the submitter of
the proposer's deposit will get burned, and a minority of stake (1/3) can stop a
proposal that might otherwise pass quorum. You can use those options to vote on
a governance proposal with the following command:
```sh
celestia-appd tx gov vote